
Creating a Super easy Crochet 🐓 How to make a Rooster Keychain – Step by Step Tutorial is a delightful way to combine creativity with practicality. This project is perfect for crochet beginners and enthusiasts alike who want to craft a charming accessory that can brighten up keys, bags, or gifts. The Super easy Crochet 🐓 How to make a Rooster Keychain – Step by Step Tutorial will guide you through every stage, making it accessible and fun while ensuring you learn key crochet techniques along the way. Whether you’re looking for a quick handmade gift or a cute personal item, this tutorial is the perfect starting point.
A key feature of this Super easy Crochet 🐓 How to make a Rooster Keychain – Step by Step Tutorial is its simplicity combined with the joy of creating something uniquely yours. Roosters have symbolic meanings in many cultures, representing qualities such as confidence and vigilance, making this keychain not only adorable but meaningful. Plus, crocheting small items like keychains is a great way to improve your crochet skills without investing too much time or materials.
In this tutorial, you will learn the essential stitches and construction methods needed to make your own Super easy Crochet 🐓 How to make a Rooster Keychain – Step by Step Tutorial. From choosing the right yarn and hook size to assembling the pieces and adding the final details, every step is carefully explained. You’ll also discover tips on how to customize colors and features to give your rooster keychain a personal touch. This project is a wonderful mix of learning and creativity that will leave you proud of your handmade creation.
Materials and Tools for Your Rooster Keychain
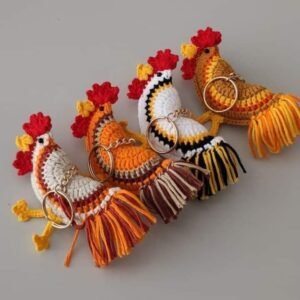
Before diving into the Super easy Crochet 🐓 How to make a Rooster Keychain – Step by Step Tutorial, it’s important to gather all the necessary materials and tools. First, select a suitable yarn—cotton or acrylic yarn in small quantities works well for keychains because of its durability and color variety. You’ll need at least four colors: red for the comb and wattles, orange or yellow for the beak, white or cream for the body, and black or dark brown for the eyes.
Choose an appropriate crochet hook, usually a small size like 2.5mm or 3mm, which helps create tight stitches that keep the stuffing inside and give your rooster a neat appearance. A keychain ring or lobster clasp is essential to attach your finished rooster, turning it into a useful accessory.
Additional materials include a tapestry needle for sewing parts together, scissors for cutting yarn, and a small amount of polyester fiberfill or cotton stuffing to give your rooster its 3D shape. Safety eyes or small beads can be used for the eyes if you prefer not to crochet or embroider them.
Having all these tools and materials ready will make following the Super easy Crochet 🐓 How to make a Rooster Keychain – Step by Step Tutorial smooth and enjoyable. Proper preparation ensures you won’t have to interrupt your crafting flow.
Basic Crochet Stitches and Techniques Used
Understanding the basic crochet stitches and techniques is key to mastering the Super easy Crochet 🐓 How to make a Rooster Keychain – Step by Step Tutorial. The primary stitches you’ll use include the chain stitch (ch), single crochet (sc), slip stitch (sl st), and increase and decrease stitches, which shape your rooster.
The chain stitch forms the foundation of most crochet projects and will be the starting point for the rooster’s body and head. Single crochet is the main stitch used here because it creates a dense fabric that holds the stuffing inside without gaps.
Increase stitches are done by making two single crochets into one stitch, which expands your work, while decrease stitches reduce the number of stitches by crocheting two stitches together. These techniques are essential to shape the rooster’s body, wings, and tail.
Slip stitches are used to join rounds or finish off pieces cleanly. You’ll also learn how to crochet in rounds, which is crucial for making amigurumi-style keychains like this rooster.
Practice these stitches and techniques before starting the project if you’re new to crochet, as mastering them will make your Super easy Crochet 🐓 How to make a Rooster Keychain – Step by Step Tutorial more enjoyable and less frustrating.
Step by Step Instructions for Making the Rooster Keychain
Starting the Super easy Crochet 🐓 How to make a Rooster Keychain – Step by Step Tutorial, first crochet the rooster’s body by creating a magic ring and working single crochets in rounds. Gradually increase the number of stitches to form a small spherical shape, then work even rounds before decreasing to close the body.
Next, crochet the rooster’s head separately using the same technique but smaller to maintain proportion. Stuff both the body and head lightly with fiberfill as you work to give the rooster its plump shape.
For the comb, make a small series of chains and single crochets with red yarn, creating a wavy edge to mimic the rooster’s characteristic crest. Attach it securely to the top of the head.
The beak is a simple small triangle made with orange or yellow yarn, crocheted in a few stitches, then sewn on the front of the head.
Create the wings by crocheting small oval shapes in white or cream yarn, adding a few slip stitches to give dimension, and sew them on each side of the body.
Finally, embroider or attach the eyes using black yarn or safety eyes. Attach a keyring or lobster clasp to the top of the rooster’s head using yarn or a small loop of fabric.
This step-by-step approach in the Super easy Crochet 🐓 How to make a Rooster Keychain – Step by Step Tutorial makes the process manageable and enjoyable, even for beginners.
Tips for Customizing and Caring for Your Rooster Keychain
Once you’ve completed your Super easy Crochet 🐓 How to make a Rooster Keychain – Step by Step Tutorial, consider customizing it to make it uniquely yours. You can experiment with different yarn colors to create roosters with unique appearances, such as vibrant blues, greens, or pastel shades.
Adding small embellishments like tiny beads, sequins, or embroidery can also enhance your keychain’s charm. For example, a little bow tie or flower can give your rooster personality.
To keep your keychain looking fresh, spot clean it with a damp cloth as needed. Avoid machine washing unless you’re confident in your yarn’s durability and the assembly’s strength.
If you want to make more keychains as gifts or for sale, try varying the sizes or combining multiple roosters into a set.
Remember to securely attach the keyring and check the seams regularly to prevent any parts from loosening over time.
With these tips, your Super easy Crochet 🐓 How to make a Rooster Keychain – Step by Step Tutorial can remain a beloved accessory for years to come.
FAQ
Q: Is this project suitable for beginners?
A: Yes, this Super easy Crochet 🐓 How to make a Rooster Keychain – Step by Step Tutorial is designed for beginners with simple stitches and clear instructions.
Q: What yarn type is best for this keychain?
A: Cotton or acrylic yarn is ideal because it’s durable and comes in many colors.
Q: Can I adjust the size of the keychain?
A: Absolutely! Using a smaller or larger hook and yarn will change the size accordingly.
Q: How do I attach the keyring securely?
A: Sew the keyring loop tightly using matching yarn or fabric and reinforce it with extra stitches.
Q: How do I keep the stuffing inside?
A: Use tight single crochet stitches and stuff lightly as you go to avoid gaps.
Q: Can I machine wash the finished keychain?
A: Spot cleaning is recommended to preserve shape; machine washing might damage delicate parts.
Conclusion
This Super easy Crochet 🐓 How to make a Rooster Keychain – Step by Step Tutorial has walked you through the process of creating a cute, functional, and customizable crochet keychain.
From gathering materials and mastering basic stitches to assembling and personalizing your rooster, every step has been designed to build your confidence and creativity. We hope you enjoyed this project and feel inspired to make more fun and practical crochet items.
Please share your honest opinions and suggestions to help improve future tutorials. Your feedback means a lot and helps make crafting even more enjoyable for everyone.