
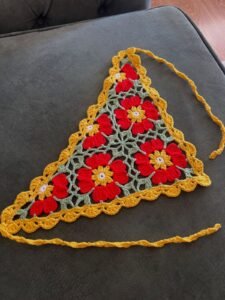
Making A very pretty crocheted bandana with flowers, perfect as an accessory.-Step by Step Tutorial is a wonderful way to add a feminine and charming touch to your everyday style. Crocheted accessories are timeless and have grown in popularity due to their versatility and unique handmade appeal. This bandana in particular stands out because of its delicate floral details, which make it perfect for spring, summer, festivals, beach days, or just casual wear. Whether you want to enhance a simple hairstyle or give your outfit a cozy, handmade vibe, this crochet bandana is a lovely choice.
The beauty of this accessory lies in its simplicity and adaptability. It can be crocheted in various colors to match your personal taste. For a soft and romantic look, pastel shades work beautifully. For a bold and vibrant appearance, bright colors or even multi-colored yarn can be used. The flower motifs add a sweet touch that makes the bandana look like a piece of wearable art. And the best part is that it is beginner-friendly if you already know some basic crochet stitches.
This A very pretty crocheted bandana with flowers, perfect as an accessory.-Step by Step Tutorial will guide you through each step, from choosing the right materials to forming the bandana shape and attaching the flowers. You will not need advanced crochet skills, but having knowledge of basic stitches like chain, single crochet, and double crochet will help. Set aside a little time, relax with your yarn and hook, and enjoy the process. Crocheting is not just crafting; it is a soothing and rewarding experience that allows your creativity to bloom.
Choosing Materials and Preparing Your Yarn
To begin, select a lightweight yarn that is comfortable to wear against the skin. Cotton yarn is highly recommended because it is soft, breathable, and holds its shape well. Cotton also prevents excessive stretching, ensuring your bandana remains beautiful and functional. You may choose solid colors or a combination of shades depending on the desired look.
Next, choose a suitable crochet hook size recommended for your yarn. Usually, a 3.0 mm to 4.0 mm hook works well for lightweight cotton yarn. The hook size is important because it determines the texture and flexibility of the final piece. A slightly smaller hook will create a tighter stitch, while a larger hook will give a looser, more flowy look.
Before starting the bandana, make sure to have scissors, a yarn needle, and any decorative elements you may want to incorporate later, such as small beads or wooden buttons. Keeping your materials organized makes the process smoother and more enjoyable.
Prepare your yarn by rolling it into a ball if necessary. A neat, untangled yarn ball makes crocheting faster and prevents frustration. If you are using multiple colors for the flowers, separate your yarn strands to ensure easy access during stitching.
Take a few minutes to warm up your hands and test your stitch tension. Working a small swatch helps you ensure your stitches are even and consistent. This simple step improves the final appearance of the bandana.
Finally, find a comfortable place to work. Crocheting is a relaxing activity, and having a cozy environment makes the process even more enjoyable. Turn on some music, take a deep breath, and prepare to create something beautiful.
Step-by-Step Instructions to Crochet the Bandana Base
Start by making a foundation chain that will form the top width of your bandana. The number of chains depends on the size you want, but a typical starting chain may be between 80 to 120 chains. This chain will sit across the head, so consider head measurement for accuracy.
Once your foundation chain is complete, work your first row of single crochet stitches. A simple stitch pattern helps maintain the bandana’s structure without making it too bulky. Keep your tension even, and check that the row is straight.
After the first row, begin decreasing stitches at the beginning and end of each row to form a triangle shape. To decrease, simply skip the first stitch of the row or work two stitches together. Continue this gradual decrease until only a few stitches remain.
The triangular shape of the bandana should form nicely as you continue working. If you prefer a slightly looser drape, you can incorporate double crochet rows instead of only single crochet. Adjusting stitch height can greatly affect the overall look.
Once the triangle is complete, create ties for securing the bandana. You can do this by chaining 40 to 60 stitches on each corner of the wide end. These ties will allow you to wrap and secure the bandana comfortably.
Fasten off your yarn and weave in all loose ends using a yarn needle. This step ensures your bandana looks polished and professional. At this stage, your base is complete, and you are ready to move on to the decorative flowers.
Creating the Crochet Flowers
To create the flowers, begin with a small magic ring or a chain loop of 4 to 6 chains joined with a slip stitch. This will form the center base of your flower. A magic ring provides a cleaner center, but either method works well.
Work single crochets into the center to form a small circle. This creates the foundation of the flower. Each flower typically consists of 5 petals, but you can adjust the number depending on the style you want.
To form the petals, chain 3 to 4 stitches and then insert the hook back into the circle with a combination of double crochet and slip stitch. Repeat this petal-forming process around the center ring until your flower is complete.
Once your flower is shaped, fasten off and leave a long tail for sewing. Using different yarn colors for each flower adds visual variety and charm. You can make many flowers to match your style or keep the look simple with only a few.
Arrange your flowers along the edges or corners of the bandana to determine placement. You may want a floral border, a cluster in one corner, or a single statement flower. The placement is entirely up to your creative preference.
Use a yarn needle to sew the flowers securely onto the bandana base. Make sure they are attached firmly so they do not loosen during wear. Once sewn, your bandana will already begin to look beautifully detailed and unique.
Styling and Wearing Your Crocheted Bandana
Wearing this A very pretty crocheted bandana with flowers, perfect as an accessory.-Step by Step Tutorial piece allows you to express your personal style in a soft and artistic way. You can tie the bandana at the back of your head and wear it with your hair loose, in a ponytail, or in braids.
The bandana works perfectly with casual outfits such as jeans and a simple blouse. It also looks lovely paired with beachwear, bohemian-style dresses, or festival clothing. The floral details add a sweet and cheerful touch.
If you prefer minimal styling, choose neutral yarn colors for a subtle accessory. For a bolder statement, use vibrant or contrasting colors that make the flowers stand out. The crochet texture adds softness that complements both modern and vintage-inspired looks.
This bandana is also a thoughtful handmade gift. Whether for a friend, family member, or someone who appreciates handcrafted items, giving a handmade crochet accessory shows care and creativity.
You can also experiment with seasonal or themed colors. For example, pastel florals are perfect for spring, while warm earthy tones pair beautifully with fall outfits. Crochet allows endless opportunities for personalization.
Wear your bandana proudly knowing you created something beautiful with your own hands. Handmade accessories carry sentimental value and make everyday style feel special.
FAQ
1. Do I need advanced crochet skills to make this bandana?
No, this project is beginner-friendly as long as you know basic stitches like chain, single crochet, and double crochet.
2. What yarn is best for this bandana?
Lightweight cotton yarn is recommended because it is soft, breathable, and comfortable for wearing on the head.
3. Can I make the bandana larger or smaller?
Yes, simply adjust the starting chain length and continue shaping the triangle to the desired size.
4. How many flowers should I add?
You can add as many or as few as you prefer. Decorating is a personal choice.
5. Can I wash the bandana?
Yes, hand wash in cold water and lay flat to dry to preserve the shape and details.
Conclusion
This A very pretty crocheted bandana with flowers, perfect as an accessory.-Step by Step Tutorial introduced you to a charming and creative piece that can beautifully enhance your personal style.
We explored how to choose materials, create the bandana base, crochet delicate flowers, and style the final accessory.
With just a bit of yarn and creativity, you can craft something unique, feminine, and meaningful. I hope this tutorial inspires you to try it for yourself. Leave your sincere opinion and share suggestions for future tutorials. Your feedback helps bring new ideas to life!