
Learning Adorned Baby Dragon Crochet Pattern- Step by Step Tutorial is a creative and enjoyable way to bring a touch of magic into your crafting projects. Baby dragons are popular in crochet because they are cute, colorful, and can be customized in many ways. Whether you are making one as a gift, a decoration, or for your own collection, this tutorial will help you achieve beautiful results. The best part is that crocheting a baby dragon allows you to learn new stitches and techniques while creating something unique and charming.
The Adorned Baby Dragon Crochet Pattern- Step by Step Tutorial is designed to guide you through every stage of the project. From choosing the right materials to assembling all the parts, each step is explained clearly to ensure even beginners can follow along. You will learn how to crochet the dragon’s head, body, wings, and tail, as well as how to add small decorations to make your baby dragon truly special.
This project is also perfect for using leftover yarn from other creations. Small crochet projects like this one are eco-friendly because they help reduce yarn waste. Plus, crocheting a baby dragon is a relaxing and rewarding activity. At the end of this tutorial, you will have your own adorable baby dragon to display, gift, or keep as a handmade treasure.
Materials and Preparation for Adorned Baby Dragon Crochet Pattern- Step by Step Tutorial
Before you begin the Adorned Baby Dragon Crochet Pattern- Step by Step Tutorial, gather all the necessary materials so you can work without interruptions.
First, you will need yarn in your desired colors. Many people choose bright or pastel colors for baby dragons, but you can be as creative as you like. Acrylic yarn is a popular choice because it is affordable, durable, and comes in many colors. Cotton yarn also works well if you prefer a natural, softer texture.
Next, choose the correct crochet hook size for your yarn. Usually, the yarn label suggests a hook size, but for small amigurumi projects like this baby dragon, you might want to use a slightly smaller hook to ensure tight stitches so the stuffing does not show through.
You will also need stuffing to fill the dragon’s body and give it a soft, three-dimensional shape. Polyester fiberfill is the most common stuffing used in crochet projects because it is lightweight and washable.
Other essential tools include scissors for cutting yarn, a yarn needle for sewing parts together, and stitch markers to help you keep track of rounds. Safety eyes or small beads can be used for the dragon’s eyes, giving it a cute and expressive look.
Optional materials include embroidery thread or tiny decorative elements such as ribbons, buttons, or glittery yarn for adding the “adorned” details that make your baby dragon unique.
Once all your materials are ready, you can move on to learning the basic stitches needed for this project.
Basic Stitches for Adorned Baby Dragon Crochet Pattern- Step by Step Tutorial
In this section of the Adorned Baby Dragon Crochet Pattern- Step by Step Tutorial, we will focus on the basic crochet stitches required for the project. Understanding these stitches is essential before starting the actual baby dragon pattern.
The chain stitch, abbreviated as “ch,” is the foundation of most crochet projects. It creates a simple string of loops and is often used to start rounds or rows. Practicing this stitch will help you feel comfortable holding the hook and yarn correctly.
The slip stitch, abbreviated as “sl st,” is used to join rounds or move the yarn across the work without adding height. It is essential for keeping your dragon’s parts neat and secure.
Single crochet, abbreviated as “sc,” is the main stitch used in most amigurumi patterns, including this baby dragon. It creates a tight, dense fabric perfect for holding stuffing inside without gaps.
Increasing stitches, often written as “inc,” means working two single crochet stitches in the same stitch to make the piece wider. This technique is used for shaping the dragon’s head, body, and wings.
Decreasing stitches, written as “dec,” combines two stitches into one to make the piece narrower. This is useful for shaping the tail, snout, or other tapered areas of the dragon.
Finally, learning how to crochet in continuous rounds rather than rows will help you create smooth, seamless shapes, which is essential for three-dimensional amigurumi projects like this one.
Step by Step Instructions for Adorned Baby Dragon Crochet Pattern- Step by Step Tutorial
Now we will move on to the detailed Adorned Baby Dragon Crochet Pattern- Step by Step Tutorial, where you will learn how to create each part of your dragon and assemble them into the final adorable creature.
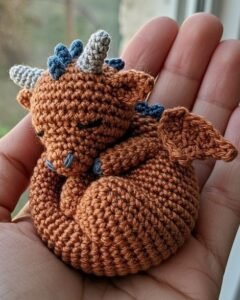
Start with the dragon’s head. Using a magic ring, crochet single crochet stitches in continuous rounds, increasing gradually to form a sphere. After a few rounds, stop to insert the safety eyes, then continue crocheting until the head is complete. Stuff it firmly before closing.
Next, make the body. Begin with a magic ring again, increasing in the first few rounds to create the base, then continue crocheting evenly to build the body shape. Before closing the body, fill it with stuffing to give it a soft but firm feel.
The wings are usually crocheted separately using chain stitches and double crochet stitches to create a slightly lacy, lightweight effect. Make two wings and set them aside for assembly later.
The tail can be made by crocheting in continuous rounds, starting wide at the base and gradually decreasing toward the tip. For a fun effect, you can add small triangular spikes along the tail’s length using separate pieces sewn in afterward.
The dragon’s legs and arms are made with small, simple tubular shapes using single crochet stitches. These parts give your baby dragon a cute, chubby appearance.
Finally, assemble all the parts using a yarn needle. Attach the head to the body, then sew on the arms, legs, tail, and wings. Add any extra decorations like ribbons or embroidered details to make your baby dragon truly “adorned.”
Creative Ideas and Decoration Tips for Adorned Baby Dragon Crochet Pattern- Step by Step Tutorial
One of the best parts about the Adorned Baby Dragon Crochet Pattern- Step by Step Tutorial is the creative freedom you have when decorating your finished dragon.
You can use multicolored yarn for the wings or tail to create a rainbow effect. This makes the baby dragon look magical and unique.
Adding tiny accessories like a crochet crown, scarf, or little satchel can give your dragon personality and make it stand out.
For holiday-themed dragons, use seasonal colors—red and green for Christmas, pastels for Easter, or orange and black for Halloween. This turns your baby dragon into a festive decoration.
You can also embroider small stars, hearts, or swirls on the dragon’s body using contrasting yarn. These little details truly bring the “adorned” part of the pattern to life.
Another creative idea is to attach your baby dragon to a keychain ring or use it as a hanging ornament for a child’s room.
Finally, consider making a whole family of baby dragons in different colors and sizes. Displaying them together creates a charming, magical scene perfect for gifts or decorations.
FAQ About Adorned Baby Dragon Crochet Pattern- Step by Step Tutorial
1. Is this project suitable for beginners?
Yes, the Adorned Baby Dragon Crochet Pattern- Step by Step Tutorial is beginner-friendly as long as you know basic stitches like single crochet, increases, and decreases.
2. How long does it take to finish one baby dragon?
On average, it takes about 4–6 hours to complete one dragon, depending on your crochet speed and the level of detail you add.
3. Can I use leftover yarn for this project?
Absolutely! This pattern is perfect for using small amounts of leftover yarn from other projects.
4. What type of stuffing should I use?
Polyester fiberfill is the most common stuffing for crochet toys because it is lightweight, washable, and easy to use.
5. How can I make the dragon bigger or smaller?
Use thicker yarn and a larger hook for a bigger dragon or thinner yarn and a smaller hook for a smaller one.
6. Are safety eyes necessary, or can I crochet the eyes?
You can crochet the eyes using black yarn if you prefer not to use plastic safety eyes, making the toy suitable for very young children.
Conclusion
In this article, we explored the Adorned Baby Dragon Crochet Pattern- Step by Step Tutorial in detail, covering everything from materials and basic stitches to step-by-step instructions and creative decoration ideas.
By following this tutorial, you can create your own adorable baby dragon, customize it with unique details, and enjoy a fun and rewarding crochet project.
We hope you found this guide helpful and inspiring. Please share your honest opinions and suggestions so we can continue creating tutorials that help crafters of all levels bring their ideas to life.