
Aesthetic crochet coaster for beginners-Step by Step Tutorial projects have become incredibly popular among crafters who enjoy decorative yet functional handmade items. In this article, you will learn how to create your own aesthetic crochet coaster using simple techniques suitable even for absolute beginners. This Aesthetic crochet coaster for beginners-Step by Step Tutorial explains each stage carefully, ensuring that you can follow along confidently while improving your crochet skills. Whether you are new to the craft or simply want a relaxing and creative project, this tutorial offers everything you need.
Making an aesthetic crochet coaster is a perfect way to start your crochet journey. It is a small, quick project that allows you to practice essential stitches while creating something beautiful and useful. Throughout this Aesthetic crochet coaster for beginners-Step by Step Tutorial, you will discover how to choose the right materials, form the base of the coaster, add decorative elements, and finish the piece neatly. The final result is a stylish item that elevates any space, from living rooms to cozy coffee corners.
By following this Aesthetic crochet coaster for beginners-Step by Step Tutorial, you will gain confidence in your abilities while learning the basics of crochet construction. You will understand how different stitches affect texture, how to maintain consistent tension, and how to shape a functional accessory. More importantly, you will enjoy the relaxing rhythm of crafting, making this project both enjoyable and rewarding. Now let’s explore everything you need to begin your coaster.
Materials Needed to Start Your Crochet Coaster
To start this Aesthetic crochet coaster for beginners-Step by Step Tutorial, gather a few essential materials. The most recommended yarn for coasters is cotton because of its durability, structure, and excellent ability to absorb moisture. Cotton yarn also helps the coaster stay flat, which is important for both aesthetics and functionality. Choose colors that match your décor or experiment with soft tones for an elegant and aesthetic finish.
Selecting the right hook size is also important. The hook must match your yarn weight to create even and well-formed stitches. For most aesthetic crochet coaster projects, a 3.0 mm to 4.0 mm crochet hook is ideal. Using the correct hook gives your coaster a professional appearance, especially when working with tighter stitches commonly used in coaster patterns. This Aesthetic crochet coaster for beginners-Step by Step Tutorial will guide you through creating neat and consistent stitches.
You will also need a pair of scissors to trim yarn ends and a tapestry needle for weaving in the final threads. These simple tools complete your basic crochet kit and make it easier to finish your project neatly. Keeping everything organized helps make the crocheting experience smoother and more enjoyable, especially for beginners.
Before beginning your coaster, it is helpful to set up a comfortable crafting space. Good lighting and a relaxed sitting position make a huge difference while working on a project like this. Since this Aesthetic crochet coaster for beginners-Step by Step Tutorial is designed for beginners, creating a stress-free environment helps you focus on learning each step slowly and accurately.
If you are completely new to crochet, practicing a few basic stitches beforehand is recommended. Learning the chain stitch, single crochet, and slip stitch will help you feel more confident. The tutorial will integrate these basic skills into the process, ensuring you understand how to use them to create your coaster.
Finally, choose the color palette that best expresses the aesthetic you want. Soft pastel colors, earth tones, and neutral shades are often used to create modern and elegant aesthetic crochet coasters. With your materials prepared, you are ready to start crafting your beautiful coaster.
Step-by-Step Instructions for the Crochet Base
To begin the coaster, follow the foundation steps explained in this Aesthetic crochet coaster for beginners-Step by Step Tutorial. Start with a slip knot and chain a small number of stitches to form the center. Most coasters are worked in rounds, so creating a stable center allows the shape to expand evenly. Working in the round also helps the coaster remain flat and balanced.
Once the center is formed, you will continue crocheting in circular rounds while gradually increasing the stitch count. These increases help shape the coaster and give it a smooth, round form. If you are new to increasing stitches, do not worry—this Aesthetic crochet coaster for beginners-Step by Step Tutorial walks you through each step clearly, ensuring that the process feels simple and intuitive.
Keeping your tension even will make the coaster look more polished. Beginners sometimes struggle with this, but with practice, it becomes easier. As you work each round, observe how the coaster expands. If it starts to curl upward, loosen your tension slightly. If it becomes wavy, tighten it a bit. These adjustments are part of the learning experience of this Aesthetic crochet coaster for beginners-Step by Step Tutorial.
Using a stitch marker can be helpful to track where each round begins. While optional, stitch markers make it easier to follow the pattern accurately, especially for beginners. The tutorial encourages using small tools like these because they simplify the process and reduce mistakes while learning.
As your coaster grows, you will notice the structure becoming more defined. The base is the foundation for the entire project, and taking your time at this stage ensures a better final result. Continue following the increases explained in this Aesthetic crochet coaster for beginners-Step by Step Tutorial until your coaster reaches the desired size.
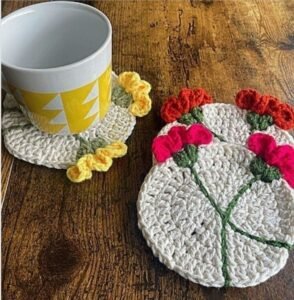
Once the base is complete, you can move on to the next stage of the project. This part focuses on adding decorative elements and shaping the coaster to make it visually appealing, turning a simple round base into a beautifully aesthetic crochet coaster.
Adding Texture, Aesthetic Details, and Edging
After completing the base, it’s time to enhance your aesthetic crochet coaster with decorative touches. Beginner-friendly texture stitches such as half double crochet or simple shell stitches can add charm without complicating the process. This Aesthetic crochet coaster for beginners-Step by Step Tutorial provides easy options to make your coaster look more artistic and stylish.
One popular detail is adding a subtle scalloped edge around the coaster. This creates an elegant finish that upgrades the overall look. The technique is simple and uses basic stitches, making it perfect for beginners. Working slowly around the edge ensures consistency and helps the coaster maintain a balanced shape.
Another way to elevate your coaster is by incorporating color changes. Alternating colors or creating a border in a contrasting shade can make the coaster more visually interesting. The tutorial offers ideas for color combinations that match different aesthetics, whether minimalistic, boho, or modern. These small creative decisions make your coaster unique.
As you continue decorating, pay attention to stitch count and tension. These elements help keep the coaster flat and proportional. The Aesthetic crochet coaster for beginners-Step by Step Tutorial emphasizes small adjustments that beginners can easily follow to avoid misalignment or uneven edges.
Be sure to enjoy this part of the process. Adding finishing touches allows you to experiment with your creativity while applying everything you learned from the previous steps. Whether you choose a simple border or a textured pattern, your aesthetic crochet coaster will reflect your personal style.
When the decoration is complete, prepare to finalize the coaster by securing the yarn, hiding threads, and giving the piece a polished appearance. These final steps ensure your creation is durable and ready for daily use.
Finishing the Coaster and Final Adjustments
To finish your aesthetic crochet coaster, start by trimming the working yarn and pulling it through the last stitch to secure it. This prevents unraveling and keeps your coaster firmly locked. The Aesthetic crochet coaster for beginners-Step by Step Tutorial shows how to complete this step neatly, even if you are new to crochet.
Next, use a tapestry needle to weave in all loose ends. This is an important part of the finishing process because it hides the yarn tails and strengthens the structure of the coaster. Beginners often overlook this step, but the tutorial highlights its importance for achieving a professional look.
Blocking is optional but recommended, especially if you want your coaster perfectly flat. Lightly dampen the piece, shape it gently, and let it air dry. Blocking helps even out the stitches and enhances the aesthetic quality of the finished project. This Aesthetic crochet coaster for beginners-Step by Step Tutorial explains how simple blocking can greatly improve the final appearance.
If your coaster looks slightly uneven, do not worry—this can happen to beginners. With time and practice, your consistency will naturally improve. The tutorial encourages viewing each project as part of your learning journey, allowing you to improve your technique while enjoying the process.
Once your coaster is complete, take a moment to admire your work. You have transformed simple yarn into a beautiful, functional, and aesthetic accessory. This experience often inspires beginners to create more coasters using different colors, textures, and patterns.
Your finished aesthetic crochet coaster is now ready to be used in your home or gifted to someone special. With this Aesthetic crochet coaster for beginners-Step by Step Tutorial, you have learned essential skills that can be applied to many future crochet projects.
About Aesthetic Crochet Coasters
1. What yarn is best for an aesthetic crochet coaster?
Cotton yarn is highly recommended because it is durable, absorbent, and holds its shape well.
2. Can beginners really follow this Aesthetic crochet coaster for beginners-Step by Step Tutorial?
Yes, the tutorial is designed specifically for beginners, offering simple instructions and easy stitches.
3. How long does it take to make one coaster?
Most beginners finish a coaster in about one to two hours, depending on their pace.
4. Do I need special tools?
No, only basic tools such as a crochet hook, scissors, and a tapestry needle are needed.
5. Can I wash crochet coasters?
Yes, cotton coasters can be washed gently by hand or in a delicate cycle.
6. Can I make larger or smaller coasters?
Absolutely. Adjusting the number of rounds will change the size easily.
7. What are the easiest stitches for beginners?
Chain stitch, single crochet, and slip stitch are perfect for starting this tutorial.
Conclusion
This Aesthetic crochet coaster for beginners-Step by Step Tutorial has guided you through creating a beautiful, functional, and stylish crochet accessory.
You learned how to gather materials, construct the base, add decorative elements, and finish the coaster neatly. This project is perfect for beginners looking to develop their skills while enjoying a relaxing and rewarding craft.
I hope you feel inspired to create more aesthetic coasters in your favorite colors. Please leave your sincere opinion and suggestions—they help improve future tutorials!