
If you are looking for a creative and meaningful crochet project, this American Eclipse in Crochet – Step by Step Tutorial is the perfect choice. Inspired by the celestial beauty of an eclipse, this design combines the artistry of crochet with the wonder of nature. Whether you’re a beginner or an experienced crafter, this project allows you to express creativity while learning new techniques. The American Eclipse in Crochet symbolizes unity, transformation, and light overcoming darkness — all represented through yarn, color, and stitch patterns.
This tutorial is designed to guide you carefully through each stage, from choosing the right materials to mastering the stitches that bring your crochet eclipse to life. The American Eclipse in Crochet – Step by Step Tutorial provides detailed guidance for anyone wanting to make a unique decorative piece or even a themed accessory inspired by one of nature’s most fascinating events. With patience and practice, you’ll be able to recreate the breathtaking moment of an eclipse using just your hook and yarn.
Before diving into the steps, take a moment to imagine your finished piece. Whether it’s a wall hanging, a cushion cover, or a centerpiece for your home, this crochet project captures the cosmic theme in a cozy, handmade form. By following this American Eclipse in Crochet – Step by Step Tutorial, you’ll not only improve your crochet skills but also create something symbolic and visually stunning. Let’s begin your journey to craft the magic of the American eclipse with yarn and creativity.
Choosing Materials and Colors for Your Crochet Eclipse
The first step in this American Eclipse in Crochet – Step by Step Tutorial is to gather the right materials. The yarn you select will play a major role in how your eclipse turns out. For this project, cotton or acrylic yarn is ideal, depending on your purpose. Cotton yarn provides a matte, natural look suitable for wall hangings, while acrylic yarn offers softness and a bit of shine, perfect for accessories or decorative pieces.
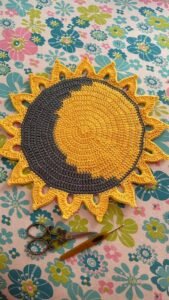
When it comes to color, the choice is symbolic. Think about the shades that best represent the eclipse: deep black or midnight blue for the shadow of the moon, bright yellow or gold for the sun’s rays, and silver or white for the ring of light. Combining these colors carefully will create a realistic contrast that mirrors the beauty of the celestial event.
You’ll also need a crochet hook suitable for your yarn size, typically between 3.5mm and 5mm. A smaller hook creates tighter stitches, giving your eclipse more definition, while a larger hook produces a softer and more flexible design. Don’t forget scissors, a yarn needle, and optional items like a wooden hoop if you plan to display your finished work as wall art.
One tip from experienced crocheters is to test your colors together before starting the main piece. Make a small sample circle using your chosen shades to ensure they complement each other. The American Eclipse in Crochet – Step by Step Tutorial emphasizes the importance of color balance because it creates the illusion of movement and depth.
Depending on your design, you might also need stitch markers to keep track of your rounds. This is especially helpful when working on circular or layered projects that represent the different phases of the eclipse. Keeping your work organized ensures clean lines and symmetry.
Lastly, make sure to set up a comfortable workspace with good lighting. The contrast between dark and light yarns can be challenging to work with, so proper visibility will make the process smoother and more enjoyable.
Step-by-Step Instructions to Crochet the American Eclipse
Now, let’s get to the heart of the American Eclipse in Crochet – Step by Step Tutorial. Begin by creating a magic ring, which forms the center of your eclipse — the point where the moon and sun align. Chain two and make 12 double crochet stitches into the ring. Pull the loop tight to close the circle, representing the start of your eclipse design.
For the next round, switch to your lighter color (such as gold or white) and double crochet twice into each stitch around. This creates the glowing ring of light around the moon’s shadow. Remember to join each round with a slip stitch and chain one before moving to the next to keep the circle smooth.
In round three, switch back to a darker yarn. Make one double crochet in the first stitch and two in the next, repeating this pattern around. This will gradually enlarge the circle and add dimension. You can continue alternating colors every few rounds to symbolize the shifting light of the eclipse.
To add more texture, try incorporating front post double crochets in one of your rounds. This stitch makes the raised sunbeam effect stand out beautifully against the darker background. Texture plays a big role in giving your eclipse a realistic and artistic look.
As you continue crocheting, the size of your piece will depend on your goal. For a coaster, stop after about 5 or 6 rounds. For a wall hanging, you might continue to 12 or more rounds. Always keep your stitches even and count regularly to maintain a perfect circle.
Once your eclipse reaches the desired size, fasten off your yarn and weave in the ends neatly. You can now block your piece to keep it flat and smooth. This ensures that your American Eclipse in Crochet maintains its round shape and professional finish.
Adding Details and Finishing Touches
In this part of the American Eclipse in Crochet – Step by Step Tutorial, you’ll learn how to give your eclipse a more defined and artistic finish. Borders, textures, and small details can make a big difference in your final result.
Start by adding a contrast border using a single crochet stitch around the entire circle. This not only secures the edges but also enhances the design’s visual balance. Choose a color that stands out, such as white or yellow, to represent the sun’s glow.
If you want your crochet eclipse to look more dimensional, you can make a layered design. Crochet a smaller black circle to represent the moon and sew or attach it to the center of your larger circle. This creates a realistic overlap effect — a simple yet striking way to capture the essence of the eclipse.
Another beautiful touch is to use metallic yarn for the sun’s corona. A few stitches of gold or silver thread can add shimmer and life to your project. Be careful not to overdo it; subtle accents work best for maintaining a refined look.
You can also turn your finished crochet eclipse into different types of crafts. Attach a loop or small chain to hang it as a decoration, or use multiple eclipses sewn together to form a crochet garland. It’s a versatile design that can fit many creative ideas.
Finally, if you’re using your piece as part of a larger project — like a blanket, bag, or pillow — be sure to match your yarn types and thickness for consistency. The American Eclipse in Crochet – Step by Step Tutorial encourages experimentation while maintaining harmony and craftsmanship in your final piece.
Tips for Success and Creative Variations
Now that you understand the basics, here are some tips from the American Eclipse in Crochet – Step by Step Tutorial to help your project shine. First, always maintain a steady tension. Consistent stitches are essential for keeping your circle smooth and preventing warping. Take your time and check your progress every few rounds.
Second, block your work after completing it. Blocking shapes the stitches evenly and enhances the visual appeal. Simply wet your crochet piece slightly, lay it flat, and pin it to the correct shape. Once dry, it will hold its form beautifully.
Third, don’t be afraid to experiment with color schemes. While the American Eclipse traditionally features black and gold, you can try using blues, purples, or even ombre yarns for a unique interpretation. Crochet is an art form, and your eclipse should reflect your personal creativity.
Another creative idea is to combine multiple eclipses into one piece. Arrange smaller circles representing different eclipse phases — from partial to total — and sew them together for an artistic wall hanging. This approach transforms your project into a storytelling piece.
You can also mix techniques by adding embroidery details on top of your crochet work. A few stitched stars or comets around your eclipse can bring a celestial theme to life. This is a fun way to personalize your piece further.
Lastly, keep practicing and experimenting. The American Eclipse in Crochet – Step by Step Tutorial is more than just a guide; it’s an invitation to explore creativity, patience, and craftsmanship. Every piece you make improves your skills and inspires new ideas.
Frequently Asked Questions
1. What is the best yarn for the American Eclipse in Crochet?
Cotton or acrylic yarn works best. Cotton gives a natural matte finish, while acrylic adds softness and color vibrancy.
2. Can beginners follow this tutorial?
Yes! This American Eclipse in Crochet – Step by Step Tutorial is suitable for all skill levels. Basic knowledge of crochet stitches is enough to start.
3. How big should the crochet eclipse be?
That depends on its purpose. Small versions make great coasters, while larger ones are perfect for wall art or home décor.
4. How can I make my eclipse look more realistic?
Use a combination of dark and light yarns, layered circles, and textured stitches to simulate the moon’s shadow and sun’s light.
5. Can I wash my crochet eclipse piece?
Yes, but hand washing is recommended. Use mild soap and cold water, then lay it flat to dry to maintain its shape and color.
6. What other projects can I make with the eclipse motif?
You can create wall hangings, blankets, cushions, tote bags, or decorative banners — all using the eclipse as your central design.
Conclusion
By following this American Eclipse in Crochet – Step by Step Tutorial, you’ve learned how to transform simple yarn into a stunning representation of one of nature’s most breathtaking events. From selecting the perfect colors to mastering the stitches that create depth and contrast, each step brings you closer to capturing the beauty of the eclipse in your handmade art.
This project combines creativity, symbolism, and technique, making it a rewarding experience for crafters of all levels. Whether displayed as a home decoration or given as a heartfelt gift, your crochet eclipse will shine as a reminder of craftsmanship and creativity.
We hope this tutorial has inspired you to create your own version of the American Eclipse in Crochet. Please leave your honest opinion and suggestions below — your feedback helps improve future crochet guides and encourages others to begin their creative journey too!