
Creating an Amigurumi ladybug keychain – Step by Step Tutorial is one of the most delightful crochet projects for beginners and advanced crafters alike. Amigurumi, the Japanese art of crocheting small stuffed toys, has become increasingly popular worldwide, and adding this technique to a cute ladybug keychain makes it both fun and practical. By following this detailed tutorial, you will not only learn how to crochet a ladybug but also discover how to transform it into a charming keychain that can be gifted, sold, or kept as a personal accessory.
One of the main advantages of making a crochet Amigurumi ladybug keychain is its size and portability. Unlike large crochet projects that may take weeks to complete, a ladybug keychain is a small and achievable creation. It allows you to practice important crochet techniques such as magic rings, increases, and decreases while working on something manageable and rewarding. This makes it a perfect project for beginners who want to explore the art of Amigurumi without feeling overwhelmed.
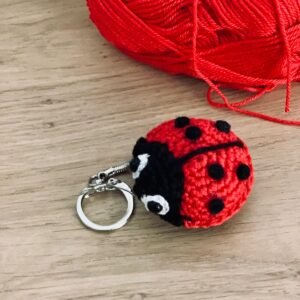
Another great reason to try this Amigurumi ladybug keychain – Step by Step Tutorial is its versatility. You can make it in classic red and black for a traditional ladybug look, or experiment with different colors to give it a more playful appearance. The finished product makes a wonderful handmade gift for friends, a cute accessory for bags, or even a fun way to personalize your keys. With just a few materials and some patience, you’ll have a unique item that showcases your creativity and crochet skills.
Materials You Will Need for the Amigurumi Ladybug Keychain
Before you begin, it’s essential to gather all the materials you’ll need for this Amigurumi ladybug keychain – Step by Step Tutorial. The basic supplies include yarn, a crochet hook, stuffing, and a few extra accessories. Choosing the right materials will not only make your project easier but will also give your ladybug a professional finish.
First, select a yarn that works well for Amigurumi. Cotton yarn is often recommended because it provides a neat stitch definition, but acrylic yarn can also be used for a softer look. Choose a red yarn for the ladybug’s body, black yarn for the head and spots, and optionally white yarn for eye details.
Next, you’ll need a crochet hook that matches the yarn weight. Most Amigurumi projects require a smaller hook size to create tight stitches, which helps prevent stuffing from showing through. A hook size of 2.5mm to 3.5mm is commonly used for small projects like this.
Don’t forget the stuffing, which is essential for shaping your Amigurumi ladybug keychain. Polyester fiberfill is the most common choice because it is lightweight and easy to use. You’ll also need a tapestry needle for sewing the parts together and embroidering details such as the eyes.
Finally, to turn your ladybug into a keychain, you will need a key ring and possibly a small chain attachment. These can be found at most craft stores or online. Having all these materials ready before starting will ensure a smooth crochet experience and help you complete your project without interruptions.
Step by Step Instructions for Crocheting the Ladybug Body
The core part of this Amigurumi ladybug keychain – Step by Step Tutorial is creating the body. This section will guide you step by step to ensure your ladybug looks cute and well-proportioned.
Start with a magic ring using your red yarn. This technique creates a tight circle, which is the perfect base for crocheting in the round. Crochet six single crochets into the ring and pull it tight to close. This will be the beginning of the ladybug’s round body.
Next, increase in each stitch of the round to double the number of stitches. This expansion allows the body to grow evenly. Continue crocheting in the round, alternating between increase rows and straight single crochet rows to give the ladybug its rounded shape.
Once the body has reached the desired size, usually about 4 to 5 rounds of increases, you can switch to making several rounds without increases. This helps the body take on a spherical form, giving your ladybug a realistic look.
After shaping the main body, start decreasing to close the sphere. Before the final round, remember to stuff the body with polyester fiberfill. Stuff it firmly but not too tightly, as you want the ladybug to hold its shape without stretching the stitches.
When the body is completely closed, weave in the yarn tail securely. You now have the base of your Amigurumi ladybug keychain, ready for the next steps: adding the head, spots, and details.
Adding the Ladybug’s Head, Spots, and Details
Now that the body is complete, it’s time to give your ladybug its distinctive features. This section of the Amigurumi ladybug keychain – Step by Step Tutorial will cover the head, black spots, and finishing details.
The head can be crocheted separately using black yarn. Similar to the body, start with a magic ring and increase until you have a small round piece. This piece should be smaller than the body but large enough to balance the overall look. Once stuffed lightly, sew the head onto one end of the ladybug body using a tapestry needle.
For the spots, crochet small flat circles using black yarn. These can be as simple as starting with a magic ring and adding six single crochets. Depending on the size of your ladybug, make four to six spots. Sew them securely onto the red body, spacing them evenly to mimic a natural ladybug pattern.
The eyes can be embroidered with white yarn or made using small safety eyes if you prefer. If you choose safety eyes, insert them before closing the head. Embroidered eyes, on the other hand, can be stitched on at the end for a softer look.
To complete the details, you may embroider a black line down the middle of the ladybug’s back, representing the split of its wings. This adds charm and realism to your Amigurumi ladybug keychain.
Finally, attach the key ring. Sew or securely fasten a small chain to the top of the ladybug’s body, then connect it to the key ring. Your keychain is now functional and adorable.
Tips for Personalizing Your Amigurumi Ladybug Keychain
One of the joys of this Amigurumi ladybug keychain – Step by Step Tutorial is that it allows for endless creativity and personalization. While the traditional ladybug is red with black spots, you can experiment with colors, textures, and decorative elements to make your keychain truly unique.
Consider using pastel colors for a softer, whimsical look. A pink ladybug with white spots or a blue ladybug with silver accents can be just as charming as the classic design. These variations also make wonderful gifts, especially for children who enjoy colorful accessories.
You can also experiment with yarn textures. Using a sparkly or variegated yarn can add a playful touch to your Amigurumi ladybug. This makes your keychain stand out and adds a layer of uniqueness to your handmade item.
Adding embellishments such as small bows, beads, or embroidered initials can make your ladybug keychain extra special. If you’re planning to sell your creations, these custom details can help attract buyers who are looking for one-of-a-kind accessories.
Another way to personalize your project is by changing the size. Using a thicker yarn and larger hook will result in a bigger ladybug, which could serve as a bag charm rather than a keychain. On the other hand, thinner yarn will create a mini keychain that is lightweight and subtle.
Lastly, consider making sets of ladybug keychains in different colors. This is a fun way to showcase your creativity, and it’s especially useful if you’re gifting them to multiple people. Everyone can receive a ladybug in their favorite color.
FAQ About Amigurumi Ladybug Keychain – Step by Step Tutorial
1. How long does it take to make an Amigurumi ladybug keychain?
For beginners, it may take around 3 to 4 hours, while experienced crocheters can finish it in 1 to 2 hours.
2. Can I make this project with leftover yarn?
Yes! This is a perfect scrap yarn project since it requires only small amounts of red, black, and optional white yarn.
3. Do I need special skills to follow this tutorial?
Not at all. Basic crochet knowledge such as single crochet, increases, and decreases is enough to complete the project.
4. Can children make an Amigurumi ladybug keychain?
Older children who know how to crochet can definitely make it, but very young children may need help with small parts like sewing spots and attaching the key ring.
5. How can I make my ladybug keychain more durable?
Ensure that the stitches are tight, the stuffing is firm, and all parts are sewn securely. Using cotton yarn also increases durability.
6. Can I sell the finished ladybug keychain?
Yes, handmade Amigurumi keychains are popular craft fair and online market items. Just make sure to give your creation a neat and professional finish.
Conclusion
In this Amigurumi ladybug keychain – Step by Step Tutorial, we explored how to create a charming and functional crochet accessory. From gathering materials to crocheting the body, adding the head and spots, and customizing details, you now have the knowledge to make your own handmade keychain.
This project is beginner-friendly, quick to complete, and offers endless opportunities for personalization. Whether you keep it for yourself, gift it, or sell it, the ladybug keychain is a delightful way to showcase your crochet skills.
I hope this tutorial inspires you to pick up your yarn and hook and start creating. If you enjoyed this guide, please share your honest opinion in the comments and let me know your suggestions for future tutorials. Your feedback helps me bring more creative and useful content for all crochet lovers.