
Amigurumi mouse bookmark step by step is a delightful and creative crochet project that combines the charm of amigurumi with the practicality of a bookmark. In this complete Amigurumi mouse bookmark step by step guide, you will learn how to create an adorable mouse-shaped bookmark that is both functional and decorative. This Amigurumi mouse bookmark step by step tutorial is perfect for beginners who want to explore amigurumi techniques, as well as experienced crafters looking for a fun and quick project.
Working on an Amigurumi mouse bookmark step by step project is a great way to develop essential crochet skills such as working in small rounds, shaping, and assembling details. Small projects like this are ideal for improving precision and stitch consistency. By following this Amigurumi mouse bookmark step by step, you will gain confidence while creating a handmade piece that is useful and visually appealing.
Another advantage of the Amigurumi mouse bookmark step by step is the opportunity for customization. You can choose different yarn colors, adjust the size, and add unique details to make your bookmark truly special. This Amigurumi mouse bookmark step by step encourages creativity and allows you to design personalized gifts or accessories that reflect your style.
Materials and Preparation for Amigurumi mouse bookmark step by step
To begin your Amigurumi mouse bookmark step by step, it is important to gather all the necessary materials. You will need yarn in at least two colors, a crochet hook, scissors, a yarn needle, stuffing (optional for the head), and stitch markers. Having everything prepared will make your Amigurumi mouse bookmark step by step more efficient and enjoyable.
Choosing the right yarn is essential in the Amigurumi mouse bookmark step by step. Soft cotton or acrylic yarn works well for creating a smooth and durable finish.
Selecting the correct crochet hook size is also important. In this Amigurumi mouse bookmark step by step, using a slightly smaller hook helps create tight stitches.
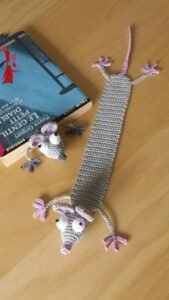
Color selection plays a key role in the Amigurumi mouse bookmark step by step. Neutral tones like gray, white, or beige are common, but you can explore creative variations.
Preparing your workspace is another important step. A clean and well-lit area helps you focus while working on the Amigurumi mouse bookmark step by step.
Finally, organize your tools before starting. This preparation step in the Amigurumi mouse bookmark step by step ensures a smooth workflow.
Step-by-Step Instructions for Amigurumi mouse bookmark step by step
The first step in the Amigurumi mouse bookmark step by step is creating the mouse’s head. Begin with a magic ring and crochet in rounds to form a small sphere.
Next, increase and shape the head evenly. This stage in the Amigurumi mouse bookmark step by step ensures a balanced and neat structure.
Once the head is complete, create the long body of the bookmark. In the Amigurumi mouse bookmark step by step, this is usually a simple chain or flat piece.
Attach the body securely to the head. This step in the Amigurumi mouse bookmark step by step ensures durability.
Add details such as ears, eyes, and a tail. These features in the Amigurumi mouse bookmark step by step bring the character to life.
Finally, weave in loose ends and adjust the shape. This completes your Amigurumi mouse bookmark step by step with a polished finish.
Creative Ideas for Amigurumi mouse bookmark step by step
One of the most enjoyable aspects of the Amigurumi mouse bookmark step by step is customization. You can experiment with different yarn colors to create unique designs.
You can also vary the length of the bookmark. This flexibility in the Amigurumi mouse bookmark step by step allows you to adapt it for different book sizes.
Adding texture is another creative idea. This technique in the Amigurumi mouse bookmark step by step enhances visual interest.
You may also create themed variations. This expands the possibilities of the Amigurumi mouse bookmark step by step into a collection.
Personalizing facial expressions can make each piece unique. This detail in the Amigurumi mouse bookmark step by step adds charm.
Finally, consider making sets as gifts. This enhances the versatility of the Amigurumi mouse bookmark step by step.
Tips for Best Results in Amigurumi mouse bookmark step by step
Maintaining consistent tension is essential in the Amigurumi mouse bookmark step by step. This ensures a neat and professional look.
Take your time with each step. Rushing the Amigurumi mouse bookmark step by step may lead to uneven stitches.
Use high-quality yarn for durability. This improves the final result of your Amigurumi mouse bookmark step by step.
Count your stitches carefully. Accuracy is important throughout the Amigurumi mouse bookmark step by step.
Practice basic techniques if needed. This builds confidence when working on the Amigurumi mouse bookmark step by step.
Most importantly, enjoy the process. The Amigurumi mouse bookmark step by step is meant to be relaxing and creative.
Amigurumi mouse bookmark step by step
Is this tutorial suitable for beginners?
Yes, the Amigurumi mouse bookmark step by step is beginner-friendly and easy to follow.
What type of yarn should I use?
Soft cotton or acrylic yarn is ideal for the Amigurumi mouse bookmark step by step.
How long does it take to complete?
The time required for the Amigurumi mouse bookmark step by step depends on your experience level.
Can I customize the design?
Yes, customization is a key feature of the Amigurumi mouse bookmark step by step.
Do I need special tools?
No, basic crochet tools are enough for the Amigurumi mouse bookmark step by step.
How do I use the finished bookmark?
After completing the Amigurumi mouse bookmark step by step, simply place it between the pages of your book.
Conclusion
This complete Amigurumi mouse bookmark step by step tutorial has guided you through every step needed to create a charming and functional handmade accessory.
From selecting materials and learning techniques to exploring creative ideas and improving your skills, you now have everything needed to succeed.
The Amigurumi mouse bookmark step by step is a perfect way to combine creativity with practicality. If you enjoyed this tutorial, please leave your honest opinion and share your suggestions. Your feedback is valuable and helps inspire future creative content.