
If you are a crochet lover searching for a simple yet charming project, this Beautiful Crocheted Sunflower Keychain – Step by Step Tutorial is perfect for you. This tutorial will teach you how to create a delightful sunflower keychain that adds warmth, beauty, and personality to your daily life. Whether you want to decorate your keys, bag, or even give it as a handmade gift, this sunflower keychain will brighten up any space with its sunny charm.
Crochet keychains are among the most popular projects for crafters because they are quick, practical, and allow for plenty of creativity. The Beautiful Crocheted Sunflower Keychain – Step by Step Tutorial is especially appealing because it combines simplicity with elegance. Using only basic crochet stitches, you can create a miniature sunflower that captures the essence of summer and nature in your hands. It’s a wonderful way to express your creativity while improving your crochet skills.
This sunflower keychain project is beginner-friendly, making it suitable for anyone who knows how to make basic stitches such as chain, single crochet, and double crochet. With patience and attention to detail, you can create a beautiful handmade accessory that reflects your style. Throughout this tutorial, you’ll find clear instructions and helpful tips to ensure your sunflower turns out perfectly every time. Let’s dive into the Beautiful Crocheted Sunflower Keychain – Step by Step Tutorial and create a piece that shines with handmade joy!
Materials and Preparation
To begin this Beautiful Crocheted Sunflower Keychain – Step by Step Tutorial, you’ll need just a few materials. Gather your crochet hook, cotton yarn in yellow, brown, and green tones, scissors, a yarn needle, and a metal keychain ring. The yarn should be lightweight or medium weight, as this gives your keychain the perfect size—not too bulky and not too small.
Choosing high-quality yarn is important because it ensures that your sunflower keeps its shape and vibrant color over time. Cotton yarn is a great option since it provides a smooth texture and clean stitches. Acrylic yarn also works well if you prefer a more flexible material. The crochet hook size depends on the yarn thickness, but most crafters use a 2.5 mm or 3 mm hook for this project.
Before you start crocheting, make sure your yarn is tangle-free. Prepare a comfortable workspace with good lighting, and keep your materials organized. Having your tools within reach helps you stay focused and enjoy the creative process without interruptions.
It’s also helpful to understand the basic pattern before you start. The sunflower will be made in parts—the center, petals, and leaves. Once all parts are crocheted, you’ll assemble them and attach the keychain ring. This structure makes the process easy to follow and fun to create.
If you’re new to crochet, take your time practicing the stitches before starting. The Beautiful Crocheted Sunflower Keychain – Step by Step Tutorial is designed to help you learn at your own pace. The goal isn’t just to finish quickly but to enjoy each step as your sunflower slowly blooms in your hands.
When you have everything ready, you’re set to begin crocheting your sunflower. Let’s start with the central part, which forms the base of your design and sets the foundation for the petals and leaves.
Making the Sunflower Center
The first step in the Beautiful Crocheted Sunflower Keychain – Step by Step Tutorial is creating the sunflower’s center. This part uses brown yarn to mimic the natural color of a real sunflower’s core. Start by making a magic ring, which will help you form a tight circle with no hole in the middle.
Inside the magic ring, crochet six single crochets (sc). Pull the yarn tail to close the ring tightly. This will form a small, neat circle that will serve as your sunflower’s base. Join with a slip stitch to the first single crochet to close the round.
For the next round, make two single crochets in each stitch around. You’ll now have a total of twelve stitches. This expansion gives the center a flat, rounded shape. Join again with a slip stitch at the end of the round.
If you want your sunflower center to be slightly larger, you can add another round by making one single crochet in the first stitch and two single crochets in the next stitch, repeating all around. Remember to keep the shape flat as you go to ensure the petals will sit nicely later.
Once the center is complete, fasten off and weave in the ends neatly with a yarn needle. This gives your project a clean finish. You can slightly shape the center with your fingers to make it perfectly round.
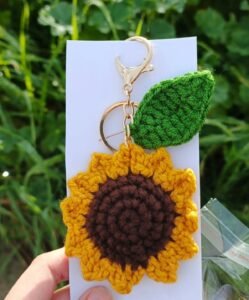
Your sunflower’s heart is now complete! The warm brown tone adds depth and contrast, making the yellow petals pop beautifully. With the base ready, it’s time to move on to crocheting the petals, the most charming part of this Beautiful Crocheted Sunflower Keychain – Step by Step Tutorial.
Crocheting the Petals
Now that you have the center ready, it’s time to add the petals, the defining feature of your sunflower. For this part of the Beautiful Crocheted Sunflower Keychain – Step by Step Tutorial, switch to yellow yarn. The petals are crocheted around the center to form the iconic sunflower shape.
Join the yellow yarn in any stitch of the brown circle. Chain three, which will count as your first double crochet (dc). In the same stitch, make one double crochet, chain two, and slip stitch into the next stitch. This forms your first petal.
Continue this pattern all around: slip stitch into the next stitch, chain three, make two double crochets, chain two, and slip stitch again. Each petal should be small but full enough to create a bright, rounded look. By the time you finish, you’ll have a circle of lovely yellow petals surrounding the brown center.
After finishing the last petal, fasten off and weave in the ends. You can shape the petals with your fingers to give them a natural curve, just like real sunflower petals that spread outward in perfect harmony.
If you want your sunflower to have more dimension, you can make a second layer of petals behind the first. Simply repeat the same pattern but attach the yarn slightly behind the first round of petals. This adds depth and gives your keychain a fuller, more realistic look.
Once your petals are complete, admire your progress! The sunflower design is now taking shape, radiating cheerful, sunny vibes. The next step in this Beautiful Crocheted Sunflower Keychain – Step by Step Tutorial is adding leaves and assembling everything together.
Adding Leaves and Assembling the Keychain
In this stage of the Beautiful Crocheted Sunflower Keychain – Step by Step Tutorial, we’ll create small green leaves to complete the natural look. Using green yarn, chain eight stitches. Starting from the second chain from the hook, make one single crochet, one half double crochet, four double crochets, and one single crochet in the last stitch. Chain one and slip stitch back into the same space to form a pointed leaf.
You can make one or two leaves depending on your preference. After finishing, weave in the yarn ends and set them aside for assembly. These leaves will give your sunflower keychain a more vibrant, lively appearance.
Now, it’s time to put everything together. Take your sunflower and position the leaves behind it. Secure them with a few stitches or a dab of fabric glue if you prefer a no-sew option. Make sure the leaves peek slightly from behind the petals to enhance the design.
Once your sunflower and leaves are attached, connect the metal keychain ring. You can sew it directly to the back of the flower or use a small loop of yarn to attach it securely. Ensure that it’s fastened tightly so the keychain can handle daily use.
At this point, your Beautiful Crocheted Sunflower Keychain is complete! The bright petals, realistic center, and charming leaves come together to form a miniature piece of art. You can make several of these in different sizes or colors to give as gifts or sell at craft fairs.
Don’t forget to block your crochet piece if you want it to look perfectly shaped. Lightly mist it with water, pin it to a flat surface, and let it dry naturally. This step ensures your sunflower holds its beautiful form for a long time.
Beautiful Crocheted Sunflower Keychain
1. Is this project suitable for beginners?
Yes! The Beautiful Crocheted Sunflower Keychain – Step by Step Tutorial is beginner-friendly. It uses basic stitches that are easy to learn and perfect for practicing crochet skills.
2. What kind of yarn should I use?
Cotton yarn works best because it provides structure and durability. It also gives a neat finish to the petals and center.
3. How long does it take to make one sunflower keychain?
Depending on your experience, it usually takes about one to two hours to complete. It’s a quick and satisfying project.
4. Can I customize the colors?
Absolutely! You can make sunflowers in any color combination you like. Try pastel shades for a soft look or bold tones for a modern style.
5. How do I keep the keychain clean?
You can gently hand wash it in cool water with mild soap. Let it air dry completely before using it again.
6. Can I sell these sunflower keychains?
Yes, handmade sunflower keychains make great items to sell at craft fairs or online. Just be sure to photograph them well to show off their beauty.
Conclusion
In this Beautiful Crocheted Sunflower Keychain – Step by Step Tutorial, you learned how to create an adorable sunflower accessory using simple crochet techniques. From preparing your materials to making the center, petals, and leaves, each step guided you through the process of turning yarn into a lovely handmade piece.
This project is perfect for beginners and experienced crafters alike, offering a quick yet rewarding way to express creativity. The result is a beautiful crocheted sunflower keychain that radiates happiness wherever you take it.
Now it’s your turn! Try making one yourself, experiment with colors, and personalize your sunflower creation. Once finished, share your honest opinion and suggestions—we’d love to hear your experiences and ideas for future crochet tutorials.