
The Christmas crochet centerpiece – Step by Step Tutorial is a delightful and festive way to bring handmade charm to your holiday decorations. If you love the magic of Christmas and enjoy crafting with yarn, this tutorial will show you how to create a stunning crochet centerpiece that can instantly elevate your dining or coffee table. A crochet centerpiece not only adds a cozy and elegant touch to your home but also serves as a beautiful symbol of creativity and care during the most wonderful time of the year.
Crocheting your own Christmas centerpiece gives your home an authentic and personal feel. Instead of buying mass-produced items, you can make something completely unique, filled with love and holiday spirit. The Christmas crochet centerpiece – Step by Step Tutorial allows you to experiment with festive colors like red, green, gold, and white, incorporating traditional Christmas themes such as snowflakes, stars, holly leaves, and even miniature Christmas trees. Whether you’re a beginner or an experienced crocheter, this project is both enjoyable and meaningful.
A handmade centerpiece can also make an incredible gift. Family members and friends will appreciate the time, thought, and effort you put into crafting such a personal decoration. This Christmas crochet centerpiece – Step by Step Tutorial will guide you through each phase, from choosing materials and planning your design to crocheting the individual motifs and assembling them into a finished masterpiece. It’s time to get into the festive spirit and bring a handmade glow to your holiday celebrations.
Choosing the Right Materials for Your Crochet Centerpiece
Before you begin the Christmas crochet centerpiece – Step by Step Tutorial, it’s important to choose the right materials. The yarn and tools you select will affect both the texture and overall appearance of your finished piece. For a centerpiece, cotton yarn is highly recommended because it offers a firm and elegant look, perfect for decorative projects. You can also use metallic or glitter yarns to add a festive sparkle that captures the holiday light beautifully.
When selecting colors, think about the atmosphere you want to create. Classic Christmas combinations like red and green are timeless, but gold, silver, and white can give your piece a more sophisticated and modern vibe. Some crocheters also love to incorporate variegated yarns for a snowy, whimsical look. The beauty of this Christmas crochet centerpiece – Step by Step Tutorial is that you can completely personalize it to match your decor.
In addition to yarn, you’ll need an appropriate crochet hook—usually between 2.5mm and 3.5mm, depending on your yarn weight. Smaller hooks create tighter stitches that make your design more refined. Scissors and a yarn needle are essential for cutting and weaving in ends, while stitch markers can help keep track of your pattern, especially if it includes multiple motifs.
You might also want to use a blocking board or iron to shape and set your crochet pieces once they’re finished. Blocking ensures that your centerpiece lies flat and maintains its structure. If you’re making snowflake or lace-style motifs, light starching can help them hold their shape longer.
Finally, consider adding small embellishments such as beads, ribbons, or even tiny bells. These small touches can make your Christmas crochet centerpiece – Step by Step Tutorial truly stand out and become a conversation piece during your holiday gatherings.
Step-by-Step Guide to Making Your Crochet Centerpiece
Now that you’ve gathered your materials, it’s time to dive into the main part of the Christmas crochet centerpiece – Step by Step Tutorial. The process might look detailed, but it’s actually easy to follow and deeply rewarding once you see your creation come to life.
Start by crocheting a circular base for your centerpiece. You can begin with a magic ring and then crochet several rounds using double crochet stitches. This circular base serves as the foundation of your design, allowing you to build patterns outward, such as snowflakes, stars, or leaves. Choose your main color for the base—white or gold works beautifully as a neutral background.
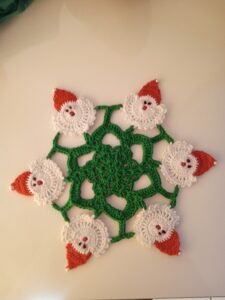
Next, move on to the decorative motifs. Many crocheters love to add small poinsettias, holly leaves, or tiny ornaments. To make a poinsettia, crochet red petals in the shape of teardrops and connect them at the base. Add small yellow or gold beads at the center to mimic the flower’s natural look. These small details will make your Christmas crochet centerpiece – Step by Step Tutorial more realistic and appealing.
Once your motifs are ready, position them evenly around the circular base. You can sew or crochet them directly onto the foundation, depending on your preference. For an elegant touch, alternate colors or designs to create a symmetrical pattern that draws the eye toward the center.
To add depth, consider layering different motifs. For example, place small snowflakes over a solid-colored background or intersperse holly leaves between poinsettia flowers. The layering technique brings texture and visual interest to your centerpiece, making it look more intricate and festive.
Finish the outer edge of your centerpiece with a beautiful border. You can use shell stitches, picots, or scallops to give the edges a soft, decorative frame. This final step in the Christmas crochet centerpiece – Step by Step Tutorial ties all the elements together, giving your piece a professional and polished finish.
Decorating and Customizing Your Crochet Centerpiece
One of the joys of following a Christmas crochet centerpiece – Step by Step Tutorial is the freedom to make it your own. You can adjust the size, colors, and design elements to perfectly match your home’s holiday aesthetic. Whether you want something rustic and cozy or bright and glamorous, crochet gives you endless creative options.
If you prefer a natural look, use earth tones like deep green, cream, and brown. You can also incorporate small crocheted pinecones or acorns to enhance the rustic feel. For a more modern approach, choose minimalist color schemes—such as all white with silver details—for a snowy, elegant appearance.
Adding embellishments is another way to elevate your centerpiece. Sew on gold or silver beads to imitate sparkling Christmas lights or use sequins to mimic the shimmer of snow. You can also weave a satin ribbon around the outer edge for a luxurious touch. These extra decorations enhance your Christmas crochet centerpiece – Step by Step Tutorial and give it a personal flair.
Some crafters like to include LED tealight candles or glass ornaments in the center of their crochet piece. This creates a warm and glowing effect, perfect for dinner tables or mantels. Just make sure to use flameless candles to protect your yarn.
Another creative idea is to combine multiple crochet pieces. You can make smaller snowflake motifs and connect them to form a larger table runner or circular arrangement. The Christmas crochet centerpiece – Step by Step Tutorial is easily adaptable, so you can expand it depending on your space and style.
Lastly, remember that your centerpiece doesn’t have to be purely decorative—it can also be functional. Use it under a bowl of ornaments, a plate of cookies, or a Christmas candle arrangement. The versatility of crochet makes it a practical and beautiful addition to your holiday decor.
Tips for Maintaining and Displaying Your Crochet Centerpiece
Once your Christmas crochet centerpiece – Step by Step Tutorial is complete, proper care ensures it remains in excellent condition for years to come. Since crochet decorations are often made with delicate yarns, handling them gently is essential to preserve their beauty.
Always store your crochet centerpiece flat in a cool, dry place. Folding it can cause creases, so it’s best to roll it up loosely if storage space is limited. If you used metallic yarns, keep it away from direct sunlight to prevent fading.
When cleaning your centerpiece, avoid harsh washing. Instead, gently hand wash it in cold water with mild soap, then press out excess moisture with a towel. Lay it flat to dry to maintain its shape. These simple steps will keep your Christmas crochet centerpiece – Step by Step Tutorial looking fresh and festive year after year.
If your centerpiece starts to curl or lose shape over time, lightly block it again. Use a damp cloth and a warm iron to press gently over the fabric without direct heat. This will help restore its structure without damaging the fibers.
For display, place your crochet centerpiece on a table where it can be admired. Whether it’s under a vase, a holiday candle arrangement, or a tray of cookies, it will instantly make your space feel cozier. Pair it with matching crochet coasters or napkin rings to create a cohesive holiday set.
Finally, when the holiday season ends, handle your crochet piece with care during storage. Wrap it in tissue paper or fabric to prevent dust accumulation and keep it looking as beautiful as when you first made it.
1. What yarn is best for a Christmas crochet centerpiece?
Cotton yarn is ideal for durability and structure, while metallic or glitter yarn adds a festive sparkle.
2. How long does it take to make a crochet centerpiece?
Depending on size and complexity, it usually takes 4 to 8 hours to complete one piece.
3. Can beginners make this project?
Yes, the Christmas crochet centerpiece – Step by Step Tutorial is suitable for beginners, using basic stitches like chains, double crochet, and slip stitches.
4. How can I make my centerpiece more festive?
Add embellishments like beads, ribbons, or crocheted flowers in Christmas colors to enhance the festive look.
5. Can I wash my crochet centerpiece?
Yes, gently hand wash with mild soap and cold water. Avoid wringing and let it dry flat.
6. Can I customize the size of the centerpiece?
Absolutely! Simply adjust the number of stitches and motifs to make it larger or smaller based on your table size.
Conclusion
The Christmas crochet centerpiece – Step by Step Tutorial offers a wonderful way to combine creativity, tradition, and festive spirit. Through this tutorial, you learned how to choose the best materials, crochet beautiful motifs, assemble your centerpiece, and maintain it for future holidays. This handmade decoration not only enhances your Christmas decor but also carries your personal touch and love.
Making your own crochet centerpiece turns a simple yarn project into a cherished holiday keepsake. Every stitch you make adds to the warmth and joy of the season.
I hope this guide has inspired you to bring a little handmade magic to your Christmas celebrations. Please share your honest opinion and any suggestions in the comments—I’d love to hear how your crochet centerpiece turned out and how it brightened your holiday home.