
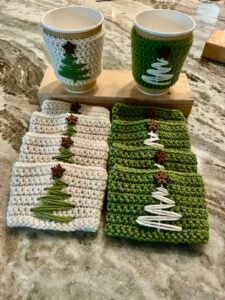
When the holiday season arrives, nothing feels warmer than handmade decorations that bring both joy and comfort. A Christmas Crochet Cup Cover – Festive & Easy Pattern for the Holidays – Step by Step Tutorial is the perfect project for crafters who love mixing creativity with functionality. Not only does it make your cups look cheerful and seasonal, but it also protects your hands from hot drinks and adds a personal touch to your holiday gatherings. By learning this pattern, you can create festive pieces that brighten your home and even serve as thoughtful handmade gifts for family and friends.
Crochet projects like this cup cover are wonderful because they are beginner-friendly and can be made in a short amount of time. They require minimal yarn, making them cost-effective while still offering a polished and professional finish. Following this Christmas Crochet Cup Cover – Festive & Easy Pattern for the Holidays – Step by Step Tutorial, you will understand how to select the right stitches, colors, and designs that reflect the festive season. Whether you prefer a simple design in classic red and green or something more whimsical with little details like stars or snowflakes, this project is customizable to your style.
The charm of this project is how versatile it is. A crochet cup cover can be adjusted for any type of cup or mug, making it a practical accessory as well as a decorative one. In this article, we’ll explore step-by-step instructions, essential materials, and creative variations to help you succeed in crafting your own Christmas Crochet Cup Cover – Festive & Easy Pattern for the Holidays – Step by Step Tutorial. If you’re ready to make your holiday drinks even more special, let’s dive into the process and turn yarn into festive magic.
Materials and Preparation for the Christmas Crochet Cup Cover
To begin the Christmas Crochet Cup Cover – Festive & Easy Pattern for the Holidays – Step by Step Tutorial, you’ll need just a few basic supplies. The first and most important material is yarn, and for a holiday project, choosing colors like red, green, white, and gold instantly adds a festive touch. Acrylic yarn is an excellent option because it’s durable, affordable, and easy to care for, making it suitable for items that will be used often.
Next, you’ll need an appropriate crochet hook, usually between 3.5mm and 4.5mm, depending on your yarn thickness. The hook size directly affects the tightness of your stitches, so it’s important to test your gauge before starting. A yarn needle is also necessary for weaving in ends and finishing touches. Don’t forget a pair of sharp scissors to cut the yarn cleanly.
Aside from the basic materials, having stitch markers can make your work easier, especially if you’re a beginner. They help keep track of rounds and ensure your cup cover stays even. Since this is a holiday project, you can also prepare embellishments such as small crochet appliqués like stars, candy canes, or holly leaves to attach later for extra decoration.
Before starting, measure your cup or mug to ensure the cover fits snugly. A flexible measuring tape will help determine the circumference and height of the cup. These measurements allow you to adjust your pattern accordingly so that your finished piece is functional as well as decorative.
When preparing, it’s also important to decide on the overall look you want. Do you prefer a minimalist striped pattern in red and white, or a detailed design that resembles Santa’s outfit with a belt buckle? Visualizing your design ahead of time will help guide your yarn and color choices.
Finally, gather everything in one place before you begin. Having your materials ready ensures a smooth crafting process and helps you stay focused on enjoying the experience of creating your Christmas Crochet Cup Cover – Festive & Easy Pattern for the Holidays – Step by Step Tutorial.
Step by Step Instructions for Crocheting the Cup Cover
The foundation of the Christmas Crochet Cup Cover – Festive & Easy Pattern for the Holidays – Step by Step Tutorial begins with creating a base chain that matches the circumference of your cup. Start by chaining a length that wraps around your cup snugly without stretching too much. Once you’ve reached the correct length, join the chain into a ring with a slip stitch.
Next, work single crochet stitches around the chain to form the first round. This creates a strong base for the cover. Continue working in rounds using half double crochet or double crochet stitches, depending on your desired texture. Double crochet stitches create a looser and softer fabric, while single crochet stitches provide a denser structure.
As you move upward, you’ll be building the body of the cup cover. Keep crocheting in rounds until the cover reaches the height of your cup. For a standard mug, about 10 to 12 rows are usually enough. Remember to check the fit occasionally by slipping the cover onto the cup to ensure it’s not too tight or too loose.
To add a festive touch, you can alternate yarn colors every two or three rows to create stripes. Red and white stripes resemble candy canes, while red and green stripes scream Christmas spirit. Color changes are simple—just switch to the new yarn at the end of a row, secure it with a knot, and continue stitching.
Once the desired height is achieved, finish off the top edge with a round of slip stitches or a decorative border such as picot or scallop stitches. This not only gives the piece a polished look but also helps maintain its shape.
The final step in the tutorial is weaving in all yarn ends with a yarn needle. Make sure they are secure so that your cup cover holds up through use and washing. Now, your handmade festive crochet cup cover is ready to bring holiday cheer!
Creative Variations for Your Holiday Cup Covers
One of the most exciting aspects of the Christmas Crochet Cup Cover – Festive & Easy Pattern for the Holidays – Step by Step Tutorial is how easily it can be personalized. A simple striped cover is beautiful, but you can take it further by adding fun embellishments. For example, attach a small crochet snowflake to the front for a winter wonderland theme.
Another idea is to design the cup cover to resemble Santa’s iconic red suit. Use red yarn for the body, add a black stripe for the belt, and finish it with a yellow or gold buckle in the center. This whimsical variation instantly makes your cup the star of any holiday table.
If you enjoy working with appliqué, try adding holly leaves and berries as decorations. These little touches can be sewn onto the cover for extra charm. You could even create a set of cup covers with different themes—snowmen, reindeer, or even Christmas trees—so that each guest at your gathering has a unique design.
Experimenting with textures is another way to elevate the design. Instead of sticking to basic stitches, try using puff stitches or bobble stitches to create a raised, cozy texture. These stitches not only look festive but also add warmth and thickness to your cup cover.
For a more elegant look, incorporate metallic yarns in gold or silver into your design. These shiny accents add sophistication while still staying true to the holiday spirit. Just a few rows of metallic yarn can completely transform the appearance of your cup cover.
The beauty of crochet is that the possibilities are endless. By combining colors, stitches, and embellishments, you can create a collection of festive cup covers that are not only functional but also serve as holiday décor.
Tips for Beginners and Best Practices
If you’re new to crochet, the Christmas Crochet Cup Cover – Festive & Easy Pattern for the Holidays – Step by Step Tutorial is a great beginner project. It’s small, straightforward, and forgiving of mistakes. Start slow, and don’t worry if your first stitches aren’t perfect—practice will naturally improve your technique.
One tip is to always count your stitches in each round to ensure consistency. Losing or adding stitches can cause the cover to warp, so keeping track is important. Stitch markers can be very helpful here, especially for marking the beginning of each round.
Another best practice is to test your gauge before starting the project. Crochet a small swatch using your chosen yarn and hook, then measure it. This ensures your finished cover will fit the cup properly. Skipping this step may result in a cover that is either too tight or too loose.
If you struggle with color changes, remember to always switch yarns at the end of a round. Secure the ends by weaving them neatly into the fabric so they don’t unravel. Clean finishing makes your work look professional and ensures durability.
Blocking your finished crochet piece is another valuable tip. Lightly dampen the cup cover, shape it to the correct dimensions, and let it dry flat. This process helps even out stitches and gives your project a polished finish.
Lastly, enjoy the process. Crocheting is not just about the final product—it’s about relaxation, creativity, and expressing your unique style. Even if your stitches aren’t perfect, the handmade charm will shine through.
FAQ about Christmas Crochet Cup Cover
1. Can I wash my crochet cup cover?
Yes, most crochet cup covers made with acrylic yarn are machine washable. However, it’s best to use a gentle cycle and air-dry to maintain the shape and texture.
2. How long does it take to make a cup cover?
For beginners, it may take about two to three hours. More experienced crocheters can complete a cup cover in less than an hour, especially with simple designs.
3. Can I use cotton yarn instead of acrylic?
Absolutely. Cotton yarn is a great choice because it’s absorbent and durable. It also gives a natural look to your crochet projects.
4. Do I need to follow the pattern exactly?
No, the pattern is just a guide. You can adjust the stitches, colors, and decorations to match your personal style and preferences.
5. Are crochet cup covers safe for hot drinks?
Yes, they act as an insulating layer, protecting your hands from hot surfaces. Just make sure the yarn you use is heat-resistant, like cotton or acrylic.
6. Can these cup covers be given as gifts?
Definitely. Handmade crochet cup covers are thoughtful and practical gifts, especially during the holiday season. You can even pair them with a mug for a complete set.
Conclusion
The Christmas Crochet Cup Cover – Festive & Easy Pattern for the Holidays – Step by Step Tutorial is a delightful project that blends creativity, functionality, and holiday cheer. With just a few materials, some basic stitches, and a little imagination, you can transform simple cups into festive décor pieces. We explored the materials needed, the step-by-step process, creative variations, and helpful tips for beginners.
Whether you make one for yourself or as a gift for loved ones, this crochet cup cover will surely bring warmth to your holiday season.
Now that you’ve learned how to create it, we’d love to hear your thoughts. Share your honest opinion and suggestions in the comments—your feedback helps inspire even more festive creations!