
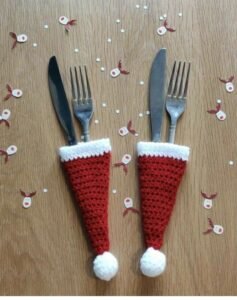
If you’re looking for a festive and practical way to elevate your holiday table setting, this Christmas Crochet Cutlery Holder – Step by Step Tutorial is the perfect DIY project for you. Combining creativity with function, this charming craft transforms simple yarn into a decorative holder for forks, knives, and spoons, adding a personal touch to your Christmas dinner. Whether you’re an experienced crocheter or just beginning your yarn journey, this tutorial will guide you through the process clearly and carefully.
The beauty of creating your own Christmas Crochet Cutlery Holder lies in its versatility. You can choose any yarn color that fits your Christmas theme—classic red and green, snowy white, or even a sparkly gold or silver. The best part is how easy it is to make these holders using basic crochet stitches, making it a fun and beginner-friendly project that also results in a beautiful handmade item you’ll be proud to display.
This Christmas Crochet Cutlery Holder – Step by Step Tutorial is not just about crafting something pretty—it’s about creating memories. Handmade items often carry more meaning than store-bought décor, and guests will appreciate the attention to detail. Plus, these holders make lovely gifts or can be used year after year. Let’s get started on this festive journey of crochet creativity.
Materials You Will Need
To begin this Christmas Crochet Cutlery Holder – Step by Step Tutorial, you’ll first need to gather a few essential materials. You don’t need a large list of supplies—just some basic crochet tools that many crafters already have on hand. Begin by selecting your yarn. A medium-weight cotton or acrylic yarn is ideal for this project, especially if you’re aiming for a sturdy and washable holder.
Next, you’ll need a crochet hook that suits the thickness of your yarn. A 4.0 mm or 4.5 mm hook usually works well for worsted-weight yarns. Make sure to check the yarn label for hook size suggestions. You will also need a pair of scissors and a yarn needle for weaving in ends once your holder is complete. These simple tools are all you need to create your crochet masterpiece.
To add a bit of festive flair, consider incorporating embellishments like small buttons, tiny bells, or even crocheted motifs such as stars, Christmas trees, or snowflakes. These decorative elements can be sewn onto your holder once the base is complete. They not only make the holder more eye-catching but also reflect your personal holiday style.
You might want to use stitch markers if you’re unfamiliar with working in the round or need help keeping track of rows. These can be helpful for maintaining consistency, especially if you’re making multiple holders. They’re also useful if you plan to experiment with different sizes or shapes.
Prepare your workspace by setting up in a comfortable and well-lit area. Having all your tools within reach will make the process smoother and more enjoyable. This project doesn’t require much space, so even a cozy corner of your home can become a productive crochet station.
Now that you’ve gathered your materials, you’re ready to move forward with the Christmas Crochet Cutlery Holder – Step by Step Tutorial. The next sections will walk you through the steps, from starting your base to finishing touches.
Creating the Base of the Cutlery Holder
The foundation of your Christmas Crochet Cutlery Holder starts with a simple rectangle or pocket shape that will hold the cutlery. You’ll begin by chaining a length that will be the width of the holder. Depending on your desired size, this may be around 15–20 chains for standard cutlery. Keep it slightly wider than the fork to ensure a comfortable fit.
Once your foundation chain is ready, begin working single crochet (SC) stitches across. This stitch provides a dense, tight fabric that’s ideal for holding utensils securely. Work one SC into each chain, then turn your work. Continue adding rows of SC until your fabric measures about 5–6 inches in height. This will be the back part of your holder.
To create the pocket, fold the bottom part of the rectangle up by about 3 inches. You’ll then seam the sides using slip stitches or by whipstitching with your yarn needle. Be sure to leave the top part open to insert your cutlery. If you’d like a more rounded look, you can add increases to the sides as you work.
You can also choose to make the holder in the round, using a magic circle and building up with half-double crochets (HDC). This method gives a more seamless appearance and is great for advanced crocheters looking for a sleeker finish.
Whichever construction method you choose, keep your tension consistent to maintain an even shape. Uneven stitches can lead to a wobbly pocket that may not hold your silverware correctly. Taking your time here ensures a better-looking final product.
Once the base is complete, you can optionally add a decorative border. A simple scalloped edge or picot trim will give your Christmas Crochet Cutlery Holder a charming, polished look. Choose a contrasting color for extra flair.
Adding Festive Decorative Elements
Now that the base of your Christmas Crochet Cutlery Holder is complete, it’s time to bring in some holiday cheer with embellishments. This is the fun part—where you can be creative and make your holder uniquely yours. Start by selecting motifs that represent Christmas, such as stars, candy canes, snowflakes, or Christmas trees.
These small crochet appliqués can be made separately and sewn onto the front of the pocket. A white snowflake against a red background or a green Christmas tree with button ornaments can really bring the design to life. Use patterns that involve basic stitches to keep things simple and beginner-friendly.
You can also embroider small details onto the holder using a yarn needle and contrasting yarn. Stitch on initials for personalization or add a few lines to represent twinkling lights or falling snow. This technique works well with thinner yarns and allows for detailed customization.
If you enjoy working with beads or tiny jingle bells, you can sew them onto the motifs for a bit of sparkle and sound. Be careful not to use items that could come loose or pose a choking hazard if children will be using the holders.
A pom-pom or bow can be a lovely finishing touch. These can be attached to the corner or center of the holder, depending on the look you want to achieve. Handmade pom-poms in red, white, or green add a cozy, homemade vibe to the final design.
Don’t forget to block your crochet piece if it’s curling or uneven. Gently steam it or dampen it and pin it flat to dry. Blocking enhances the overall look and helps the holder maintain its shape during use.
Adding these festive details transforms your Christmas Crochet Cutlery Holder into a memorable holiday keepsake that your guests will notice and appreciate.
Customizing Your Cutlery Holder
One of the best parts about this Christmas Crochet Cutlery Holder – Step by Step Tutorial is the ability to customize each holder for your family and guests. Since these items are handmade, you can adapt the size, shape, color, and embellishments to match different tastes and dining styles. A great way to start is by using different yarn colors to match your holiday theme.
For instance, you can make one set of holders in traditional red and green, and another set in snowy whites and icy blues for a winter wonderland theme. If you’re hosting a formal dinner, go for elegant shades like gold or silver, and use metallic thread for added shimmer.
Add personalization to your holders by stitching or crocheting the initials of your guests onto each one. This can also double as a name tag or place card on your dinner table. Using embroidery floss or thinner yarn works best for small lettering and details.
Vary the size of the holders to accommodate different types of cutlery or even napkins. A wider holder can also include space for a festive note or candy cane, while a slimmer one might be just right for a simple fork and knife set. Experiment with different shapes such as rounded tops, Christmas tree outlines, or stocking-shaped holders.
You might also want to make matching sets that include napkin rings, placemats, or coasters. Keeping a cohesive look across the table makes your entire setup more impressive and festive. These extras can be made using the same yarn and motifs used on your cutlery holders.
Finally, think about functionality. If you plan to reuse the holders, consider making them machine washable by using durable, washable yarns. This makes cleaning up after the big meal much easier and allows you to keep them for many holidays to come.
Caring for and Storing Your Crochet Holders
Once your holiday celebrations are over, you’ll want to properly care for and store your Christmas Crochet Cutlery Holder sets to ensure they stay in good condition for years. Start by gently hand washing the holders if they’ve come into contact with food or moisture. Use mild detergent and cool water to avoid damaging the fibers.
Lay the holders flat to dry, reshaping them as needed. This is especially important if you used cotton yarn, which can lose shape when wet. Avoid wringing out the pieces as this may distort the fabric. If needed, press lightly with a warm iron while protecting the yarn with a cloth.
Before storing, make sure each holder is completely dry to prevent mildew or mold. Store them in a cool, dry place, ideally in a breathable fabric bag or a plastic bin with a lid. Adding a sachet of lavender or cedar chips can help deter pests like moths and keep the items smelling fresh.
Label your storage container so you can easily find your Christmas Crochet Cutlery Holder set next holiday season. If you’ve made multiple styles or colors, keep them sorted for quicker access when it’s time to decorate your table again.
For holders with embellishments, make sure nothing is pressing on or bending delicate parts like buttons or bells. You may want to wrap each one in tissue paper or soft cloth for added protection.
With just a little care, your handmade crochet holders will remain beautiful and functional for many Christmases to come.
FAQ – Christmas Crochet Cutlery Holder
Q: Is this project suitable for beginners?
A: Yes! This Christmas Crochet Cutlery Holder – Step by Step Tutorial uses basic stitches like single crochet and half-double crochet, making it perfect for beginners.
Q: How long does it take to make one holder?
A: On average, it takes about 1 to 2 hours to complete one holder, depending on your crochet speed and the level of detail you include.
Q: What kind of yarn works best for this pattern?
A: Worsted-weight cotton or acrylic yarns are ideal. They’re sturdy, washable, and available in festive colors.
Q: Can I machine wash these cutlery holders?
A: Yes, if you use machine-washable yarn. Always check the yarn label and follow care instructions to preserve your crochet work.
Q: How can I personalize these holders?
A: You can personalize them with embroidered initials, custom appliqués, or color themes that match each guest’s style.
Q: Can I sell these at craft fairs or markets?
A: Absolutely! These are great handmade items to sell during the holiday season, especially if you offer personalized or themed versions.
Conclusion
This Christmas Crochet Cutlery Holder – Step by Step Tutorial has shown how a simple project can bring warmth and personality to your holiday table. From choosing yarn and crafting the base to adding festive embellishments and personal touches, each step allows for creativity and expression. These holders are not only functional but also a joyful part of your Christmas decor.
We hope this tutorial inspires you to try making your own and maybe even gift them to loved ones. If you followed along, we’d love to hear your thoughts! Please leave a sincere opinion and feel free to share any suggestions or ideas for future holiday crochet projects.