
Creating festive decorations with yarn is a beloved tradition among crafters, and starting this guide with Christmas crochet ornaments-Step by Step Tutorial sets the perfect tone for a magical and creative holiday season. Handmade ornaments add personality, warmth, and charm to any Christmas décor, and this tutorial will help you bring those meaningful details to life. Working with crochet during the holidays is more than a craft; it becomes a moment of comfort and joy. Using the main keyword naturally throughout the text ensures the article remains well-optimized for search engines while maintaining a natural, friendly flow.
Many people search for ways to make unique decorations, and that’s why the Christmas crochet ornaments-Step by Step Tutorial is so valuable. Crocheting your own ornaments allows you to personalize every piece, whether you prefer classic, rustic, or modern styles. It also gives you an opportunity to reuse leftover yarn, making this a sustainable and budget-friendly craft. The satisfaction of hanging something handmade on your Christmas tree is incomparable, creating a special connection with your décor. It also becomes a wonderful tradition to repeat every year.
Before we begin the first steps, it’s important to understand the basics of how this tutorial works. Throughout the Christmas crochet ornaments-Step by Step Tutorial, you will learn how to assemble materials, follow beginner-friendly techniques, and explore creative ideas to make your ornaments truly unique. The goal is not only to teach you the method but also to inspire your creativity. Whether you want to make stars, hearts, snowflakes, or simple circles, these instructions will guide you through each part of the process with clarity and purpose.
Understanding the Basics of Crochet Ornaments
To fully appreciate and benefit from this Christmas crochet ornaments-Step by Step Tutorial, it’s essential to understand the basic principles behind crocheting holiday ornaments. Crochet ornaments often use simple stitches like chains, single crochets, and double crochets, which makes the craft accessible to beginners. Even if you have limited experience, the repetitive and rhythmic movements will help you quickly gain confidence. The simplicity of the stitches doesn’t limit creativity; instead, it gives you room to explore shapes, colors, and textures.
Crochet ornaments are typically made in small pieces, which is perfect for crafters who enjoy quick and satisfying projects. Each ornament can be finished in a short amount of time, making it ideal for busy holiday schedules. In this Christmas crochet ornaments-Step by Step Tutorial, you will discover how small items like stars and baubles can be created with minimal yarn and maximum charm. This makes crochet ornaments an enjoyable project to make while watching a holiday movie or relaxing with a warm drink.
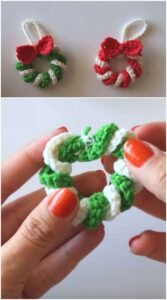
One of the most appealing aspects of crochet ornaments is their versatility. You can make simple flat designs or more complex, stuffed shapes, depending on your skill level and the style you prefer. Flat ornaments are perfect for hanging on trees, wreaths, and garlands, while stuffed ornaments resemble traditional Christmas baubles. With the Christmas crochet ornaments-Step by Step Tutorial, you’ll learn how to adapt the instructions to your desired ornament style.
Another important point is choosing the right type of yarn. Although many kinds of yarn can be used, medium-weight acrylic or cotton is ideal for beginners due to its stability and ease of handling. Lighter yarns create delicate, lace-like ornaments, while thicker yarns create bold, textured decorations. Understanding how yarn affects the final look helps you make informed decisions throughout this Christmas crochet ornaments-Step by Step Tutorial.
The beauty of crochet ornaments is that they can become family keepsakes. Every stitch represents care and creativity, making these pieces meaningful additions to your Christmas celebrations. Personalized ornaments can also be cherished year after year and passed down through generations. When you combine creativity with tradition, the result is something truly special and memorable.
Materials You Will Need
Gathering the right materials is an essential part of the Christmas crochet ornaments-Step by Step Tutorial, and the good news is that you don’t need many supplies to start. The main material is yarn, and choosing the right one can make a difference in the texture and appearance of your ornaments. Acrylic yarn is lightweight, durable, and easy to find, making it a great choice for beginners. Cotton yarn provides a clean, crisp look, perfect for snowflakes or stars.
Next, you will need an appropriate crochet hook. The hook size should match your yarn weight, ensuring even stitches and a balanced structure. A 3.5 mm or 4.0 mm hook is commonly used for medium-weight yarn, but you can adjust it according to your chosen yarn. The right hook will make the crocheting process smooth and enjoyable as you move through the Christmas crochet ornaments-Step by Step Tutorial.
Scissors are another essential tool. A sharp pair of scissors will help you trim yarn ends neatly, giving your ornaments a polished appearance. You will also need a yarn needle to weave in loose ends, ensuring your pieces look clean and professional. Although these tools are simple, they make a big difference in the final quality of your handmade ornaments.
Stuffing material may be needed if you choose to make 3D or plush ornaments. Fiberfill is the most common stuffing option and is perfect for creating soft, rounded shapes. If you prefer flat ornaments, you won’t need stuffing. This flexibility allows you to explore both flat and dimensional styles throughout the Christmas crochet ornaments-Step by Step Tutorial.
Optional materials include beads, ribbons, bells, glitter yarn, or small embellishments. These decorative additions can give your ornaments a festive sparkle and unique personality. Adding these extras allows you to tailor your creations to your holiday theme and style preferences. Whether traditional or modern, your ornaments can reflect your artistic vision.
Finally, it’s helpful to have a small workspace where you can keep your yarn, tools, and finished pieces organized. A tidy and comfortable area makes the crafting process more enjoyable and efficient. With all materials ready, you can fully immerse yourself in the Christmas crochet ornaments-Step by Step Tutorial.
Step-by-Step Guide to Making Crochet Ornaments
The first step in the Christmas crochet ornaments-Step by Step Tutorial is choosing the shape you want to create. Start with something simple, like a star or a circle, especially if you are new to crochet. Flat shapes are beginner-friendly and require fewer stitches. Begin by making a magic ring or a chain loop to form the center of your ornament.
As you continue, follow your chosen pattern using stitches such as single crochet, half double crochet, or double crochet. These basic stitches build the foundation of your ornament. The key to success is maintaining even tension and counting your stitches to ensure symmetry. This tutorial is designed to help you stay on track and feel confident as you move from one round to the next.
Once the base shape is complete, you can add decorative rounds or simple edging. Scalloped edges, picots, or textured stitches like front post double crochet can give your ornament an elegant frame. These small details elevate your design while keeping the process fun and beginner-friendly. Each ornament you make during this Christmas crochet ornaments-Step by Step Tutorial can have its own unique charme.
If you’re creating a stuffed ornament, make two identical shapes and join them together. Crocheting around the edges while stuffing lightly gives your ornament a cute and rounded appearance. This method works well for heart-shaped ornaments, ball ornaments, or even small amigurumi-style decorations. The possibilities are endless, and you can experiment freely.
After completing the main body of your ornament, it’s time to add embellishments. Small beads can mimic ornaments or snowflakes, while ribbons create elegant hanging loops. Embroidery yarn can be used to stitch tiny details like stars or stripes. These finishing touches give your ornaments personality and make them truly one-of-a-kind.
Finally, weave in all loose ends using your yarn needle, shape your ornament gently with your hands, and attach a hanging loop. Your handmade crochet ornament is now ready to display on your Christmas tree, garland, wreath, or gift packaging. The satisfaction of seeing your finished piece is one of the highlights of following this Christmas crochet ornaments-Step by Step Tutorial.
Creative Ideas for Using Your Crochet Ornaments
After finishing the Christmas crochet ornaments-Step by Step Tutorial, you may be excited to try out different ways to use your handmade decorations. One of the most popular uses is hanging them on your Christmas tree. Crochet ornaments bring warmth, texture, and a handmade touch that plastic ornaments cannot replace. Their soft and charming look blends beautifully with lights and garlands.
Another creative idea is to use your crochet ornaments as personalized gift toppers. Adding a handmade ornament to a wrapped gift instantly elevates its presentation and adds sentimental value. The recipient not only receives a present but also a keepsake they can use for years to come. This practice is becoming increasingly popular among crafters looking to add meaning to their holiday gifts.
You can also create festive garlands by connecting multiple ornaments with a long crochet chain. Garlands can decorate fireplaces, windows, cabinets, or even door frames. Choosing colors that match your holiday theme gives your home a cohesive and festive look. This is one of the most enjoyable ways to use the ornaments you made during the Christmas crochet ornaments-Step by Step Tutorial.
If you enjoy customizing your holiday décor further, consider using your ornaments in table settings. Small crochet stars or hearts can be used as napkin rings, place markers, or decorative accents for festive dinners. These handmade touches bring warmth to gatherings and show guests you put care into every detail of your celebration.
Crochet ornaments also make thoughtful gifts on their own. You can package them in sets, include them in holiday baskets, or give them as teacher gifts, neighbor gifts, or stocking fillers. Handmade items carry emotional value and express kindness and creativity. Making ornaments following this Christmas crochet ornaments-Step by Step Tutorial allows you to spread joy through your craft.
Finally, you can turn your ornaments into keychains, magnets, or small decorative wall hangings. Yarn crafts are wonderfully adaptable, and these ornaments can become charming everyday accessories. Their versatility ensures that you can use your creations not just during Christmas but throughout the year if you wish to.
Frequently Asked Questions
1. Can beginners follow this Christmas crochet ornaments-Step by Step Tutorial?
Yes. This tutorial is designed for all skill levels and provides simple, clear steps perfect for beginners.
2. What type of yarn should I use for crochet ornaments?
Medium-weight acrylic or cotton yarn works best. They are easy to handle and create ornaments with good structure.
3. Do I need special tools to make crochet ornaments?
No. Basic crochet tools like yarn, hook, scissors, and yarn needle are enough.
4. How long does it take to make one ornament?
Most ornaments can be completed in 20–45 minutes, depending on the design and skill level.
5. Can I make stuffed ornaments with this tutorial?
Yes. You can choose between flat and stuffed designs using the same basic steps.
6. Are crochet ornaments durable?
Yes. When made with quality yarn and properly secured ends, crochet ornaments last for many years.
Conclusion
Following this Christmas crochet ornaments-Step by Step Tutorial allows you to create charming, personalized, and meaningful holiday decorations with simple tools and stitches.
You learned the basics of crochet ornaments, explored materials, followed step-by-step instructions, and discovered creative ways to use your finished pieces.
I hope this tutorial inspires you to continue making beautiful handmade items. Please leave your honest opinion and share suggestions for future projects.