
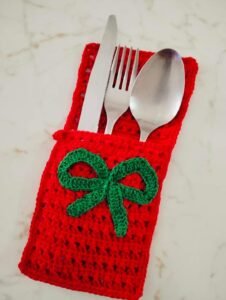
If you love handmade Christmas decorations and want to add a special touch to your holiday table, this Christmas crocheted cutlery holder – Step by Step Tutorial is the perfect project for you! A crocheted cutlery holder is both decorative and functional, keeping your knives, forks, and spoons neatly arranged while adding a cozy, festive feel to your table setting. Whether you’re preparing for a big family dinner or a small holiday gathering, these charming crochet creations will impress your guests and bring warmth to your décor.
Creating your own Christmas crocheted cutlery holder is a fun way to combine creativity and craftsmanship. You can personalize each holder to match your holiday theme, using classic Christmas colors like red, green, and white, or experimenting with modern tones like gold, silver, and cream. Crochet projects like this are beginner-friendly, budget-conscious, and highly rewarding because they allow you to create something beautiful and useful at the same time.
Before we start, you’ll need a few materials. Gather some medium-weight yarn in your chosen colors, a crochet hook (usually 3.5 mm or 4 mm works well), scissors, a yarn needle, and some optional embellishments such as ribbons, buttons, or small appliqués. Once you have everything ready, follow this Christmas crocheted cutlery holder – Step by Step Tutorial carefully, and by the end, you’ll have festive, handmade holders that will make your holiday table shine.
Materials and Preparation
To begin this Christmas crocheted cutlery holder – Step by Step Tutorial, it’s important to have all your supplies prepared. For this project, choose soft, durable yarn that holds its shape. Cotton or acrylic yarn is ideal for crochet table decorations because it’s easy to clean and sturdy enough to hold utensils. Select traditional Christmas colors like red for the base, white for accents, and green for decorative edges.
Your crochet hook should match your yarn weight. A 3.5 mm to 4 mm hook usually works perfectly for medium-weight yarn. Make sure you have scissors to cut yarn ends neatly and a tapestry needle for weaving in your loose threads. You can also prepare small embellishments, like tiny snowflakes or stars, to attach later for extra charm.
Before you start crocheting, think about the shape and size of your holder. Most Christmas crocheted cutlery holders are rectangular or stocking-shaped, but you can also make tree, bell, or mitten shapes for variety. Sketch your design or visualize how it will fit your tableware—this helps in planning your stitches and color changes.
If you are new to crochet, take a few minutes to practice basic stitches like chain stitch (ch), single crochet (sc), and double crochet (dc). These stitches form the foundation of your cutlery holder. You can also test your gauge with a small swatch to ensure your stitches aren’t too tight or too loose.
Once everything is ready, choose a comfortable, well-lit space to work in. Crocheting small details like edges and decorations requires focus and precision, so good lighting will make your work easier and more enjoyable.
Lastly, keep your materials organized. You’ll be switching colors often, so having each yarn ball in a small container or zip bag will prevent tangling and make your process smoother.
Step-by-Step Crochet Instructions
Now it’s time to start the Christmas crocheted cutlery holder – Step by Step Tutorial! Begin by making the base. Start with a foundation chain long enough to form the width of your holder—usually around 20 to 25 chains depending on the yarn and hook size. Once your chain is ready, work single crochets into each chain to form the first row.
Continue crocheting in rows of single or half double crochet stitches until your piece measures the desired length (typically around 15 to 20 cm). This creates a neat, rectangular shape that serves as the base pocket for your utensils. Remember to keep your tension even for a smooth finish.
When your base is done, fold the bottom part up about halfway to form the pocket. Use slip stitches or single crochet along the sides to join the front and back, leaving the top open for inserting the cutlery. This simple step transforms your flat piece into a practical holder.
To give your Christmas crocheted cutlery holder a festive border, switch to a contrasting color yarn and crochet around all edges using single crochet stitches. You can also add a scalloped border by alternating single and double crochets for a more decorative look.
For an extra holiday feel, you can crochet small appliqués like snowflakes, Christmas trees, or candy canes and sew them onto the front of your holder. These tiny details add charm and make each holder unique.
Finish by weaving in all loose yarn ends using a tapestry needle. At this point, your holder should be taking shape beautifully—ready for decoration and personalization!
Decorating and Personalizing Your Holder
This Christmas crocheted cutlery holder – Step by Step Tutorial wouldn’t be complete without the fun part—decorating! One of the best things about handmade projects is that you can personalize them to suit your style and festive theme. There are endless creative options to make your holders stand out.
Start by adding crochet appliqués such as stars, bells, or holly leaves. These can be made separately and then sewn onto your holder. If you want something quick, use buttons shaped like snowmen, Santa Claus, or reindeer for a cute holiday effect.
You can also decorate your Christmas crocheted cutlery holder with ribbons or bows. Thread a thin ribbon through the top edge or tie a bow around the middle to give it an elegant finish. Choose metallic or glittery ribbons for a more glamorous Christmas table look.
If you prefer a rustic style, add jute string or wooden buttons. A simple, natural finish contrasts beautifully with red or green yarn. You can even attach small name tags to each holder so guests can have personalized place settings.
Consider using gold or silver thread to crochet a few accent stitches along the borders. This subtle shimmer adds sophistication and enhances the Christmas vibe without overpowering your design.
Finally, make sure all decorations are securely attached, especially if children will be using them. Once everything is in place, admire your finished Christmas crocheted cutlery holder—it’s not just a practical piece but also a beautiful addition to your festive home décor.
Creative Ideas and Practical Uses
Beyond their decorative purpose, Christmas crocheted cutlery holders can be used in many creative ways during the holidays. They can double as small gift pouches for candy, gift cards, or handmade treats, making them versatile and charming. You can crochet them in sets to match your entire table or as keepsakes for your guests to take home.
If you enjoy hosting themed dinners, consider making different designs for each occasion. For example, crochet Santa-themed holders with a red base and a white border, or create Christmas tree holders using green yarn and golden embellishments. The possibilities are endless!
Another idea is to use these holders as part of your table centerpiece. Arrange several crocheted cutlery holders in a decorative basket with napkins, candles, and pinecones for a cozy holiday touch.
You can also make smaller versions of the holder to use as ornaments or party favors. Simply reduce the stitch count and add a hanging loop to the top. These mini holders can be hung on Christmas trees or attached to wrapped gifts as an extra surprise.
For crafters who enjoy selling handmade items, these holders are excellent for seasonal markets or online shops. They’re quick to make, inexpensive in materials, and always in demand during the festive season.
Finally, these projects are a wonderful way to share your love of crochet with others. Teaching someone how to make their own Christmas crocheted cutlery holder can be a fun holiday activity for families and friends.
Christmas Crocheted Cutlery Holder
1. What type of yarn is best for a Christmas crocheted cutlery holder?
Cotton or acrylic yarn is recommended because it’s durable, easy to clean, and holds shape well. Cotton gives a clean finish, while acrylic offers a softer, more flexible texture.
2. Can beginners follow this Christmas crocheted cutlery holder – Step by Step Tutorial?
Yes! This tutorial is designed for all skill levels. It uses basic stitches such as chain, single crochet, and double crochet, making it beginner-friendly and easy to follow.
3. How can I make the holder more decorative?
You can add small appliqués like stars, snowflakes, or bells, and use metallic threads, ribbons, or buttons to make it stand out.
4. Can I wash my crocheted cutlery holder?
Yes, hand wash gently in cool water with mild soap. Avoid wringing or twisting. Lay flat to dry to maintain its shape and structure.
5. How long does it take to make one holder?
It depends on your skill level, but most crocheters can complete one holder in one to two hours.
6. What shapes can I make other than rectangles?
You can experiment with stockings, mittens, or Christmas tree shapes for added creativity and variety in your table setting.
Conclusion
Making a Christmas crocheted cutlery holder is a delightful way to prepare for the holidays while expressing your creativity through yarn and color.
This Step by Step Tutorial has guided you through everything—from materials and preparation to crocheting, decorating, and creative uses. With a few simple stitches, you can transform yarn into beautiful festive accessories that bring warmth and joy to your holiday table.
Now it’s your turn to try! Grab your hook, pick your favorite Christmas colors, and start crafting your own Christmas crocheted cutlery holder today. When you finish, share your experience—leave a sincere opinion and suggestions about this tutorial. Your feedback will help inspire even more crochet lovers to bring handmade magic into their homes this Christmas!