
Beginning this Christmas crocheted cutlery holder-Step by Step Tutorial, you will learn how to create a beautiful, festive, and practical handmade piece that adds charm to any holiday table setting. This project is perfect for those who love combining creativity with functionality, and it transforms a simple Christmas dinner into something magical and memorable. Because this guide is detailed and beginner-friendly, anyone can follow the steps and achieve a stunning result while enjoying the calming and joyful process of crocheting. Throughout the article, you will see the keyword Christmas crocheted cutlery holder-Step by Step Tutorial used strategically to support SEO without affecting the natural flow of the text.
A crocheted cutlery holder is a small yet impactful detail that brings warmth and character to your Christmas décor. This tutorial will help you make a piece that not only holds your utensils neatly but also enhances the festive atmosphere. Handmade touches like this show care, creativity, and attention to detail, making your celebration even more special. With the guidance of this Christmas crocheted cutlery holder-Step by Step Tutorial, you will understand how to select materials, create the base shape, decorate your piece, and ensure it is durable enough to last for many holiday seasons.
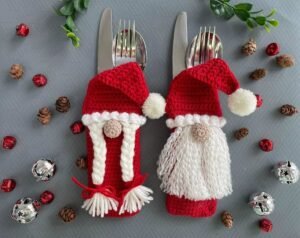
Before diving into the steps, take a moment to imagine how this adorable crocheted cutlery holder will look on your Christmas table. Projects like this remind us that crafting goes beyond technique—it allows us to express our personality, elevate festive traditions, and share our handmade creations with the people we love. This Christmas crocheted cutlery holder-Step by Step Tutorial will not only teach you how to make a beautiful piece but will also inspire you to celebrate creativity throughout the season.
Understanding the Project and Preparing Your Materials
The first step in this Christmas crocheted cutlery holder-Step by Step Tutorial is understanding the structure of the project and preparing all the materials you will need. A well-organized workspace and the right supplies will greatly improve your crocheting experience and help you achieve professional-looking results. Take your time to choose high-quality yarn, proper hook size, and optional decorations that match your preferred Christmas theme.
When selecting yarn, cotton or cotton-blend yarn is highly recommended because it creates a sturdy fabric that holds its shape well. Cotton yarn also gives your finished cutlery holder a clean, elegant look that complements the festive atmosphere. Red, green, white, and gold are classic Christmas colors that work perfectly for this project. According to the guidelines of this Christmas crocheted cutlery holder-Step by Step Tutorial, choose yarn that feels comfortable in your hands and is easy to work with.
Choosing the right crochet hook size is just as important as choosing the right yarn. A hook between 3.5 mm and 4 mm usually works best for cotton yarn. Smaller hooks will create tighter stitches, resulting in a firmer structure for your cutlery holder. Larger hooks give a softer, more flexible finish. Experimenting with a small swatch is a good idea before starting the full project. This Christmas crocheted cutlery holder-Step by Step Tutorial encourages beginners to test stitch tension to avoid uneven edges.
Before starting, gather scissors, a tapestry needle, and stitch markers. Stitch markers can be extremely helpful, especially if you are new to crocheting or working with rows and rounds that require precision. Optional embellishments such as ribbons, bells, buttons, or crocheted appliqués can add personality to your final piece. The tutorial stresses that embellishments should enhance the design without affecting the functionality of the cutlery holder.
Organizing your workspace will improve your focus and enjoyment while following this Christmas crocheted cutlery holder-Step by Step Tutorial. Good lighting, comfortable seating, and a quiet environment can make a big difference during longer crafting sessions. Keeping all your materials within reach ensures you can follow each step smoothly.
Finally, review the entire tutorial before starting. Understanding the general process allows you to anticipate each stage and reduces mistakes. Whether you want a simple, minimalist look or a richly decorated piece, this tutorial gives you the foundation to personalize your project beautifully.
Step-by-Step Instructions to Crochet the Cutlery Holder
The Christmas crocheted cutlery holder-Step by Step Tutorial begins with a simple foundation chain that forms the base of your project. The number of stitches depends on the size of the cutlery you plan to place inside. Keeping your chain even and consistent ensures the structure will be smooth and symmetrical. Avoid making the foundation chain too tight, as it may cause the edges to curl.
Once the chain is complete, start working in single crochet or half-double crochet stitches to build the first rows. These stitches provide a firm texture ideal for holding utensils. The Christmas crocheted cutlery holder-Step by Step Tutorial recommends maintaining consistent tension so your stitches look even across the entire piece. Uneven tension can cause distortion, especially when folding the sides to form the pocket.
As you continue building the rows, the cutlery holder will begin to take shape. When the fabric reaches the desired height, it’s time to fold the bottom portion upward to create the pocket. Secure the sides by stitching them together with slip stitches or single crochet. This step forms the functional structure of your holder. According to the Christmas crocheted cutlery holder-Step by Step Tutorial, ensure the pocket is wide enough for different types of cutlery.
At this stage, you can start adding decorative edges to enhance the Christmas design. A scalloped or picot border adds elegance without making the piece too heavy. Experimenting with different stitch patterns is encouraged, as long as they complement the festive style. The tutorial emphasizes choosing borders that align with your Christmas theme and color palette.
After shaping the main structure, check all your stitches for consistency. Use a tapestry needle to weave in all loose yarn ends securely. This helps maintain a neat finish and prevents unraveling. In this Christmas crocheted cutlery holder-Step by Step Tutorial, attention to detail is key to achieving a polished final result.
If desired, lightly block your finished holder to help it maintain its shape. Blocking involves gently shaping the fabric using steam or water and allowing it to dry flat. This step is optional but recommended, especially if you want crisp, clean edges.
Adding Festive Decorations and Personal Touches
With the main structure completed, this part of the Christmas crocheted cutlery holder-Step by Step Tutorial focuses on enhancing your piece with festive decorations. Christmas is the perfect opportunity to add personality, texture, and sparkle to your handmade creations. Decorations should be tasteful, secure, and aligned with the overall theme of your holiday table.
Ribbons are a popular choice for Christmas décor. You can tie small bows and sew them onto the front of the cutlery holder for a classic holiday look. The combination of red and gold creates a traditional festive appeal. The Christmas crocheted cutlery holder-Step by Step Tutorial recommends attaching ribbons tightly to ensure they remain intact through repeated use.
Crocheted appliqués are another charming option. Tiny snowflakes, holly leaves, candy canes, and mini Christmas trees can be crafted with leftover yarn and sewn directly onto the holder. These appliqués add playful texture and instantly communicate the Christmas theme. The tutorial highlights that appliqués should be placed on the outer portion of the holder to avoid interfering with the cutlery.
Buttons and small wooden ornaments can also be stylish additions. Choose lightweight decorations that won’t weigh down the structure. Avoid overly heavy embellishments that could distort the shape of the holder over time. This Christmas crocheted cutlery holder-Step by Step Tutorial encourages crafters to focus on balance, simplicity, and harmony.
Another great idea is adding embroidered details. For example, you can stitch stars, initials, or little patterns using a tapestry needle and a contrasting color of yarn. Embroidery adds a personalized touch and makes the project even more meaningful, especially if you’re creating gifts.
When adding decorations, make sure each element is securely attached. Use tight, discreet stitches so the ornament stays in place even with frequent handling. The tutorial stresses prioritizing safety and durability—especially if children will be using the cutlery holders.
Finally, step back and evaluate the overall design. Make sure the decorations match your Christmas aesthetic and complement the crochet work. A well-decorated cutlery holder transforms your table and brings festive elegance to every meal.
Using, Caring for, and Preserving Your Cutlery Holder
This section of the Christmas crocheted cutlery holder-Step by Step Tutorial explains how to care for and store your handmade piece to ensure it stays beautiful for many Christmas seasons. Handmade decorations require gentle handling, but when treated properly, they last for years and become cherished seasonal items.
To keep your cutlery holder clean, hand wash it using mild soap and cold water. Avoid bleach or strong detergents that could damage the cotton fibers or cause the colors to fade. Rinse gently and lay the item flat to dry. The tutorial emphasizes that drying flat prevents stretching and helps the piece retain its structure.
If your cutlery holder becomes wrinkled or misshapen, you can lightly steam it to restore its shape. Always use caution when steaming crochet items—keep the steamer or iron at a safe distance to avoid damaging the yarn. A cloth placed over the piece can protect it while shaping.
For storage, keep the cutlery holder in a cool, dry place. Moisture can damage cotton yarn, leading to mold or unpleasant odors. A fabric bag or a storage box with ventilation is ideal. The Christmas crocheted cutlery holder-Step by Step Tutorial highlights the importance of proper storage to maintain the beauty of handmade Christmas items.
Avoid storing your piece in direct sunlight, as UV rays can cause colors to fade. If you make a full set of cutlery holders, consider keeping them together to make decorating easier next holiday season.
Finally, enjoy using your creation during Christmas dinners, family gatherings, or festive events. Handmade touches like this create a warm, inviting atmosphere and show your dedication to crafting meaningful décor.
Christmas crocheted cutlery holder-Step by Step Tutorial
1. Is this Christmas crocheted cutlery holder-Step by Step Tutorial suitable for beginners?
Yes. The tutorial uses simple stitches and clear explanations, making it ideal for beginners.
2. What type of yarn should I use for this project?
Cotton yarn is recommended because it provides structure and durability.
3. Can I make the cutlery holder in different sizes?
Absolutely. You can adjust the number of stitches in the foundation chain to make it wider or narrower.
4. Do I have to add decorations?
No. Decorations are optional and can be customized to match your Christmas theme.
5. How long does it take to complete one holder?
It usually takes 1 to 2 hours, depending on your experience level.
6. Can I wash the crocheted cutlery holder?
Yes, but only hand wash with mild soap and cold water to protect the fibers.
Conclusion
This Christmas crocheted cutlery holder-Step by Step Tutorial has shown you how to create a beautiful, functional, and festive piece for your holiday table.
From selecting materials to adding personal touches and caring for your holder, you now have everything needed to craft with confidence and creativity.
I hope this guide inspires you to bring more handmade beauty into your Christmas celebrations. Please leave your honest opinion and share suggestions for future tutorials—I would love to hear your thoughts!