
Creating holiday decorations by hand is a meaningful tradition, and this Christmas ornaments made with crocheted socks-Step by Step Tutorial is a charming way to add warmth and personality to your festive decor. Handmade ornaments bring a unique touch that store-bought decorations cannot replicate, allowing you to craft pieces filled with love, creativity, and holiday spirit. Whether you’re an experienced crocheter or someone trying out a new craft, this project offers an enjoyable and rewarding experience. In this tutorial, you will learn how to transform small crocheted socks into beautiful Christmas ornaments that brighten any tree or cozy corner of your home.
The beauty of this Christmas ornaments made with crocheted socks-Step by Step Tutorial is that it takes a simple crochet piece—a tiny sock—and turns it into a memorable keepsake. These ornaments can be customized with colors, textures, and patterns that reflect your style or match your festive theme. You can create traditional red-and-green socks, pastel winter tones, or vibrant multicolored designs. Each ornament becomes a special handmade treasure, perfect for gifting, decorating, or even using as personalized holiday tags. With easy-to-follow instructions and plenty of creative freedom, this project welcomes crafters of all skill levels.
Another reason this Christmas ornaments made with crocheted socks-Step by Step Tutorial is so enjoyable is the sense of accomplishment it brings. Crocheting small socks is quick, relaxing, and satisfying, making the process ideal for the busy holiday season. These ornaments allow you to express your creativity while building a collection of handcrafted decorations that can be cherished year after year. Before diving into the detailed steps and techniques, gather your favorite yarns, hooks, and embellishments to prepare for a festive crochet experience.
Choosing Materials for Crocheted Sock Ornaments
Selecting the right materials is the first step in creating spectacular pieces with this Christmas ornaments made with crocheted socks-Step by Step Tutorial. Using soft and durable yarn ensures your little socks remain sturdy and attractive throughout the holiday season. Cotton yarn offers a clean, defined stitch look, while acrylic yarn provides extra softness and flexibility. You may choose solid colors or variegated yarns to make your ornaments even more interesting.
Choosing the correct hook size is just as important. A smaller hook helps create tighter stitches, which is ideal for small crochet projects like these ornaments. Tighter stitches help maintain the sock’s shape and prevent visible gaps. Depending on your yarn choice, a hook between 2.0 mm and 3.5 mm is usually perfect. Experimenting with different hook sizes can also help you find the ideal look for your ornament.
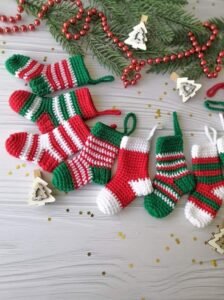
When selecting colors, consider the overall theme of your holiday decor. Traditional Christmas tones, such as red, white, gold, and green, create a classic appearance. For a modern look, try muted winter shades like soft blue, silver, or cream. Because the socks are small, you can use leftover yarn from previous projects, making this tutorial budget-friendly and sustainable.
Prepare additional materials such as scissors, a yarn needle, small ribbons, beads, or bells to embellish your socks. These small accessories add a delightful finishing touch and help your ornament stand out. You can also add stuffing to the socks to give them a plush, cozy look. Each choice you make contributes to the charm and personality of your handmade decoration.
Before you begin crocheting, take a moment to organize your materials and create a comfortable crafting space. This ensures a smoother and more enjoyable experience. Having everything ready helps you stay focused on the creative process and immerse yourself in the holiday spirit as you craft your ornaments.
Finally, remember that the materials you choose influence the final appearance and durability of your decorations. By selecting quality supplies and festive embellishments, your crocheted sock ornaments will become treasured pieces in your holiday collection for many seasons to come.
Step-by-Step Tutorial: Crocheting the Mini Socks
To start the Christmas ornaments made with crocheted socks-Step by Step Tutorial, begin with a simple foundation chain. This creates the base of your miniature sock and determines the width of your design. Keeping your tension even at this stage ensures your sock will have a clean and symmetrical shape once completed. Don’t worry if it feels a little tight or loose—practice will help you adjust your tension naturally.
After forming the foundation chain, work a few rows of single crochet or half-double crochet to build the cuff. The cuff is an important part of the sock’s design, as it gives your ornament a realistic and cozy appearance. You can create a ribbed effect by working in the back loops only or adding a decorative edging using contrasting yarn. This detail allows you to personalize your ornament right from the beginning.
Once the cuff is complete, it’s time to create the body of the sock. Continue crocheting in rounds to form the tube shape. This is where your sock begins to take form, and you will quickly see the project develop. Keep your stitches uniform to maintain the clean structure of the sock. Crocheting small tubes can feel a bit fiddly at first, but the process becomes easier as you progress.
Next, shape the heel by working short rows or using gradual decreases. This step is essential for capturing the traditional sock silhouette. Don’t rush the heel—taking your time ensures the final shape looks neat and well-defined. Even beginners can achieve a clean heel shape with patience and attention to detail.
Once the heel is complete, finish the foot of the sock by crocheting several more rounds. Adjust the length according to your preference, whether you want a tiny ankle sock or a longer stocking-style ornament. When you reach the toe, shape it by decreasing stitches until the opening closes. Use your yarn needle to secure the final stitch and weave in all loose ends.
At this point, your miniature crocheted sock is complete and ready for decorating. You can leave it flat for a simple look or add a bit of stuffing to give it fullness. Take a moment to admire your work—each tiny sock represents creativity, patience, and holiday joy.
Decorating Your Crocheted Sock Ornaments
One of the most exciting parts of this Christmas ornaments made with crocheted socks-Step by Step Tutorial is adding decorative touches. These details transform a simple crocheted sock into a personalized ornament bursting with character. A small ribbon loop attached to the cuff makes it easy to hang the ornament on your tree, window, or garland.
Adding embellishments like miniature bells brings a cheerful holiday sound. These small metallic accents catch the light and add charm to your design. Beads, sequins, or tiny pearls are also wonderful additions, giving your ornament a festive sparkle. Sew them on carefully to ensure they stay secure throughout the season.
Embroidery is another beautiful way to customize your sock ornaments. You can embroider small snowflakes, initials, stars, or simple decorative lines directly onto the sock using a contrasting yarn color. Embroidery adds a delicate handmade touch that enhances the overall appearance of the decoration.
For a cozy winter look, add faux fur trimming around the cuff. This gives the decoration a luxurious and warm feel, making it stand out among other ornaments. You can also attach small pom-poms made of yarn to give the sock a playful, whimsical look that children especially enjoy.
If you want your ornament to be more three-dimensional, add a bit of stuffing inside the sock. This gives it a plush and cuddly look, making it feel like a tiny holiday stocking. Just make sure your stitches are tight enough to prevent the stuffing from showing through. Finish by sewing the top closed or leaving it slightly open for a realistic stocking effect.
Finally, consider making several ornaments in different colors to create a coordinated set. A collection of crocheted socks hanging together creates a festive and heartwarming display. Decorations made by hand always carry a special charm, making them perfect pieces to pass down through generations.
Tips for Beginners and Final Adjustments
Whether you’re new to crochet or simply exploring holiday crafts, this Christmas ornaments made with crocheted socks-Step by Step Tutorial is a wonderful starting point. One helpful tip is to begin with thicker yarn if you find thin yarns difficult to manage. Slightly thicker yarn makes each stitch more visible and easier to control, especially for beginners.
Counting your stitches is crucial when creating small crochet projects. Because the socks are tiny, even one extra or missing stitch can affect the final shape. Using stitch markers can help you keep track of rounds and ensure your sock remains symmetrical. It’s a small habit that makes a big difference in the result.
Be patient with shaping the heel and toe, as these parts require a bit more focus. If you make a mistake, simply unravel a few stitches and redo them. Crochet is very forgiving, and taking your time ensures your ornament looks clean and well-crafted. Don’t feel discouraged—every experienced crocheter has learned through trial and error.
Blocking your sock ornament is optional but can dramatically enhance its appearance. Gently dampen the ornament, shape it with your hands, and allow it to dry flat. This process helps smooth out uneven stitches and gives the sock a polished finish. Blocking is especially helpful if you plan to gift the ornaments or display them prominently.
If you choose to stuff your ornament, use only a small amount of filling. Overstuffing can distort the shape and stretch the stitches. The goal is to give it a soft and rounded appearance while maintaining the structure of the crochet work. Adjust the amount until you achieve the perfect balance.
Finally, embrace the joy of holiday crafting. These small socks are meant to be fun, charming, and creatively expressive. Every handmade ornament carries a story and a memory, making your crocheted sock decorations meaningful additions to your seasonal celebrations.
FAQ About Christmas Ornaments Made with Crocheted Socks
Can beginners make crocheted sock ornaments?
Yes, this project is beginner-friendly. With basic stitch knowledge and patience, even new crocheters can create beautiful ornaments.
What kind of yarn works best for these ornaments?
Cotton or acrylic yarn works well. Choose yarn that holds shape and showcases festive colors.
Should the ornaments be stuffed?
Stuffing is optional. It gives the sock a fuller shape but is not necessary for a flat, minimalist look.
How do I attach the ornament to the Christmas tree?
Create a loop using ribbon, yarn, or string and sew it securely onto the cuff of the sock.
Can I personalize the ornament?
Absolutely. Add embroidery, beads, small charms, or initials to make each ornament unique.
How long does it take to crochet one sock?
Most crocheted socks take between 20 to 40 minutes, depending on your skill level and design details.
Conclusion
This Christmas ornaments made with crocheted socks-Step by Step Tutorial has shown how simple materials, basic crochet skills, and a touch of creativity can lead to charming handmade decorations.
Through each step, you learned how to crochet miniature socks, personalize them with unique embellishments, and turn them into delightful ornaments for the holiday season.
I hope this tutorial inspires you to craft your own festive creations and enjoy the beauty of handmade decor. Please leave your sincere opinion and share suggestions for future tutorials—your feedback helps this creative journey grow even brighter.