
If you’re looking for a fun and festive project to add to your holiday decorations, this Christmas Reindeer Coaster – Step by Step Tutorial is the perfect choice. Creating a handmade reindeer coaster not only brings the magic of Christmas into your home but also makes for a charming and practical decoration for your table setting. Whether you’re an experienced crocheter or a complete beginner, this project will help you craft a beautiful coaster that captures the warm and cozy spirit of the holidays.
Making your own Christmas Reindeer Coaster is a delightful way to express your creativity during the most wonderful time of the year. These adorable coasters can be used to protect your table from hot drinks, decorate your holiday table, or even serve as cute handmade gifts for friends and family. With just a few basic materials and simple stitches, you’ll be able to crochet your own little reindeer that spreads Christmas cheer wherever it’s placed.
This step by step tutorial will guide you through every stage of the process, from selecting materials to assembling the final piece. You’ll learn how to shape the coaster, create the reindeer’s face, and add all the cute details that bring it to life—like its red nose and antlers. Each step is easy to follow and designed to ensure you can enjoy the creative journey while achieving professional-looking results. So, grab your yarn and hook, and let’s make this holiday season even more special with a handmade touch!
Materials You’ll Need for the Christmas Reindeer Coaster
Before you start crocheting your Christmas Reindeer Coaster, make sure you have all the necessary materials ready. The right supplies will make your project go smoothly and help you achieve the best results. You’ll need yarn in several colors: brown for the reindeer’s head, beige or tan for the inner ears, black for the eyes, and of course, red for the classic Rudolph nose.
For yarn, cotton is an excellent choice because it absorbs moisture well and is easy to clean—ideal for coasters. However, if you prefer a softer texture, you can use acrylic yarn. Just make sure it’s medium-weight (category 4), which is perfect for this project. Pair it with a crochet hook that matches your yarn, typically a 3.5 mm or 4 mm hook.
You’ll also need a pair of scissors, a yarn needle for sewing in ends, and stitch markers to help you keep track of your rounds. If you want to add a little sparkle to your Christmas Reindeer Coaster, you can use metallic yarn or even small embellishments like a ribbon bow or tiny bells. These optional details make your coaster extra festive and fun.
When it comes to stuffing or shaping, this project doesn’t require any filling since it’s a flat design. Still, it’s important to keep your stitches even and tight so the coaster holds its shape well. Blocking the finished piece lightly can help give it a perfect circular form.
Finally, it’s always a good idea to have a comfortable and well-lit workspace. Since this is a decorative piece with some color changes and small details, good lighting helps ensure your stitches look neat and your colors stay vibrant. Once your materials are ready, you can move on to the fun part—crocheting your reindeer!
Step-by-Step: Making the Reindeer Base
The base of your Christmas Reindeer Coaster is the main part of the project, and it’s where your adorable reindeer’s face will take shape. Begin by making a magic ring with brown yarn. Inside the ring, crochet six single crochets and pull the loop tight. This forms the center of your coaster.
In the next round, increase by making two single crochets in each stitch. This will give you twelve stitches total. Continue increasing in each round—adding one more single crochet between increases each time—until your coaster reaches the desired size. Typically, a good coaster size is about four to five inches in diameter.
As you work the rounds, make sure your stitches are even and your circle remains flat. If it starts to curl up, loosen your tension slightly or add an extra increase. The goal is to create a perfect circle that will later be decorated to look like a reindeer’s head.
Once the base is the size you want, fasten off the yarn and weave in the end neatly. You can also edge the circle with a round of slip stitches or single crochets in a contrasting color to make the outline stand out. This gives the coaster a neat and finished appearance.
At this point, your reindeer base is complete. Now comes the fun part—adding all the charming features that bring your Christmas character to life!
Adding the Reindeer Details
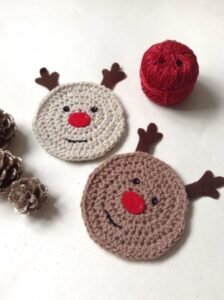
This step is where your Christmas Reindeer Coaster truly begins to look like a festive friend. Start by making the reindeer’s nose using red yarn. Crochet a small circle—begin with a magic ring, make six single crochets into it, and then increase in each stitch. This forms the perfect little red nose that gives your coaster its cheerful personality.
Next, you’ll make the ears. Using brown yarn, chain four stitches and work single crochets back along the chain to form a teardrop shape. Repeat for the second ear, then make two smaller versions in beige yarn to serve as the inner ears. Sew or crochet them together, and then attach them to the top sides of the coaster.
For the eyes, you can either crochet small black circles or use safety eyes. If crocheting, make a magic ring with black yarn, add six single crochets, and secure. Sew the eyes symmetrically above the nose, leaving a bit of space between them. This positioning helps create a friendly and expressive look.
Now, let’s make the antlers. Using a slightly darker brown yarn, chain about six stitches and work slip stitches back across to form the antler base. Make two smaller branches by chaining and joining them halfway up. Repeat for the second antler and attach both securely to the top of the coaster, just behind the ears.
Finally, add any decorative touches you like—a tiny bow under the reindeer’s nose, a sprinkle of glittery thread, or even small embroidered snowflakes. These final details make your Christmas Reindeer Coaster one-of-a-kind and perfect for the season.
Finishing Touches and Creative Variations
Once you’ve completed the main design, it’s time to give your Christmas Reindeer Coaster a final polish. Weave in all loose yarn ends carefully using your yarn needle. This not only makes the coaster look neat but also ensures durability so it won’t unravel over time.
If you want a more defined edge, you can crochet a final round in a contrasting color such as white or gold. A white border adds a snowy touch that enhances the Christmas theme beautifully. This small detail gives your coaster a professional and festive finish.
You can also customize your coasters for variety. Make one with a red nose for Rudolph and others with brown noses for his reindeer friends. Create a whole set to decorate your Christmas table—they’ll look adorable when arranged together.
Another creative idea is to turn your reindeer coasters into hanging ornaments. Simply add a loop of yarn or ribbon to the top and hang them on your Christmas tree. They’re lightweight, cute, and can double as thoughtful handmade gifts.
Blocking your coaster is optional but recommended. Lightly dampen it, shape it into a perfect circle, and let it dry flat. This step gives it a crisp, clean appearance. When everything is done, your festive Christmas Reindeer Coaster is ready to spread holiday cheer!
FAQ
1. What type of yarn should I use for a Christmas Reindeer Coaster?
Cotton yarn is best because it’s absorbent and durable. It also helps your coaster stay flat and easy to clean after use.
2. How long does it take to make one coaster?
It depends on your crochet speed, but most people can finish one in about an hour or two. Once you get the hang of it, making a set becomes quick and fun.
3. Can I wash the crocheted coasters?
Yes, they can be hand-washed with mild soap and cold water. Avoid wringing them; gently press with a towel and let them air dry flat.
4. Can I make the coaster larger or smaller?
Absolutely! You can adjust the size by adding or removing rounds in the base circle. Just make sure to keep the increases even so the coaster stays flat.
5. What if I don’t know how to make a magic ring?
You can replace it with a chain of four stitches joined in a loop. Then, work your first round of stitches inside the loop—it works just as well.
6. Is this project beginner-friendly?
Yes! This Christmas Reindeer Coaster – Step by Step Tutorial is simple enough for beginners. It uses basic stitches like single crochet and chain stitches, making it perfect for anyone new to crochet.
Conclusion
Creating your own Christmas Reindeer Coaster is a heartwarming and joyful way to celebrate the holiday season. This step by step tutorial teaches you how to make an adorable, festive coaster that’s both decorative and practical. You’ve learned how to crochet the base, add the reindeer features, and finish with creative touches that make your piece shine.
Handmade decorations like this bring warmth and personality to your home. They’re also wonderful gifts for loved ones—small, thoughtful, and full of holiday spirit. Every stitch you make adds a little more joy to the season.
Now that you’ve mastered this Christmas Reindeer Coaster – Step by Step Tutorial, why not share your results? Leave your honest opinion and suggestions below about this project. Your feedback helps inspire new ideas and keeps the spirit of creativity alive all year round.