
Starting this Colorful crocheted unicorn-Step by Step Tutorial, you will be guided through every detail needed to create an adorable and vibrant unicorn using simple crochet techniques. This design is loved by beginners and advanced crocheters because it combines charm, imagination, and creativity in one fun project. Throughout this article, we will revisit the keywords Colorful crocheted unicorn-Step by Step Tutorial to maintain a strong SEO structure and ensure clarity. With patience and a bit of yarn, you can turn this tutorial into a beautiful piece of handmade art.
The magic of creating a unicorn lies not only in the stitches but also in the opportunity to play with colors. A project like this Colorful crocheted unicorn-Step by Step Tutorial is perfect for anyone who enjoys adding personality and joy to their crochet pieces. Handmade toys like this make wonderful gifts, delightful home decorations, and even keepsakes that carry special meaning. In this article, you will learn how to form the head, body, mane, horn, and all the details that give the unicorn its signature charm.
As we move through the Colorful crocheted unicorn-Step by Step Tutorial, you will notice that every step is broken down clearly so even beginners can follow along with confidence. You will understand how to build each part, assemble the details, and give your unicorn an expressive and cheerful look. Our goal is to provide a humanized, helpful guide that respects Google AdSense standards while staying informative and easy to read. By the end of this article, you should feel capable of creating your very own colorful unicorn from start to finish.
Choosing Materials for Your Colorful Unicorn
When starting this Colorful crocheted unicorn-Step by Step Tutorial, one of the most important steps is gathering the right materials. The yarn you choose influences the softness, durability, and final appearance of your unicorn. Many crafters prefer using soft cotton yarn or acrylic yarn because both are comfortable to work with and hold their shape well. Selecting multiple colors will bring your unicorn to life with vibrant charm.
Another important material to consider is the crochet hook. Using the correct hook size ensures your stitches stay even and the fabric turns out firm enough to keep stuffing from showing through. For most yarn weights suitable for amigurumi, a small hook provides the best results. Having a stitch marker on hand will also make it easier to track your rounds, especially when creating the head and body.
Stuffing is another essential element of this Colorful crocheted unicorn-Step by Step Tutorial. High-quality fiberfill stuffing helps the unicorn stay plush and structured. Make sure to pack the stuffing evenly so the finished toy looks smooth, not lumpy. You will also need safety eyes or embroidered eyes, depending on your preference and the intended age of the person who will use the toy.
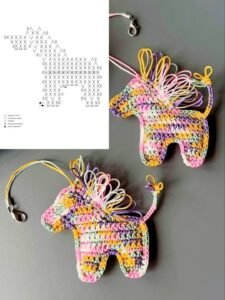
Don’t forget the details that complete the unicorn’s iconic design. For the horn, many crocheters choose gold or yellow yarn to highlight the magical element. For the mane and tail, colorful shades such as pink, purple, blue, and yellow add personality and creativity. These vibrant colors help bring out the whimsical effect that this Colorful crocheted unicorn-Step by Step Tutorial aims to achieve.
A simple yarn needle will also be necessary to assemble all the pieces safely and securely. This step is crucial because proper attachment prevents parts from loosening over time. Making sure each piece is sewn tightly will give your unicorn a professional and polished finish. Keep scissors nearby as well to trim any loose ends and ensure a clean overall look.
Lastly, having a peaceful workspace will greatly enhance the process. Keeping your yarn organized, your tools nearby, and your pattern in front of you helps maintain focus and enjoyment throughout this Colorful crocheted unicorn-Step by Step Tutorial. With the right tools and environment, your creative journey becomes even more rewarding.
Step-by-Step Instructions for the Unicorn Body
To begin the body of your unicorn in this Colorful crocheted unicorn-Step by Step Tutorial, start by crocheting a basic rounded shape. This step usually begins with a magic ring, which creates a tight foundation. As you add stitches, the body gradually expands into a rounded form. Consistency is key here, so make sure each stitch matches the previous one for an even look.
Once the base is complete, continue adding rows to elongate the body. Many crocheters prefer creating the head and body as one continuous piece to avoid visible seams. This technique also strengthens the structure of the toy. As you progress through this Colorful crocheted unicorn-Step by Step Tutorial, stuffing lightly as you go is a great way to maintain the shape.
Shaping the neck involves a slight decrease in stitches. This helps define the unicorn’s silhouette and makes the transition between head and body more natural. Following the instructions slowly and carefully will ensure the shape turns out symmetrical and neat. Take your time adjusting tension and checking for gaps.
When working on the torso, make sure to keep checking the fullness. A well-stuffed body allows the unicorn to stand or sit properly once assembled. In this Colorful crocheted unicorn-Step by Step Tutorial, stuffing as you go prevents missing areas or uneven shapes. Always add stuffing gradually and evenly.
As the body narrows toward the bottom, you will follow a series of decreases. This section helps create a solid foundation for attaching legs later. Even though this part might feel repetitive, it is essential for stability and balance. Maintaining focus on each step ensures a smooth finish.
Once the main body is finished, secure the final stitches tightly. Weaving in all loose yarn ends prevents unraveling. At this stage of the Colorful crocheted unicorn-Step by Step Tutorial, the body should look smooth, round, and ready for the next pieces, including legs, head details, and decorative elements.
Creating the Unicorn Mane, Tail, and Horn
The mane is one of the most fun and creative parts of this Colorful crocheted unicorn-Step by Step Tutorial. This section allows you to play freely with colors and textures. Many crocheters create small spirals using simple chains followed by repeated stitches to give the mane a curly, lively effect. Mixing bright colors creates a striking rainbow-like appearance.
For the tail, the same technique can be applied. Creating several strands of different lengths gives the unicorn a playful and magical finish. Attaching each strand individually ensures a full, fluffy tail. Make sure to secure the pieces tightly so they remain intact through use and handling.
The horn is another essential element in this Colorful crocheted unicorn-Step by Step Tutorial. Typically, it is worked in a cone shape using gold or yellow yarn. This part requires gradual decreases so the horn becomes narrower toward the top. Adding a small amount of stuffing inside helps it maintain its shape and stand upright.
Once the horn is formed, attach it carefully to the center of the head. Ensuring the horn is firmly in place is important for the final appearance. Position it exactly in the middle so your unicorn looks symmetrical. Taking your time with this step will make a big difference.
The placement of the mane should be done after the horn. Adding curls around the horn creates a layered effect that highlights the unicorn’s magical design. Choosing colors that contrast well with the unicorn’s body enhances the overall charm of the project.
Finally, attach the tail at the lower back of the unicorn’s body. This part completes the whimsical look and brings the entire Colorful crocheted unicorn-Step by Step Tutorial together beautifully. Double-check that all pieces are firmly attached for a long-lasting result.
Final Assembly and Finishing Touches
Assembling your unicorn is one of the most rewarding parts of the Colorful crocheted unicorn-Step by Step Tutorial. Begin by attaching the legs to the bottom of the torso. Position them evenly so the unicorn can sit or stand without leaning. Sewing them securely ensures durability.
Next, attach the arms. These smaller pieces add balance and personality to your unicorn. Whether you choose to angle them outward or downward, make sure both sides match so the final look remains symmetrical. Taking a moment to align everything properly will give your unicorn a polished look.
The facial features play a major role in giving your unicorn charm and expression. Safety eyes are commonly used, but you can also embroider the eyes for a softer or more child-safe finish. As you follow the Colorful crocheted unicorn-Step by Step Tutorial, take your time shaping the mouth with simple embroidery for a cute smile.
After the eyes and mouth are secured, attach the ears. These small triangular pieces give your unicorn a gentle and friendly look. Slightly bending the ears forward adds a subtle touch of character. Positioning them evenly on both sides of the horn keeps the design balanced.
Once the mane, horn, and ears are attached, do a quick inspection of all parts. Make sure there are no loose ends, and that the stuffing is distributed evenly. This quality check ensures your unicorn looks smooth and professional. Any small adjustments now will greatly improve the final outcome.
In the last step of the Colorful crocheted unicorn-Step by Step Tutorial, trim any excess yarn and fluff the mane and tail. Giving them a gentle shake helps bring out the curls and enhances the colorful effect. Now your unicorn is complete, charming, and ready to brighten any space.
About the Colorful Crocheted Unicorn
1. Is this project suitable for beginners?
Yes, this Colorful crocheted unicorn-Step by Step Tutorial is beginner-friendly if you have basic knowledge of single crochet, increases, and decreases.
2. What type of yarn is best for this unicorn?
Soft cotton or acrylic yarn works well because it keeps the structure firm while remaining comfortable to work with.
3. How long does it take to complete the project?
Most people finish within a few hours to a couple of days, depending on experience and available time.
4. Can I customize the colors?
Absolutely. The mane and tail are perfect for experimenting with different color combinations.
5. Do I need safety eyes?
No, they are optional. You can embroider the eyes for a baby-safe version.
6. Can this unicorn stand on its own?
With firm stuffing and well-placed legs, it can sit or stand depending on your desired design.
Conclusion
This Colorful crocheted unicorn-Step by Step Tutorial showed you how to choose materials, crochet each part, assemble the unicorn, and add finishing touches.
From the body to the magical mane and horn, each step contributes to a delightful handmade creation.
Now that you’ve learned the process, you can create as many unicorns as you like using your favorite colors. If you enjoyed this guide, please leave a sincere opinion and share your suggestions so future tutorials can be even better.