
Creating a beautiful handmade angel can be one of the most rewarding projects for any crafter, and in this Crochet Angel for Beginners – Step by Step Tutorial, you’ll learn how to make your very own delicate crochet angel from start to finish. Whether you’re new to crochet or already have some experience, this project is a perfect blend of simplicity and charm. A crochet angel makes a wonderful gift, a keepsake, or a lovely piece of holiday decor that carries meaning and creativity in every stitch.
One of the best things about this Crochet Angel for Beginners – Step by Step Tutorial is that it allows you to practice essential crochet techniques while creating something truly special. You’ll use basic stitches like chains, single crochets, and double crochets to form the angel’s body, wings, and halo. The design can be as simple or as detailed as you like, depending on your level of experience. This makes it a flexible project that’s easy to personalize with your choice of yarn colors, thread thickness, and embellishments.
A crochet angel is more than just a decoration—it’s a symbol of peace, hope, and love. Many crocheters make them as gifts for loved ones, holiday ornaments, or even as part of handmade collections for special occasions. Throughout this Crochet Angel for Beginners – Step by Step Tutorial, you’ll find clear, step-by-step guidance to help you understand each stage of the process. So grab your crochet hook, some yarn or crochet thread, and let’s get started creating a beautiful angel that will bring warmth and joy wherever it’s displayed.
Materials and Preparation
Before you begin your Crochet Angel for Beginners – Step by Step Tutorial, it’s important to gather all the materials you’ll need. This ensures a smooth crafting process without interruptions. For this project, you’ll need lightweight cotton yarn or crochet thread, which gives the angel a delicate and detailed look. White or cream shades are most popular for angels, but you can choose any color that fits your personal taste or theme.
You’ll also need an appropriate crochet hook for your chosen yarn size—usually between 1.75mm and 2.5mm for fine thread or 3mm for lightweight yarn. Don’t forget scissors and a yarn needle for weaving in ends. For the halo, a small piece of gold or silver thread adds a lovely finishing touch. Some people like to stiffen their crochet angel with fabric stiffener or diluted glue so it stands upright, which is optional but recommended if you want it to hold its shape.
Before starting, take a moment to get comfortable with your materials. Make a few practice stitches if you’re new to crochet, ensuring your tension is consistent. The key to a neat and professional-looking angel lies in maintaining even stitches throughout. This Crochet Angel for Beginners – Step by Step Tutorial is designed to help you feel confident with each movement, so there’s no rush—just enjoy the process.
You can also prepare a clean, well-lit workspace to make crocheting easier. Keep all your materials within reach and consider having a small bowl or basket for tools and scraps. Being organized helps you stay focused and makes the project more enjoyable from start to finish.
Finally, remember that crochet is not just about creating something—it’s about expressing creativity and relaxation. So, as you begin this Crochet Angel for Beginners – Step by Step Tutorial, take a deep breath, smile, and enjoy the peaceful rhythm of crafting your beautiful angel.
Starting the Angel’s Body
The first step in this Crochet Angel for Beginners – Step by Step Tutorial is to create the body, which will form the base of your project. Begin by making a magic ring and chaining three stitches, which will count as your first double crochet. Then, work eleven more double crochets into the ring for a total of twelve stitches. Pull the ring tight and join with a slip stitch to close the round. This forms the foundation of the angel’s dress.
In the next round, chain three and make one double crochet in the same stitch. Continue by working two double crochets in each stitch around, doubling your stitch count to twenty-four. Join with a slip stitch. You should begin to see a circular shape that will become the bottom of the angel’s flowing gown.
From here, you’ll start building height. Chain three, then make one double crochet in each stitch around. Join and repeat this step for several rows until the dress reaches the desired length—typically around 7–10 cm tall. This part of the Crochet Angel for Beginners – Step by Step Tutorial allows you to decide how long or short you want the gown to be.
To give the skirt a flared effect, increase gradually by adding two double crochets in every fifth stitch for a few rows. This gentle widening will make your angel’s dress look more elegant and realistic. If you’re using fine thread, you can add more rounds for a more detailed appearance.
Once the body is complete, fasten off and weave in any loose ends. You now have the foundation of your crochet angel—the graceful dress that makes the project instantly recognizable. The next part of this Crochet Angel for Beginners – Step by Step Tutorial will guide you in creating the angel’s head and halo.
Making the Head and Halo
The head of your crochet angel is what gives it character and charm. In this Crochet Angel for Beginners – Step by Step Tutorial, we’ll make a simple round head that’s easy to attach to the body. Begin by creating another magic ring and working six single crochets into it. Pull tight and close the round with a slip stitch.
In the next round, make two single crochets in each stitch around for a total of twelve stitches. Continue working one single crochet in each stitch for the next two or three rounds to give the head some height. When it looks round and smooth, fasten off and leave a long tail for sewing. You can lightly stuff the head with fiberfill or cotton to give it shape before attaching it to the body.
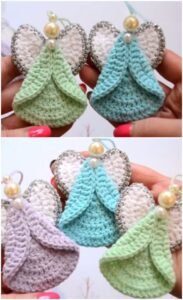
To make the halo, use gold or silver thread and chain about fifteen stitches, then join with a slip stitch to form a small ring. Work single crochet stitches all around the chain loop, then fasten off and secure it. This simple but beautiful addition will make your angel look divine and complete.
Sew the halo to the top of the angel’s head using small, neat stitches. Then attach the head to the top of the dress, making sure it’s centered. You can adjust the position slightly to give your angel a gentle, tilted pose for a more whimsical look.
This part of the Crochet Angel for Beginners – Step by Step Tutorial is also where you can get creative. Add small embroidered details like eyes or a tiny smile if you want your angel to have a face. Some crocheters prefer a minimalist look, leaving the face blank for a serene and peaceful design.
Once your angel has its head and halo, you’ll start to see it come to life. Next, we’ll move on to the wings, which are the most symbolic and beautiful part of your Crochet Angel for Beginners – Step by Step Tutorial.
Creating the Angel’s Wings
No crochet angel is complete without its wings, and in this Crochet Angel for Beginners – Step by Step Tutorial, you’ll learn how to make simple yet elegant ones. To begin, chain ten stitches. In the second chain from the hook, make a single crochet, then a half double crochet in the next, followed by a double crochet in each of the next four stitches. Continue with a half double crochet, then a single crochet in the last stitch.
You now have a small wing shape with a natural curve. Fasten off and leave a long tail for sewing. Repeat this process to create the second wing. When you place them side by side, they should mirror each other perfectly, forming the classic angel-wing shape.
If you want more decorative wings, you can add another layer by working along the edge with picot stitches or shell patterns. This adds texture and makes the wings look delicate and lacy.
Once both wings are complete, attach them to the back of your angel using the yarn needle. Try positioning them slightly angled for a natural and elegant appearance.
If you’re using fine thread, you might want to stiffen the wings with fabric stiffener to help them keep their shape. Simply apply a light coat, shape them, and let them dry completely.
When finished, your angel’s wings will give it that classic and heavenly look. You’ve now reached the final part of this Crochet Angel for Beginners – Step by Step Tutorial, where we’ll focus on the finishing touches that make your project truly special.
Finishing Touches and Display Ideas
Now that your angel is complete, this final part of the Crochet Angel for Beginners – Step by Step Tutorial focuses on adding personal details and preparing it for display. You can enhance your angel’s appearance by sewing a small ribbon bow around the neck area or adding tiny pearl beads along the dress. These small additions make your creation look even more delicate and handcrafted.
If you’re making multiple angels as gifts or decorations, consider customizing them with different colored accents. For example, gold for Christmas, pink for baby showers, or blue for weddings. Handmade crochet angels are versatile decorations that can fit any occasion beautifully.
Another lovely idea is to use your angel as a Christmas tree ornament. Simply attach a small loop of thread or ribbon to the top of the halo so you can hang it. The angel will add a warm, handmade touch to your holiday decor.
You can also create a set of angels in different sizes by adjusting your yarn thickness and hook size. A collection of small, medium, and large angels displayed together makes for a charming handmade centerpiece.
If you’d like your angel to stand upright, apply a light coat of fabric stiffener to the body and wings, then shape it and let it dry. Once dry, your angel will be ready to display proudly on a shelf, mantel, or table.
At this stage, your Crochet Angel for Beginners – Step by Step Tutorial is complete, and you’ve created something that’s both meaningful and beautiful.
FAQ
1. Is this Crochet Angel suitable for complete beginners?
Yes! This tutorial is designed with beginners in mind, using only simple stitches and easy-to-follow steps.
2. What type of yarn is best for a crochet angel?
Lightweight cotton yarn or crochet thread is ideal because it gives a delicate, detailed look and holds its shape well.
3. How long does it take to make a crochet angel?
It usually takes two to four hours depending on your experience and the level of detail you choose.
4. Can I make my angel in different colors?
Absolutely! You can customize your angel in any color scheme you like. White and gold are traditional, but pastels or metallic shades also look lovely.
5. How can I make my crochet angel stand up?
Use fabric stiffener or diluted glue to shape and strengthen your angel. Allow it to dry completely before displaying.
Conclusion
This Crochet Angel for Beginners – Step by Step Tutorial has guided you through creating a lovely handmade angel from start to finish. You’ve learned how to crochet the body, head, wings, and halo, as well as how to add personal details and finishing touches.
Whether you’re making it as a gift, a decoration, or a meaningful keepsake, your crochet angel is sure to bring joy and beauty wherever it’s displayed.
Now that you’ve completed this project, take pride in your handmade creation! Don’t forget to leave your honest opinion and share your suggestions. Your feedback helps inspire more tutorials and encourages creativity in the crochet community.