
If you love crochet projects that are both functional and stylish, this Crochet bag for storing cosmetics is the perfect idea for you! In this Step by Step Tutorial, you’ll learn how to make a beautiful, durable, and practical accessory that helps you keep your makeup, skincare products, and beauty tools neatly organized. Whether you’re a beginner looking for a new project or an experienced crocheter wanting to add something elegant to your collection, this tutorial will guide you through each detail.
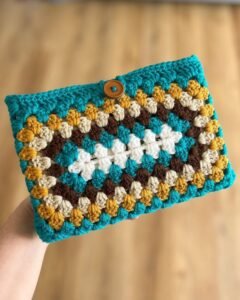
A crochet bag for storing cosmetics is not only a delightful handmade item but also a great gift for friends and family. It combines creativity and functionality, turning yarn into something that can be used every day. With endless color combinations and textures, you can personalize your bag to match your style or décor. You can even add small decorative touches like buttons, zippers, or ribbons for a professional finish.
What makes this Crochet bag for storing cosmetics so special is its versatility. You can use it to organize makeup brushes, skincare items, or travel-sized products. It’s compact yet spacious, making it ideal for both home storage and travel use. Plus, making it yourself adds a personal touch and allows you to design something truly unique. So, grab your hook and yarn, and let’s dive into this detailed Step by Step Tutorial to create your own handmade cosmetic bag.
Materials You’ll Need
Before starting your Crochet bag for storing cosmetics, let’s gather all the essential materials. Having everything prepared in advance ensures a smooth and enjoyable crocheting experience. The best part about this project is that it requires only basic supplies that you probably already have.
First, choose the right yarn. A cotton or cotton-blend yarn works best for cosmetic bags because it’s sturdy, easy to clean, and keeps its shape well. You can pick a single color for a minimalist design or use multiple shades to create stripes or patterns. Medium-weight yarn (category 4) is ideal for this project.
Next, select a crochet hook that matches your yarn weight — usually between 3.5 mm and 4.5 mm. The size of the hook can slightly affect the bag’s texture: a smaller hook gives a tighter, firmer stitch, while a larger one creates a softer and looser texture.
You’ll also need a yarn needle for sewing the parts together, a pair of scissors, and a stitch marker to help you keep track of your rounds. If you want to make your Crochet bag for storing cosmetics even more functional, consider adding a zipper or drawstring closure. These additions help keep your items safe and prevent spills when you’re on the go.
For extra durability, you might want to line your bag with fabric. This is optional but highly recommended if you plan to use it frequently. Choose a light cotton fabric in a matching or contrasting color to make your bag look polished and professional.
Finally, make sure you have a little workspace ready where you can comfortably crochet. Good lighting and a cozy chair make a big difference when working on a project like this. Once everything is ready, you can begin crocheting your beautiful cosmetic storage bag.
Step by Step: Crocheting the Base and Body
Now that your materials are ready, it’s time to begin the Crochet bag for storing cosmetics Step by Step Tutorial. We’ll start with the base, which gives structure to the bag, and then move on to the body. This process is simple and perfect for beginners, yet the result looks professional and elegant.
Start with a magic ring and crochet six single crochets into it. Pull the ring tight to close the hole. From here, work in continuous rounds, increasing evenly until you reach the desired size for the bottom of your bag. Typically, a diameter of about 5 to 6 inches works well for a medium cosmetic bag.
Once the base is complete, stop increasing and continue crocheting in rounds to build up the sides of the bag. This creates a cylindrical shape. You can use single crochet or half-double crochet stitches for a sturdy texture. If you prefer a slightly softer look, try using double crochet stitches.
As you crochet the body, consider adding color changes to create stripes or patterns. This not only adds visual appeal but also gives your bag a more handmade charm. Don’t forget to check the height frequently to ensure it fits your needs — around 6 to 8 inches is ideal for most cosmetic bags.
When the body reaches the desired height, you can start forming the top edge. To create a smooth finish, make one round of slip stitches or single crochets. If you plan to add a drawstring, crochet small chain spaces evenly around the top to thread it through later.
At this stage, your Crochet bag for storing cosmetics should already resemble a soft, flexible container. The next step will add functionality and finishing touches to make it truly beautiful and useful.
Adding the Closure and Lining
A good cosmetic bag needs a secure closure, and in this part of the Crochet bag for storing cosmetics Step by Step Tutorial, you’ll learn how to add one. Depending on your style, you can choose between a zipper or a drawstring. Both options work beautifully and are easy to install.
For a zipper closure, measure the opening of your bag and choose a zipper of the same length. Use a sewing needle and matching thread to carefully attach it to the top edge. Be sure to sew evenly so the zipper moves smoothly. This option gives a professional finish and keeps your items safely inside.
If you prefer a drawstring closure, you can crochet a long chain and thread it through the chain spaces you made earlier at the top of the bag. Tie the ends together and add small decorative tassels or beads for a cute touch. This type of closure gives your bag a relaxed, handmade look while remaining functional.
Now, let’s talk about lining. Although optional, lining your Crochet bag for storing cosmetics helps it last longer and prevents smaller items from poking through the stitches. Cut a piece of cotton fabric slightly larger than your bag, sew the sides together, and insert it inside. Then, hand-stitch it along the top edge beneath the closure.
Lining also helps maintain the bag’s shape and makes it easier to clean. If you spill makeup inside, you can simply wipe or hand wash the fabric without worrying about damaging your crochet stitches.
With the closure and lining completed, your bag is now sturdy, practical, and ready for use. But before you’re done, let’s explore some creative ways to make your design even more unique and appealing.
Customization Ideas and Finishing Touches
One of the best parts about making a Crochet bag for storing cosmetics is the endless opportunity for personalization. Every small touch you add can transform your project from simple to stunning. This section will inspire you to customize your bag and make it one of a kind.
Try experimenting with different yarn colors or textures. For example, using variegated yarn creates a beautiful gradient effect, while adding metallic threads gives your bag a touch of elegance. You can also crochet small appliques like flowers, hearts, or initials and sew them onto the bag for decoration.
Adding handles or a strap is another great option, especially if you want your cosmetic bag to double as a small purse. Crochet two short handles or a single long strap and attach them securely to the sides. This makes your Crochet bag for storing cosmetics more versatile and easy to carry when traveling.
For those who love details, you can sew on small accessories like buttons, charms, or fabric patches. These elements give personality to your bag and make it stand out as a unique handmade piece.
Don’t forget to block your crochet work before final use. Blocking helps smooth out the stitches and gives your bag a neat, finished appearance. Simply dampen the bag slightly, shape it, and let it dry completely before inserting your items.
Lastly, remember that handmade items are also great for selling or gifting. A beautifully made Crochet bag for storing cosmetics can be a thoughtful present for birthdays, holidays, or any occasion. Plus, it’s an excellent way to showcase your crochet skills and creativity.
About Crochet Bag for Storing Cosmetics
1. What type of yarn should I use for a cosmetic bag?
Cotton yarn is the best choice because it’s durable, easy to clean, and holds its shape well.
2. Can I make this bag without a lining?
Yes, but adding a lining will make it stronger and prevent smaller items from falling through the crochet holes.
3. How do I clean my crochet cosmetic bag?
If lined, you can hand wash it gently using mild soap. Avoid machine washing to preserve the shape and texture.
4. Is this project suitable for beginners?
Absolutely! The stitches used are simple, and the Step by Step Tutorial makes it easy to follow even for beginners.
5. Can I resize the bag?
Yes! You can adjust the base diameter and the height to make a smaller or larger bag depending on your needs.
6. What closure is better – zipper or drawstring?
Both are great. A zipper provides more security, while a drawstring gives a softer, more casual look.
Conclusion
Creating a Crochet bag for storing cosmetics is a fun and rewarding project that blends practicality with creativity. This Step by Step Tutorial showed you how to make a stylish and functional bag from start to finish, using simple materials and basic stitches.
You’ve learned how to craft the base, build the body, add closures and lining, and customize your bag with unique touches.
Now you have a handmade piece that’s perfect for organizing your beauty essentials or gifting to someone special. I hope this guide inspired you to try new designs and explore your crochet skills further. If you enjoyed this tutorial, please leave your honest opinion and share any suggestions for future projects. Your feedback helps inspire even more creative crochet ideas!