
Learning Crochet basket fridge magnet- Step by Step Tutorial is a fun and creative way to make your kitchen more colorful and personalized. These tiny baskets not only serve as adorable decorations but can also hold small notes or lightweight items on your fridge. Making them yourself adds a touch of charm and warmth to your home, while allowing you to express your creativity.
When you learn Crochet basket fridge magnet- Step by Step Tutorial, you will see that it does not require advanced crochet skills. Even beginners can follow this tutorial and achieve a beautiful result with just basic stitches and simple materials. The best part is that these baskets are quick to make, so you can create several in different colors and designs to suit your style.
In this article, we will guide you through the entire process. From choosing the right yarn and tools to crocheting the basket, attaching the magnet, and adding decorative touches, everything will be explained in detail. By the end of this Crochet basket fridge magnet- Step by Step Tutorial, you will be ready to make your own unique fridge magnets and maybe even gift them to friends and family.
Materials Needed for Crochet Basket Fridge Magnet
The first step in Crochet basket fridge magnet- Step by Step Tutorial is gathering all the materials. The good news is that you do not need anything expensive or hard to find. Most of the supplies are likely already in your crochet kit or can be purchased easily at any craft store.
Start with yarn. For small projects like fridge magnets, cotton yarn works best because it provides good stitch definition and durability. You can choose any color you like—bright shades for a fun look or neutral tones for a minimalist style.
You will also need a crochet hook. The size of the hook depends on the thickness of your yarn. Most patterns use a 3.0 mm to 4.0 mm hook for small projects like this, but you can adjust according to your preferences.
Magnets are, of course, essential. Use flat, strong magnets so that your basket will stay firmly on the fridge surface. You can find craft magnets in different sizes, but make sure they are strong enough to hold the basket securely.
Other materials include a yarn needle for weaving in ends, scissors for cutting the yarn, and a hot glue gun or fabric glue to attach the magnet to the finished basket. Some people also like to add decorative buttons, beads, or ribbons for extra charm.
Finally, keep a measuring tape handy if you want your baskets to be the same size. Consistency makes the final display on your fridge look neat and professional.
Crocheting the Basket Step by Step
Now that you have everything ready, it is time to start the most exciting part of Crochet basket fridge magnet- Step by Step Tutorial: crocheting the basket itself. Do not worry if you are a beginner; the steps are simple and easy to follow.
Begin with a magic ring. This technique allows you to start crocheting in the round without leaving a hole in the center. It is perfect for small circular projects like this. Make six single crochets into the magic ring and pull it tight.
For the next round, increase by making two single crochets in each stitch. This will give you a total of twelve stitches. The flat circle you are forming will become the base of your basket.
Continue increasing in each round until the base reaches the desired size. For a small fridge magnet, a 2-inch diameter base works well. You can stop increasing once you reach this size.
Next, work on the sides of the basket. To do this, simply crochet one single crochet in each stitch around without increasing. This will make the edges start to curl upward, forming the basket walls.
Keep adding rounds until the basket is as tall as you want it. Most fridge magnets look best with baskets about one to two inches tall, but you can experiment with different heights.
When you finish the last round, fasten off the yarn and use a yarn needle to weave in any loose ends. Your basic crochet basket is now complete and ready for the next step.
Attaching the Magnet and Adding Decorations
With the basket crocheted, the next step in Crochet basket fridge magnet- Step by Step Tutorial is attaching the magnet and decorating your creation. This part adds personality and functionality to your project.
Turn the basket upside down and place the magnet at the center of the base. Using a hot glue gun or strong fabric glue, attach the magnet firmly. Make sure it is well-centered so that the basket hangs evenly on the fridge.
Allow the glue to dry completely before testing the magnet on your fridge. If you want extra security, you can sew a small piece of fabric over the magnet before gluing it, creating a protective layer that keeps it in place.
Now comes the fun part: decorating your basket. You can add tiny crochet flowers, bows, or even buttons to the sides for a playful look. Embroidery is another option if you want to add initials or small designs.
Some people like to fill the basket with artificial flowers or tiny decorative items. Just make sure whatever you put inside is lightweight so it does not pull the magnet off the fridge.
Finally, give your basket a quick trim by cutting any remaining loose threads. Small details like this make your project look neat and professional.
Creative Ideas for Crochet Basket Fridge Magnets
One of the best things about Crochet basket fridge magnet- Step by Step Tutorial is how customizable it is. You can make endless variations by changing colors, patterns, and decorations.
For a seasonal touch, use red and green yarn for Christmas-themed baskets or pastel colors for Easter. Add small embellishments like bells or ribbons to match the holiday theme.
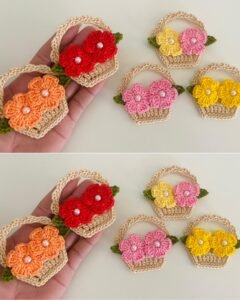
If you love flowers, crochet tiny blooms and attach them around the rim of the basket. This creates a spring-like feel and looks lovely in any kitchen.
For a minimalist style, stick to neutral colors like beige, gray, or white. A simple, undecorated basket can be just as elegant as a colorful one, especially in modern kitchens.
You can also make themed baskets for different purposes. For example, create one labeled “Notes” to hold small paper reminders or one with a heart design for Valentine’s Day decorations.
Making sets of baskets is another fun idea. Arrange three or four small baskets in a row on your fridge for a coordinated and charming display. Each basket can have a different color or decoration, making your fridge look lively and unique.
Finally, consider giving these baskets as gifts. Handmade items always carry special meaning, and a set of crochet fridge magnets would be a thoughtful present for housewarmings, birthdays, or holidays.
FAQ About Crochet Basket Fridge Magnets
1. Do I need advanced crochet skills to make these baskets?
No, this project is beginner-friendly. Basic stitches like single crochet are all you need to complete it.
2. What type of yarn works best for fridge magnets?
Cotton yarn is ideal because it is durable, easy to work with, and gives good stitch definition.
3. How do I make sure the magnet stays attached?
Use strong glue like a hot glue gun and ensure the magnet is flat and centered on the base.
4. Can I wash the crochet basket if it gets dirty?
Yes, but remove the magnet first if possible. Otherwise, gently spot-clean with a damp cloth.
5. How long does it take to make one basket?
Most people can complete a basket in under an hour, making it a quick and satisfying project.
6. Can I sell crochet basket fridge magnets?
Absolutely! Handmade magnets are popular at craft fairs and online shops, especially when customized.
Conclusion
In this Crochet basket fridge magnet- Step by Step Tutorial, we have covered everything from choosing materials and crocheting the basket to attaching the magnet and decorating it creatively. These small projects are perfect for beginners and offer endless customization options.
Now that you know how to make your own crochet basket fridge magnets, we would love to hear your honest opinions and suggestions.
Share your thoughts on this tutorial and let us know what other crochet projects you would like to learn in the future!