
Learning how to make a crochet basket with tulips – step by step tutorial is a rewarding experience for both beginners and experienced crocheters. This charming and practical project combines the beauty of crochet flowers with the functionality of a handcrafted basket. It’s the perfect way to bring a touch of spring into your home or create a thoughtful handmade gift. Whether you’re using it to hold yarn, keys, or decorative items, this floral basket adds a delightful aesthetic to any space.
The beauty of the crochet basket with tulips – step by step tutorial lies in its versatility. You can customize it with different yarn colors, sizes, and petal arrangements to make it truly your own. Even if you’re just starting out with crochet, this project is a great way to practice your skills while creating something beautiful. The soft tulip petals paired with the sturdy basket base create a lovely contrast that’s sure to impress anyone who sees it.
In this article, we will walk you through a detailed and easy-to-follow crochet basket with tulips – step by step tutorial. From choosing the right materials to stitching the final tulip, we’ll cover everything you need to know. By the end, you’ll feel confident in your ability to complete this pattern, and perhaps even inspired to explore more floral crochet projects.
Materials and Tools You Will Need
Before you begin this crochet basket with tulips – step by step tutorial, it’s essential to gather the right materials. Having everything ready will make your crafting process smooth and enjoyable. The materials used are easy to find and suitable for crafters of all levels.
Start by selecting your yarn. For the basket itself, a thick cotton yarn works best, as it provides the sturdiness needed for structure. Choose a contrasting color for the tulips to make them pop visually. You may use pastel shades for a soft, floral look or go bold with reds and purples for dramatic flair.
You will also need a crochet hook appropriate for your yarn size. A 4.0 mm to 5.5 mm hook is typically ideal for medium-weight yarn. Check the yarn label for hook size recommendations. If your stitches are too loose, consider using a smaller hook to maintain the basket’s shape.
Next, prepare your accessories: a yarn needle for weaving in ends, scissors for trimming, and stitch markers if you need help keeping your place in rounds. Stitch markers are especially helpful when crocheting in the round, as they prevent you from losing track of your beginning point.
Don’t forget to use some stuffing or cotton filling if you’d like your tulips to be more dimensional. Though not mandatory, a bit of stuffing can help the tulip petals look fuller and more realistic.
Finally, have a flat surface nearby to work on and organize your tools. Keeping everything accessible can speed up your progress and help maintain your creative flow throughout this crochet basket with tulips – step by step tutorial.
Crocheting the Basket Base
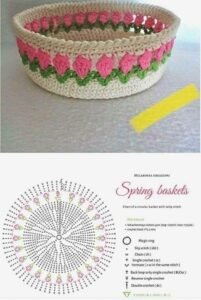
Let’s begin the crochet basket with tulips – step by step tutorial by crafting the base of the basket. The basket is typically made using a circular pattern, building up from a magic ring and increasing stitches in each round.
Start with a magic ring or chain 4 and slip stitch to form a loop. This creates a tight, neat center for your basket. Then, crochet 6 to 8 single crochets into the ring and close it by pulling the tail. This is your first round.
In the following rounds, you’ll increase evenly by adding two single crochets in each stitch or using an increasing pattern (like 2 sc in one stitch, then 1 sc in the next). This widens the base of the basket in a flat, round shape. Continue this process until you reach the desired diameter.
Once you have the base, it’s time to work upward. You’ll stop increasing and crochet one stitch in each around, forming the walls. Keep going until the height suits your needs. A common height is about 4–5 inches, but feel free to adjust based on your preference.
To give your basket extra structure, you can use the waistcoat stitch or crochet tightly. This creates a firm texture, helping the basket hold its shape well. If your basket starts to look too soft or floppy, switch to a smaller hook or use two strands of yarn together.
Finish off the top of the basket with a clean edge. You can use a round of slip stitches for a simple finish or a reverse single crochet (also known as a crab stitch) for a decorative look. Weave in the ends securely, and your basket base is complete.
Making the Crochet Tulips
The tulips are what make this crochet basket with tulips – step by step tutorial extra special. They add charm and personality to the basket and can be made in any color you love.
Start by crocheting a tulip bulb. Chain 4 and join with a slip stitch. In the first round, work several single crochets to form a ring. In the second round, increase stitches to create a bulbous shape. Tulip bulbs are usually rounded, so be sure to expand the width before closing the top.
To form the petals, crochet into the top stitches of your bulb. Typically, tulips have three to five petals. Use double or treble crochet stitches for elongated petals. They should curve slightly inward, mimicking the natural look of tulip flowers.
Once you have the flower, crochet a short stem using green yarn. A simple chain followed by slip stitches down the chain works well. For leaves, chain a few stitches and use single and double crochets to shape a pointed oval leaf.
Attach the tulips securely to the basket. You can sew them on directly or create detachable stems. Some crocheters prefer to hot glue tulips for stability, but sewing gives a neater finish. Space your tulips evenly for a balanced, beautiful result.
Add as many tulips as you like. A few scattered tulips create a minimalist look, while a full bouquet gives a vibrant and abundant effect. Play with color combinations to enhance the basket’s charm and style.
Tips for a Beautiful Finish
As we continue with the crochet basket with tulips – step by step tutorial, consider these helpful tips to ensure a polished and professional-looking result. Paying attention to details can elevate your entire project.
Tension control is key. Keeping your stitches consistent ensures the basket’s shape remains uniform and sturdy. If your tension varies too much, the sides may look uneven or collapse over time.
Color coordination also matters. Choose complementary shades that reflect the theme you’re going for. Soft pastels for springtime, or deep reds and greens for a festive vibe, are always a hit. Try not to mix too many colors that might clash.
When attaching tulips, sew them securely to avoid them coming loose with use. Use invisible stitches and tie off tightly. If the basket will be used often or handled by children, double stitching is a good idea for durability.
Block your tulips before attaching, especially if they curl too much. Use a damp cloth and gently press with an iron or pin them in place to dry. This helps the petals maintain shape and look crisp.
If you’re gifting this basket, consider adding a ribbon or bow to complete the look. Presentation can make a big difference, and the recipient will appreciate the extra touch of care.
Lastly, always double-check your work as you go. Fixing a mistake early is easier than redoing an entire section later. Enjoy the process and take pride in every stitch of your crochet basket with tulips – step by step tutorial.
Creative Ways to Use Your Crochet Basket with Tulips
After finishing your crochet basket with tulips – step by step tutorial, the fun continues with deciding how to use it. This handmade piece is both decorative and functional.
Use it as a centerpiece. Place it on your coffee table or dining room with faux eggs, pinecones, or seasonal decorations. It draws attention and creates a cozy handmade feel.
You can also use it as a yarn holder for your other crochet projects. The sturdy basket keeps your yarn organized while the tulips add a creative flair to your crafting space.
Consider it as a gift basket. Fill it with treats, bath products, or even more yarn and give it to a fellow crafter or loved one. The handmade touch makes it an unforgettable gift.
Hang it on a wall or door as a floral arrangement alternative. Add a loop to the back, and you have a cute, soft wall-hanging that never wilts.
Use it for seasonal storage. Around Easter, you can fill it with chocolate eggs. During spring, add fresh herbs in jars. The basket adapts well to any occasion.
Or simply display it as-is. The beauty of this project is that it stands on its own. Whether placed in a nursery, living room, or craft corner, it adds warmth and charm.
FAQ – Crochet Basket with Tulips
1. Is the crochet basket with tulips beginner-friendly?
Yes, this pattern can be adapted for beginners. Start with simple stitches for the basket and basic tulip shapes, and gradually explore more detailed versions as you grow.
2. What’s the best yarn for a sturdy basket?
Cotton or t-shirt yarn is ideal for a firm basket. These yarns hold their shape well and are easy to clean, making them perfect for functional pieces.
3. How do I keep the tulips from flopping over?
You can use pipe cleaners or floral wire inside the stems for structure. Alternatively, use tighter stitches and stuffing to help the tulips stand up naturally.
4. Can I wash the crochet basket with tulips?
Yes, if you’ve used washable yarn. Hand washing is recommended to preserve the shape and structure of the tulips and basket.
5. How long does it take to complete this project?
It depends on your skill level. On average, it may take 5–8 hours spread over a few days to complete both the basket and several tulips.
Conclusion
We hope you enjoyed this detailed crochet basket with tulips – step by step tutorial and feel inspired to bring your own version to life. From crafting the sturdy basket to decorating it with delicate tulips, each step offers a satisfying creative experience. This project is perfect for spring decor, thoughtful gifts, or just a cheerful addition to your home.
If you’ve followed this guide and made your own crochet basket, we’d love to hear from you! Leave your honest opinion and feel free to share suggestions or ideas for future tutorials. Happy crocheting!