
Learning Crochet Bear Applique – Step by Step Tutorial is a fun and creative way to bring a touch of charm to your projects. Whether you are making blankets, baby clothes, or decorative items, a little bear applique can transform a simple piece into something unique and heartwarming. Many crafters love this project because it is small, quick to make, and perfect for beginners who want to practice their crochet skills.
In this article, we will provide a complete guide for anyone who wants to learn how to make a crochet bear applique easily. We will cover the materials needed, the basic techniques, and the full step-by-step process. You will also find helpful tips to ensure your applique turns out beautifully, even if it is your very first crochet project.
By following this Crochet Bear Applique – Step by Step Tutorial, you can create adorable little bears that can be sewn onto bags, hats, pillow covers, or even used as decorations for handmade greeting cards. It is also a great way to use leftover yarn from other projects, making it both a creative and eco-friendly craft idea.
Materials Needed for Crochet Bear Applique
To start this Crochet Bear Applique – Step by Step Tutorial, the first thing you need to do is gather all the materials. The good news is that this project requires only basic crochet supplies, and you might already have most of them at home. The most important part is choosing the right yarn colors to make your bear look cute and realistic.
You will need a small amount of yarn in at least two shades: one for the bear’s face and ears and another for details like the nose or inner ears. A soft brown or beige shade usually works perfectly for the main part, while black or dark brown can be used for the facial features. Cotton yarn is a good choice because it gives a nice stitch definition and is easy to handle, especially for beginners.
Next, you will need a crochet hook that matches the yarn weight. Most patterns use a 3.5 mm or 4 mm hook, but you can check the yarn label for the recommended size. You will also need a pair of scissors, a yarn needle for sewing the parts together, and optionally, some small buttons or embroidery thread for the eyes and nose.
If you are a beginner, it is helpful to have a stitch marker to keep track of your rounds, especially when making the bear’s head and ears. This will make the process much smoother and prevent you from losing count of your stitches.
Finally, prepare a comfortable workspace with good lighting. Crocheting small items like appliques requires attention to detail, so a bright and organized area will help you see your stitches clearly and avoid mistakes.
Once you have everything ready, you are set to start creating your crochet bear applique. Having all the materials at hand will make the entire process easier and more enjoyable.
Step by Step Instructions for Crochet Bear Applique
Now let’s get into the fun part of this Crochet Bear Applique – Step by Step Tutorial. We will break down each step to make it easy for beginners to follow along. Even if you have never made an applique before, you will be able to create one by following these clear instructions.
Start by making a magic ring. This will be the base of your bear’s head. Work single crochets into the ring until you have a small round circle. Usually, 6 to 8 stitches are enough for the first round. Pull the ring tight, and you will have the foundation for your bear applique.
For the second round, increase the stitches evenly around the circle. This will make the head bigger and rounder. Continue increasing for one or two more rounds until you have the desired size for your bear’s head. Remember, the size of your applique depends on the number of rounds you make.
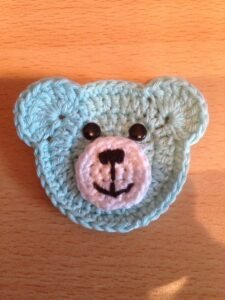
Next, make two small circles for the ears. These are usually just one round each, starting with a magic ring and working 6 to 8 single crochets into it. Once done, sew or crochet the ears onto the top sides of the head. This will give your bear its cute, recognizable look.
For the face, you can use embroidery or small safety eyes for the eyes and a small stitched triangle for the nose. If you prefer a softer look, you can crochet a small oval shape in a lighter color for the bear’s snout and sew it onto the head before adding the nose and mouth details.
Finally, weave in all loose ends neatly at the back. This will make your crochet bear applique look clean and professional. Once everything is attached, your bear is ready to be added to any project you like.
Tips for Beginners Making Crochet Bear Applique
If this is your first time making crochet bear applique, do not worry. With a few simple tips, you can avoid common mistakes and create a beautiful piece even as a beginner. The first tip is to keep your tension consistent. If your stitches are too tight, the applique might curl; if they are too loose, it might look uneven.
Another helpful tip is to practice making circles before starting the actual bear applique. Since the head and ears are basically small circles, practicing this shape will make the process much easier and less stressful.
Choosing the right yarn is also important. A smooth yarn will help you see the stitches clearly. Avoid fluffy or textured yarns for your first projects, as they can make it harder to find the right stitch spaces.
Take your time when attaching the ears and facial features. These small details make a big difference in how your bear will look. Use pins to position the pieces before sewing to ensure they are even and symmetrical.
Do not be afraid to customize your bear. You can make it in different colors, add a little bow, or even embroider a tiny smile to give it more personality. Handmade projects are all about creativity, so have fun with it.
Lastly, remember that practice makes perfect. Your first applique might not look exactly as you imagined, but with each one you make, your skills will improve, and your bears will look better and better.
Creative Ways to Use Crochet Bear Applique
One of the best things about this Crochet Bear Applique – Step by Step Tutorial is that it opens up many creative possibilities. Once you have made a few bear appliques, you can use them in countless ways to decorate or personalize your items.
For example, you can sew them onto baby blankets or pillows to create a cute nursery theme. This makes for an adorable and thoughtful handmade gift for a baby shower or birthday.
You can also use them to decorate tote bags, hats, or even clothing items. A simple sweater can become a unique piece with a small bear applique stitched onto it.
Another fun idea is to use these appliques for scrapbooking or card making. Since they are small and flat, they work perfectly as embellishments for paper crafts.
Some people like to turn their crochet appliques into magnets or keychains by adding a small backing and a loop. This way, your little bear can become a functional accessory too.
You can also combine multiple appliques to make a garland or wall hanging for a child’s room. The possibilities are endless, and each project will look special with your handmade touch.
The more you experiment with your crochet bear appliques, the more ideas you will discover to use them creatively.
FAQ About Crochet Bear Applique
1. Is crochet bear applique beginner-friendly?
Yes, this project is perfect for beginners because it uses basic stitches and simple shapes.
2. How long does it take to make one applique?
On average, it takes about 30–45 minutes to complete one bear applique, depending on your skill level.
3. Can I use leftover yarn for this project?
Absolutely! This is a great way to use small amounts of yarn from other projects.
4. Do I need special tools for crochet bear appliques?
No, basic crochet tools like a hook, yarn, scissors, and a yarn needle are enough.
5. How do I attach the applique to other items?
You can sew it on with a yarn needle or use fabric glue for non-washable projects.
Conclusion
In this article, we learned Crochet Bear Applique – Step by Step Tutorial, from gathering materials to completing the project and exploring creative ways to use it.
We also shared tips for beginners and answered common questions to help make the process smooth and enjoyable.
Now it is your turn to try this adorable project. Share your honest opinions and suggestions in the comments—we would love to hear about your experiences and see how creative you can get with your crochet bear appliques.