
If you’re tired of tangled phone chargers, messy earphones, and cables scattered all over your desk, then you’ll love this crochet cable organizer – step by step tutorial. This simple and practical project combines the beauty of handmade crochet with everyday organization. Not only does it help you keep your cords neat, but it’s also an eco-friendly, reusable alternative to plastic or rubber cable ties. Plus, you can make it in your favorite colors and customize it for different cable sizes.
Creating your own crochet cable organizer is easier than you might think. Even if you are new to crochet, this project can be a fun introduction to basic stitches and small, manageable pieces. In this tutorial, we will guide you through the materials you need, the stitches you’ll use, and each step in the process. The end result will be a functional, handmade accessory that you’ll actually use every day.
The beauty of following a step-by-step tutorial is that you can work at your own pace. You can start and stop whenever you want, and if something goes wrong, it’s easy to undo a few stitches and try again. This guide is designed to make the process as smooth as possible, so you can enjoy the satisfaction of crafting something both beautiful and practical.
Materials You Will Need for Your Crochet Cable Organizer
To get started on your crochet cable organizer, you don’t need many supplies. The project is small, so it’s perfect for using leftover yarn from other crochet works. You’ll need a medium or light-weight yarn—cotton yarn works best because it holds its shape well and is durable. You’ll also need an appropriately sized crochet hook for your chosen yarn, a pair of scissors, and a yarn needle for weaving in ends.
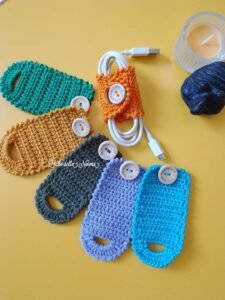
If you want your organizer to close securely, you can use a small button or snap fastener. These not only add functionality but also a cute decorative touch. For the button option, make sure you have a needle and thread handy to sew it in place after finishing your crochet piece.
Choosing the right yarn color can also make your crochet cable organizer stand out. You might want to choose bright colors so they’re easy to spot in a drawer, or you can go for neutral shades for a minimalist look. The great thing about handmade projects is that you’re in full control of the design.
When it comes to crochet hooks, beginners might find ergonomic handles more comfortable for longer crafting sessions. A size between 3.5 mm and 4.5 mm usually works well for this type of project, depending on the yarn thickness. You can experiment with different hooks to see which creates the tension you prefer.
You might also want to keep a tape measure nearby so you can ensure all your organizers are the same size, especially if you plan to make multiple ones as gifts. Consistency will make your collection look neat and professional.
Lastly, have a little storage pouch or basket for your work in progress. Keeping your supplies together will make it easier to pick up the project whenever you have a spare moment, helping you complete your crochet cable organizer faster.
Step-by-Step Guide to Crocheting Your Cable Organizer
To begin, make a slip knot on your hook and chain the number of stitches required for the desired length of your cable organizer. Usually, chaining between 18–24 stitches will give you a length suitable for most charging cables. The chain is the foundation of your project, so make sure your stitches are even and not too tight.
Next, work single crochet stitches along the chain, starting from the second chain from the hook. This will give your organizer a firm and durable base. Turn your work at the end of the row and continue adding rows until you reach your desired width—around 4–5 rows is usually enough.
Once the base is complete, you can choose to add a button loop at one end. To do this, chain a small number of stitches (enough to fit your chosen button) and slip stitch back to the base. This loop will help keep your cables securely wrapped when the organizer is in use.
At the opposite end of the piece, sew on your button using a strong thread. If you prefer a snap fastener, attach both sides according to the manufacturer’s instructions. This closure system will make your crochet cable organizer quick and easy to use.
After attaching the closure, weave in all loose ends using your yarn needle. Trim any excess yarn for a neat finish. This step not only makes your organizer look professional but also prevents it from unraveling over time.
Finally, give your organizer a quick shape adjustment by hand. Cotton yarn usually doesn’t require blocking, but if your stitches look uneven, you can lightly steam it or shape it with a damp cloth for a more polished look.
Benefits of Making a Crochet Cable Organizer
One of the biggest benefits of creating your own crochet cable organizer is reducing clutter in your home or workspace. Tangled cords not only look messy but can also damage the cables over time. A simple crochet wrap keeps everything neat and prevents wear and tear.
This project is also an excellent way to use up yarn scraps from other projects. Instead of letting leftover yarn go to waste, you can turn it into something useful. This is a great example of sustainable crafting that benefits both you and the environment.
Because the step-by-step tutorial is so easy to follow, you can make multiple organizers in a single afternoon. These make wonderful handmade gifts for friends and family, especially those who work from home or travel often with electronics.
Another advantage is the customization potential. You can make organizers in different sizes to fit various cables—small ones for earbuds, medium for chargers, and larger ones for thicker cords. Adding different patterns or colors can make them even more unique.
Crafting a cable organizer is also a relaxing activity. Crocheting in short bursts is perfect for when you want a creative break during a busy day. It’s a mindful practice that can help reduce stress while also being productive.
Lastly, handmade items carry a personal touch that store-bought products can’t match. Every stitch is part of your own effort and creativity, making each crochet cable organizer special.
Tips for Personalizing Your Crochet Cable Organizer
To make your organizer truly stand out, consider experimenting with different crochet stitches. While single crochet is the simplest and most practical choice, you could try half double crochet or a textured stitch for added style.
Adding decorative elements like small appliqués or embroidered initials can make your cable organizers even more personal. These details can be color-coordinated with the yarn or contrast for a bold look.
If you plan on making several organizers, you can color-code them for different devices—blue for phone chargers, green for headphones, red for laptop cables, and so on. This makes finding the right cord even easier.
Using variegated yarn is another great idea. This type of yarn changes colors as you crochet, creating a beautiful multicolored effect without the need to switch skeins. It’s an easy way to make each organizer unique.
You could also play with different closure types. Aside from buttons and snaps, you can crochet a small tie string or even use a piece of elastic for a stretchy fit. Each method offers a different look and functionality.
Finally, keep a few finished organizers in a small basket or drawer so you can quickly grab one whenever you buy new electronics or need to tidy up cables. Having them ready means you’ll use them more often.
FAQ – Crochet Cable Organizer
Q: How long does it take to make a crochet cable organizer?
A: For most people, it takes between 20–40 minutes to complete one, depending on your crochet speed and the complexity of your design.
Q: What is the best yarn for a cable organizer?
A: Cotton yarn is the best choice because it’s durable, holds its shape, and is easy to clean.
Q: Can beginners make a crochet cable organizer?
A: Absolutely! This project is perfect for beginners since it uses basic stitches and is small in size.
Q: How do I clean my crochet cable organizer?
A: You can hand wash it in mild soapy water and let it air dry. Avoid hot water to prevent shrinking.
Q: Can I make these to sell?
A: Yes, handmade crochet cable organizers are great for craft fairs or online shops, as long as they are your own original work.
Q: Is a button closure better than a snap?
A: It depends on preference. Buttons offer a decorative touch, while snaps are quick to fasten.
Conclusion
Making a crochet cable organizer – step by step tutorial is a rewarding project that’s both practical and creative. You’ve learned about the materials, the step-by-step process, and different ways to personalize your organizers. This small but useful crochet item can help keep your cables tidy, prevent damage, and add a touch of handmade charm to your space.
Now that you know how to make your own, why not give it a try and see how satisfying it is to create something so functional? We’d love to hear your opinion and any suggestions you might have for improving this tutorial.
Share your thoughts so we can continue making content that inspires and helps fellow crafters.