
The Crochet Car Steering Wheel Cover – Step by Step Tutorial is the perfect guide for anyone who loves adding a personal touch to their vehicle. Crocheting your own steering wheel cover not only enhances the interior aesthetics of your car but also provides comfort and functionality. It’s a simple project that even beginners can handle, and the end result is a beautiful handmade accessory that reflects your creativity. This tutorial will walk you through everything you need to know, from choosing the right yarn to fitting your finished piece perfectly around your steering wheel.
A crochet car steering wheel cover is not just about style—it’s about practicality, too. It protects your steering wheel from wear and tear, prevents it from getting too hot in summer or too cold in winter, and adds a better grip for driving comfort. With a few crochet stitches and the right materials, you can craft something durable, washable, and entirely your own. Plus, crocheting your own cover allows you to choose colors and textures that match your personality or your car’s interior design.
In this Crochet Car Steering Wheel Cover – Step by Step Tutorial, we’ll explore everything from the basic materials needed to how you can customize the design to suit your taste. Whether you prefer a minimalist, single-color look or a vibrant, striped pattern, this project offers plenty of room for creativity. By following these steps, you’ll not only make a functional accessory but also experience the satisfaction of turning yarn into something uniquely practical.
Choosing the Right Materials for Your Crochet Car Steering Wheel Cover
Before starting your Crochet Car Steering Wheel Cover – Step by Step Tutorial, it’s important to gather the correct materials. The right yarn and hook will make all the difference in how your cover feels and performs. For this project, cotton yarn is the best choice. Cotton is durable, non-slip, and easy to clean, making it ideal for something that will experience daily use. Acrylic yarn can also be used, but it may stretch more over time.
When selecting yarn, choose a medium-weight or worsted-weight type. This ensures that your cover is sturdy enough to stay in place but flexible enough to stretch around the steering wheel. Avoid bulky yarns, as they might make the cover too thick and uncomfortable to grip. If you want a smoother finish, mercerized cotton provides a subtle shine and extra durability.
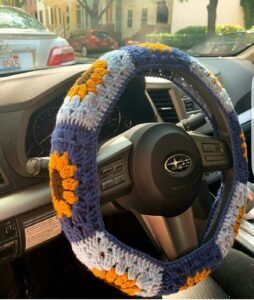
Next, consider your color palette. You can go for solid colors to match your car’s interior, or mix multiple shades for a more playful appearance. Many crocheters love to use variegated yarn, which automatically creates a gradient or patterned effect without having to switch colors manually.
You’ll also need a crochet hook that matches your yarn weight—typically a 4.0 mm or 4.5 mm hook works well. Make sure to have a yarn needle for weaving in ends and a pair of scissors for trimming excess yarn. It’s also helpful to have a measuring tape to ensure your cover fits perfectly around your steering wheel.
Before you start crocheting, measure the diameter and thickness of your steering wheel. Standard wheels are about 14 to 15 inches across, but it’s best to double-check. This ensures you can adjust the pattern for a snug fit that won’t slip while driving.
Lastly, have a few stitch markers on hand. These will help you track rounds and keep your work even. Once you have everything ready, you’re set to begin crafting your beautiful, functional crochet steering wheel cover.
Step-by-Step Instructions for Crocheting the Steering Wheel Cover
Now that you’ve gathered your materials, let’s dive into the Crochet Car Steering Wheel Cover – Step by Step Tutorial. Begin by creating a slip knot and chaining enough stitches to match the circumference of your steering wheel. For most wheels, this will be about 90 to 100 chains, but it’s always best to measure as you go. Join the chain ends together with a slip stitch to form a circle.
Start with a foundation round of single crochet stitches. This will form the base of your cover. Make sure your stitches are tight enough to hold shape but not so tight that they prevent the cover from stretching over the wheel. Once you’ve completed your first round, continue crocheting in the round until your piece is about 1.5 inches wide.
To add texture or a pattern, you can alternate between different stitches such as half-double crochet or double crochet. Some crocheters like to include a ribbed effect by alternating front post and back post double crochets. This not only looks great but also adds extra grip to your steering wheel cover.
Continue working in rounds until your strip is about 2 inches wide, which should cover the wheel’s width comfortably. You can test the fit by stretching your work over the wheel occasionally. If it feels too loose, try decreasing a few stitches in your next round; if it’s too tight, increase a few stitches evenly.
Once your piece reaches the desired size, finish off your yarn and weave in the ends securely with your yarn needle. To ensure a tight fit, you can thread a thin elastic band through the last row of stitches before joining the edges. This will help the cover stay snug around the wheel without slipping.
Finally, slip the cover over your steering wheel, adjusting it evenly all around. Make sure it fits tightly but not so tight that it’s hard to install. Once in place, you’ll have a beautiful, handcrafted cover that adds warmth and character to your car’s interior.
Customizing Your Crochet Steering Wheel Cover
The Crochet Car Steering Wheel Cover – Step by Step Tutorial becomes even more exciting when you start personalizing your design. One of the simplest ways to customize your cover is by experimenting with color combinations. You could create stripes using different yarn shades or even alternate contrasting colors for a fun and modern look.
If you want to add a bit of flair, consider crocheting small decorative motifs like hearts, stars, or flowers and attaching them around the cover. These details can be sewn securely onto your finished piece to give it a unique charm. Just make sure the decorations don’t interfere with the grip or comfort while driving.
Another customization option is to use textured stitches. The bobble stitch, puff stitch, or shell stitch can create an eye-catching, tactile design. Keep in mind that the texture should remain comfortable to touch, so avoid overly bulky patterns.
You could also add a lining to the inside of your cover. Using a non-slip fabric or thin rubber sheet ensures your cover stays firmly in place, especially during long drives. Simply hand-sew or glue the lining to the inside before installing the cover.
For those who like themed designs, consider creating a seasonal or holiday-inspired version. For example, a red-and-green pattern for Christmas or pastel colors for spring. This small project allows you to switch covers throughout the year and keep your car interior fresh and festive.
Lastly, don’t forget about finishing touches. Use high-quality yarn, neat stitches, and consistent tension throughout the project. These little details make a big difference in how professional and durable your finished crochet car steering wheel cover looks.
Tips for Maintenance and Longevity
After completing your Crochet Car Steering Wheel Cover – Step by Step Tutorial, it’s important to take care of your creation so it lasts for a long time. Because your steering wheel is handled frequently, it’s natural for the cover to accumulate dust, sweat, or dirt over time. Regular cleaning will keep it looking fresh and maintain hygiene.
To clean your cover, remove it from the steering wheel and hand wash it in lukewarm water with a mild detergent. Avoid using bleach or harsh chemicals that can damage the fibers. Gently squeeze out excess water and lay it flat to dry. Do not wring or twist, as this may distort the shape.
If your cover is made from cotton, it can be lightly ironed after drying to maintain its neat appearance. Acrylic covers, however, should not be ironed because the heat could melt or deform the fibers. Always check the yarn label for care instructions before cleaning.
Inspect your cover regularly for loose threads or stretched stitches. If you notice any, simply re-crochet the affected area or secure it with additional stitches. Keeping your cover in good condition will extend its life and keep your car interior looking stylish.
When not in use, store the cover in a cool, dry place. Avoid exposing it to direct sunlight for extended periods, as this can fade the colors over time.
By following these maintenance tips, your crochet steering wheel cover will remain soft, clean, and functional for years, ensuring that all the effort you put into making it continues to pay off every time you drive.
1. Can beginners make a crochet car steering wheel cover?
Yes, this is an excellent beginner project. It involves simple stitches and a circular pattern, making it perfect for those new to crochet.
2. What type of yarn is best for a crochet steering wheel cover?
Cotton yarn is the best option because it’s strong, non-slip, and easy to clean. It also holds its shape better than acrylic.
3. How do I make sure the cover fits my steering wheel?
Measure your steering wheel’s diameter and thickness before starting. Adjust your stitch count to ensure the cover stretches snugly without being too tight.
4. Can I wash my crochet steering wheel cover?
Absolutely. Hand wash it in cool or lukewarm water with mild detergent, then lay it flat to dry. Avoid machine washing to prevent stretching.
5. How long does it take to crochet a steering wheel cover?
Depending on your skill level, this project usually takes 3–5 hours from start to finish.
6. Can I make matching car accessories using the same pattern?
Yes! You can use the same yarn and stitch patterns to make matching seatbelt covers, tissue box covers, or gear shift cozies.
Conclusion
The Crochet Car Steering Wheel Cover – Step by Step Tutorial is a creative and practical way to enhance your car’s interior while showcasing your crochet skills. With just a few simple materials and some basic stitches, you can craft a stylish cover that’s comfortable, durable, and uniquely yours.
From selecting the right yarn to personalizing your design and maintaining it properly, every step contributes to a beautiful handmade result.
Now that you’ve learned how to create your own crochet car steering wheel cover, take the time to experiment with colors, textures, and patterns to make it truly one-of-a-kind. I hope this guide has inspired you to bring a touch of handmade charm to your everyday drives. Please share your honest opinion and suggestions below—I’d love to hear how your project turned out and what other crochet tutorials you’d like to see next!