
When it comes to handmade crafts, a crochet case – step by step tutorial is one of the most practical and creative projects you can follow. A crochet case is not only a fun way to practice your crochet skills but also a useful accessory for storing glasses, phones, pencils, hooks, or even small cosmetics. This project combines functionality with creativity, making it an ideal choice for beginners and experienced crocheters alike. By following this tutorial, you will learn how to create a personalized case that matches your own style while mastering essential crochet techniques.
The beauty of a crochet case is its versatility. Whether you want a simple protective cover or an elegant accessory with decorative details, the step-by-step instructions will help you shape the design according to your needs. You can experiment with different stitches, yarn colors, and sizes, allowing endless variations. This makes crochet cases a perfect handmade gift for friends and family, as they can be adapted to personal preferences while maintaining a cozy, handmade charm.
Another benefit of following a crochet case – step by step tutorial is that it helps you build a strong foundation in crochet basics. Beginners often feel intimidated by larger projects such as blankets or garments, but a case is small, quick, and manageable. Despite its size, it teaches important skills like counting stitches, working in rows or rounds, and adding closures like buttons or zippers. Once you learn how to make a crochet case, you’ll gain confidence to try more advanced projects in the future.
Materials and Preparation for Your Crochet Case
Before starting your crochet case – step by step tutorial, you need to prepare the right materials. The first thing you’ll need is yarn. Cotton yarn is an excellent choice because it is durable, easy to clean, and holds its shape well, making it perfect for protective cases. However, you can also experiment with acrylic or wool blends depending on the purpose of your case. Choosing a medium-weight yarn allows you to work comfortably and ensures your stitches are visible and neat.
Next, you will need a crochet hook that matches the yarn size. Most yarn labels provide recommended hook sizes, so following that suggestion is a safe choice. For beginners, a 4 mm or 5 mm hook works great as it balances control and stitch definition. A good hook ensures your work flows smoothly and prevents unnecessary strain on your hands.
Other tools to have on hand include scissors, a yarn needle for weaving in ends, and optional accessories like buttons or zippers if you plan to add a closure. You may also want to prepare a tape measure to check the dimensions of your project, especially if you are designing the case for a specific item like a phone or pair of glasses. Being prepared with the right tools makes the crochet process smoother and more enjoyable.
It is also important to create a swatch before starting your crochet case. A swatch is a small test square that helps you measure your gauge, which refers to the number of stitches per inch. Gauge ensures that your finished case will fit the object you intend to cover. Even small differences in tension can affect the size, so making a swatch prevents mistakes later on.
Finally, take a moment to decide on the style of your case. Do you want a plain, minimalist cover, or would you like to add decorative elements like stripes, flowers, or textured stitches? Planning your design beforehand helps guide your work and prevents frustration. With materials prepared and a clear idea in mind, you are ready to begin crocheting your case.
Step by Step Instructions for the Crochet Case
The crochet case – step by step tutorial begins with creating a foundation chain. The length of your chain should match the width of the item you want to cover, plus a few extra stitches to allow for seam space. Once you have your chain, you’ll work the first row using a basic stitch such as single crochet or half double crochet. These stitches are sturdy, making them ideal for a case that needs durability.
After the first row is complete, continue working in rows until the fabric reaches the length of your item. For example, if you are making a phone case, keep crocheting rows until the fabric can wrap around the phone comfortably. Remember to keep your tension even throughout, as inconsistent stitches may create uneven edges.
Once you have reached the desired length, fold the fabric in half so it resembles a pouch. Use slip stitches or a yarn needle to sew the sides together, leaving the top open. This creates the basic shape of your crochet case. If you want a tighter fit, you can add an extra row of single crochet around the opening to reinforce the edge.
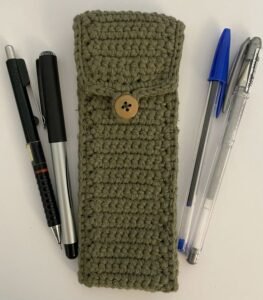
Adding a closure is optional but highly recommended, especially if you plan to carry the case in a bag. A simple way to add a closure is to crochet a small loop on one side and sew a button on the other. This keeps the contents secure while maintaining a handmade touch. For a more advanced option, you can sew in a zipper, which provides additional protection and a polished look.
At this stage, you can also add decorative details. Embellishments like crocheted flowers, appliqués, or stripes of different colors give your case a unique appearance. You can even use textured stitches like shell stitch or bobbles to add personality. The decoration possibilities are endless and allow you to make the case truly your own.
Finally, weave in all loose ends with a yarn needle. This step ensures your case looks neat and prevents the stitches from unraveling over time. Once finished, you will have a beautiful and functional crochet case that reflects both your creativity and your craftsmanship.
Tips for Customizing Your Crochet Case
One of the most rewarding parts of following a crochet case – step by step tutorial is the ability to customize your project. The size of the case is easily adjustable depending on what you want to store. For example, a small case can hold coins or lip balm, while a larger one can fit a tablet or notebook. All you need to do is adjust the length of the starting chain and the number of rows you work.
Choosing different yarn colors is another fun way to personalize your crochet case. Solid colors provide a clean and simple look, while variegated yarn adds a playful effect with minimal effort. You can also use stripes or color blocks to create a bold, eye-catching design. This flexibility makes crochet cases perfect for gift-giving since you can match the color to the recipient’s style.
Experimenting with stitches can also change the overall texture and appearance of the case. While single crochet creates a tight and sturdy fabric, double crochet makes it lighter and more flexible. Combining stitches like half double crochet with decorative patterns gives your case an elegant finish. The stitch you choose influences both the look and function of your project.
Adding linings is another way to enhance your crochet case. By sewing a fabric lining inside, you increase durability and prevent small items from poking through the stitches. Lined cases are particularly useful for storing sharp objects like crochet hooks or pens. Fabric linings also provide an opportunity to add a contrasting color or pattern inside the case.
Handles and straps are additional customization options. By crocheting a chain strap or attaching a small handle, you can transform your case into a mini purse or wristlet. This makes the crochet case even more versatile and functional. Small changes like these can turn a simple case into a stylish accessory.
Lastly, remember that practice improves your results. The first case you make might not be perfect, but every project helps you develop your skills. With time, you will discover your preferred yarns, stitches, and styles, making each crochet case unique and polished.
Caring for Your Crochet Case
After completing your crochet case – step by step tutorial, proper care will help maintain its beauty and functionality. Since most crochet cases are made with cotton or acrylic yarn, they are generally easy to wash. Handwashing in cold water with mild soap is the best way to preserve the shape and texture of your stitches. Avoid harsh detergents or bleach, as they can damage the fibers.
If your crochet case has a button, zipper, or lining, be mindful when washing. Handwashing is preferred to protect these elements, but if you use a washing machine, place the case inside a mesh laundry bag. This reduces friction and prevents stretching. After washing, gently reshape the case and lay it flat to dry. Hanging it may cause distortion.
Storing your crochet case properly also extends its life. Avoid leaving it in direct sunlight for long periods, as this may cause the yarn to fade. Keep it in a dry place to prevent moisture damage. If you are not using the case frequently, consider placing it inside a drawer or storage box.
Regular maintenance also helps keep your crochet case in good condition. Check for loose threads and weave them back in with a yarn needle to prevent unraveling. If the case develops pilling, gently remove the fuzz with a fabric shaver or scissors. Small repairs can keep your project looking new for years.
Another useful tip is to rotate the use of your crochet cases if you have made several. This prevents excessive wear on a single piece and gives you the chance to enjoy different designs. By treating your cases with care, you ensure that your hard work and creativity last a long time.
Taking good care of your crochet case not only protects the item but also honors the time and effort you invested in making it. With proper washing, storage, and occasional maintenance, your crochet case will remain a reliable and beautiful accessory.
FAQ about Crochet Case – Step by Step Tutorial
1. How long does it take to make a crochet case?
It depends on your skill level and the size of the case. Beginners may take a few hours, while experienced crocheters can finish in less than two hours.
2. What is the best yarn for a crochet case?
Cotton yarn is highly recommended because it is strong, washable, and holds its shape. Acrylic is also a good option for affordability and variety of colors.
3. Can I make a crochet case without a closure?
Yes, you can leave the case open. However, adding a closure like a button or zipper provides better security, especially for items carried in bags.
4. Do I need to line my crochet case?
Lining is optional but adds durability. It prevents sharp objects from poking through and makes the case sturdier.
5. Can beginners make a crochet case easily?
Absolutely. A crochet case is one of the best beginner projects because it uses basic stitches and simple construction.
6. How can I resize a crochet case?
You can change the size by adjusting the starting chain length and the number of rows. Measure the item you want to cover and adapt the pattern accordingly.
7. What closures work best for crochet cases?
Buttons are the simplest option, but zippers, drawstrings, or snaps can also be used depending on your preference.
8. Is it possible to decorate a crochet case?
Yes, you can add flowers, appliqués, stripes, or textured stitches to personalize the design and make it more stylish.
Conclusion
In this crochet case – step by step tutorial, we explored everything from preparing materials and following instructions to customizing and caring for your project.
Making a crochet case is not only practical but also enjoyable, allowing you to practice crochet skills while creating a functional item. With creativity, you can personalize the design to suit your needs or gift it to someone special.
Now that you have learned the process, I encourage you to try making your own crochet case. Share your results, leave your sincere opinion about this tutorial, and suggest ideas for future projects. Your feedback helps improve the craft journey for everyone in the crochet community.