
Crochet cheeseburger bucket hat tutorial is a fun, creative, and highly engaging way to explore the world of crochet while making something truly unique and eye-catching. From the very first stitch, this Crochet cheeseburger bucket hat tutorial invites you to combine playful design with practical skills, resulting in a wearable accessory that stands out in any crowd. Whether you are crafting for yourself, as a gift, or even to sell, this project blends humor, creativity, and craftsmanship in a delightful way.
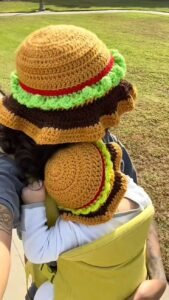
The beauty of a Crochet cheeseburger bucket hat tutorial lies in its originality and versatility. It transforms a classic bucket hat into a themed piece inspired by a cheeseburger, complete with layers that mimic buns, lettuce, cheese, and patties. This creative concept not only makes the process more enjoyable but also helps crocheters develop their skills through layering techniques, color changes, and shaping methods.
As you follow this Crochet cheeseburger bucket hat tutorial, you will discover how each step contributes to the final look and feel of the hat. From selecting the right yarn colors to assembling the layers, every detail matters. This project is also an excellent way to practice patience and precision, while still having fun experimenting with textures and designs that reflect your personality.
Getting Started with a Crochet Cheeseburger Bucket Hat Tutorial
Before beginning your Crochet cheeseburger bucket hat tutorial, gathering the right materials is essential. You will need yarn in colors that resemble a cheeseburger, such as beige for the bun, green for lettuce, yellow for cheese, and brown for the patty. Choosing soft and durable yarn ensures comfort and longevity.
Selecting the correct crochet hook size is another important step in the Crochet cheeseburger bucket hat tutorial. The hook size affects the tightness of your stitches, which directly impacts the structure of the hat. A well-matched hook and yarn combination will help you achieve a balanced and professional result.
Understanding basic stitches is crucial when starting a Crochet cheeseburger bucket hat tutorial. Techniques such as single crochet, double crochet, and slip stitch are commonly used. Mastering these stitches allows you to follow the pattern smoothly and confidently.
Taking accurate head measurements ensures that your hat fits properly. A good Crochet cheeseburger bucket hat tutorial will guide you in measuring circumference and depth, helping you customize the hat to your size or the size of the person you are making it for.
Planning your color transitions in advance can make the process easier. In a Crochet cheeseburger bucket hat tutorial, each layer represents a different ingredient, so organizing your yarn helps maintain consistency and flow throughout the project.
Finally, setting up a comfortable workspace can improve your experience. Having good lighting, organized tools, and a relaxed environment allows you to focus fully on your Crochet cheeseburger bucket hat tutorial without unnecessary distractions.
Step-by-Step Process for Crochet Cheeseburger Bucket Hat Tutorial
The first step in a Crochet cheeseburger bucket hat tutorial is creating the crown of the hat. This usually involves working in a circular pattern, gradually increasing stitches to form a flat top. Consistency in stitch placement is key to achieving a smooth surface.
Once the crown is complete, you will move on to building the sides of the hat. In a Crochet cheeseburger bucket hat tutorial, this stage involves working without increases, allowing the fabric to curve downward naturally and form the bucket shape.
Adding the brim is the next important step. The brim gives the hat its classic bucket style and can be adjusted in width depending on your preference. A well-structured Crochet cheeseburger bucket hat tutorial will guide you through increasing stitches again to create a balanced brim.
Creating the cheeseburger layers is where the fun truly begins. Each layer—bun, lettuce, cheese, and patty—is crafted separately or integrated into the design. This part of the Crochet cheeseburger bucket hat tutorial allows for creativity and personalization.
Attaching the layers securely is essential for durability. Following the instructions in your Crochet cheeseburger bucket hat tutorial ensures that each element stays in place while maintaining a neat appearance.
Finishing touches, such as weaving in ends and adjusting the shape, complete the process. These final steps in the Crochet cheeseburger bucket hat tutorial help refine your work and give your hat a polished, professional look.
Creative Customization Ideas for Crochet Cheeseburger Bucket Hat Tutorial
One of the best aspects of a Crochet cheeseburger bucket hat tutorial is the opportunity to customize your design. You can experiment with different shades of yarn to create a more realistic or stylized cheeseburger look.
Adding texture is another way to enhance your project. For example, using wavy stitches for the lettuce layer can bring more dimension to your Crochet cheeseburger bucket hat tutorial, making it visually appealing.
You can also incorporate additional “ingredients” such as tomatoes or sesame seeds. These small details make your Crochet cheeseburger bucket hat tutorial even more unique and fun to wear.
Adjusting the size of the hat allows you to create versions for different age groups. A flexible Crochet cheeseburger bucket hat tutorial can be adapted for children, teens, or adults with simple modifications.
Mixing different yarn types can create interesting effects. For example, using a slightly shiny yarn for the cheese layer can make it stand out in your Crochet cheeseburger bucket hat tutorial.
Finally, consider adding personal touches such as initials or decorative stitching. These elements make your Crochet cheeseburger bucket hat tutorial project truly one of a kind.
Common Mistakes in Crochet Cheeseburger Bucket Hat Tutorial and How to Avoid Them
One common mistake in a Crochet cheeseburger bucket hat tutorial is uneven tension. This can lead to a misshapen hat. Practicing consistent tension helps maintain a uniform structure throughout the project.
Another issue is incorrect sizing. Skipping measurements or ignoring gauge can result in a hat that doesn’t fit properly. Following the guidelines in your Crochet cheeseburger bucket hat tutorial ensures a better outcome.
Color transitions can sometimes appear messy if not handled carefully. Taking your time during this step in the Crochet cheeseburger bucket hat tutorial helps create clean and defined layers.
Forgetting to count stitches is another frequent problem. Keeping track of your stitches ensures that your Crochet cheeseburger bucket hat tutorial stays on pattern and maintains symmetry.
Using unsuitable yarn can affect the final look and feel. Choosing recommended materials for your Crochet cheeseburger bucket hat tutorial ensures comfort and durability.
Rushing through the finishing steps can reduce the overall quality. Taking the time to properly finish your Crochet cheeseburger bucket hat tutorial results in a more professional and satisfying final product.
FAQ About Crochet Cheeseburger Bucket Hat Tutorial
What skill level is required for a Crochet cheeseburger bucket hat tutorial?
This project is suitable for beginners with basic crochet knowledge, but it also offers creative opportunities for more advanced crocheters.
How long does it take to complete a Crochet cheeseburger bucket hat tutorial?
The time varies depending on your experience, but most people can complete it within a day or over a weekend.
Can I use different colors in a Crochet cheeseburger bucket hat tutorial?
Yes, customization is encouraged. You can experiment with colors to create your own unique version of the design.
Is the Crochet cheeseburger bucket hat tutorial suitable for all seasons?
Yes, by choosing different yarn types, you can adapt the hat for warmer or cooler weather.
Do I need special tools for a Crochet cheeseburger bucket hat tutorial?
Basic crochet tools such as hooks, yarn, scissors, and a yarn needle are sufficient for this project.
Can I sell items made from a Crochet cheeseburger bucket hat tutorial?
In most cases, yes, as long as the pattern allows it. Always check the guidelines associated with your specific tutorial.
Conclusion
The Crochet cheeseburger bucket hat tutorial is a creative and enjoyable project that combines skill-building with playful design. Throughout this article, you learned how to get started, follow a step-by-step process, customize your hat, and avoid common mistakes. Each stage of the Crochet cheeseburger bucket hat tutorial offers an opportunity to improve your crochet techniques while expressing your individuality.
By applying the tips and methods discussed, you can confidently create a unique accessory that reflects your style and creativity. The flexibility of the Crochet cheeseburger bucket hat tutorial ensures that it remains a fun and rewarding project for crocheters of all levels.
Now it’s your turn to try this exciting project. Share your honest opinion about this guide and leave your suggestions for improvement. Your feedback is important and helps make future tutorials even better for everyone.