
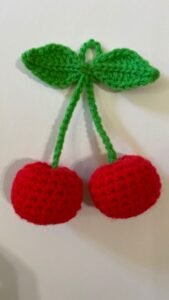
The crochet cherry – Step by Step Tutorial is an enjoyable and creative project for crochet enthusiasts of all skill levels. Whether you’re a beginner or an experienced crocheter, making a crochet cherry adds a cute and colorful embellishment to your handmade items. This tutorial will guide you through each step of crafting a charming cherry using simple stitches and techniques, perfect for personalizing bags, hats, or even creating playful keychains. By following this crochet cherry – Step by Step Tutorial, you can master the skill to create lovely cherry appliqués or standalone decorations that brighten any project.
Starting a project like the crochet cherry – Step by Step Tutorial allows you to practice essential crochet techniques such as working in rounds, increasing stitches, and sewing pieces together. These techniques form the foundation for many other crochet projects, making this tutorial a great way to build your crochet skills. Plus, the fun shape and bright colors of the cherry make this a rewarding craft to display or gift.
Additionally, the crochet cherry – Step by Step Tutorial is a versatile pattern. You can customize your cherry by using different yarn types, colors, or sizes, depending on your intended use. This flexibility means you can create cherries suitable for summer-themed projects, children’s accessories, or even festive decorations. Let’s dive into the details and get started on your own adorable crochet cherry.
Materials Needed for Crochet Cherry
Before you begin your crochet cherry – Step by Step Tutorial, it’s important to gather the right materials. For a bright and sturdy cherry, medium-weight yarn in red is ideal. Acrylic yarn is a popular choice because it offers vibrant colors and durability, but cotton yarn works well too if you prefer a firmer texture. For the stem and leaf, select a green yarn to complete the look.
You’ll need a crochet hook suitable for your yarn weight—usually, a 3.5mm to 4mm hook works best. Choosing the right hook size is essential to achieve proper tension and ensure your stitches are neither too tight nor too loose.
Other essential tools include a yarn needle for weaving in ends, scissors for cutting yarn, and a small amount of fiberfill or scrap yarn to stuff the cherry, giving it a plump and polished appearance.
Using stitch markers can be helpful, especially when working in rounds, to keep track of your stitch count. Having all your materials ready beforehand will make your crochet cherry – Step by Step Tutorial smooth and enjoyable.
Step-by-Step Crochet Cherry Instructions
Begin your crochet cherry – Step by Step Tutorial by creating the cherry’s body using the magic ring technique. The magic ring allows you to start crocheting in the round with a tight center, preventing holes in your cherry. Into this ring, crochet six single crochet stitches (sc) to form the base.
In the following rounds, gradually increase the number of stitches to create a rounded shape. For example, in round two, work two single crochets into each stitch around, doubling your stitch count. Continue increasing in a controlled manner for the next few rounds until your cherry reaches the desired size.
Once the size is right, crochet several rounds without increasing to build the height and fullness of the cherry. This part gives the cherry its plump, three-dimensional look.
Stuff your cherry firmly but gently with fiberfill or scrap yarn. Proper stuffing is key to maintaining the cherry’s shape without stretching or distorting your stitches.
For the stem, crochet a small chain of stitches with green yarn, then slip stitch back down the chain to give it thickness and stability. You can add a small crocheted leaf by creating a few chains and slip stitches to finish your cherry with a realistic touch.
Finally, sew the stem and leaf securely to the cherry body using a yarn needle, and weave in all loose ends for a neat finish.
Tips for Perfecting Your Crochet Cherry
To make your crochet cherry – Step by Step Tutorial truly stand out, focus on consistent stitch tension throughout the project. Even tension results in smooth, uniform stitches that make your cherry look professional and polished.
Using stitch markers is highly recommended, especially when increasing stitches in rounds. Marking the beginning of each round helps you count stitches accurately and avoid mistakes.
Choose high-quality yarn in vivid colors. Bright red for the cherry and a fresh green for the stem and leaf ensure your project looks lively and appealing.
When stuffing, avoid overpacking your cherry. Firm but not overly tight stuffing maintains stitch elasticity and prevents distortion.
Blocking your finished cherry lightly can help smooth out stitches and refine the shape, especially when using cotton yarn.
Adding small embellishments such as embroidered seeds or beads can give your crochet cherry a unique personality and add charm to your project.
Creative Ways to Use Crochet Cherries
Once you complete your crochet cherry – Step by Step Tutorial, the fun continues with creative uses for your handmade cherries. Attach them as appliqués on hats, scarves, or bags to add a cute, colorful detail.
Crochet cherries are perfect for decorating children’s clothes, toys, or nursery items, adding a playful and sweet element to everyday items.
Make a set of cherries and string them together to create a cheerful garland for home decor or party decorations.
Use your cherries as keychain charms or zipper pulls. Their small size and bright color make them ideal for accessories that stand out.
You can also create cherry earrings or brooches by attaching jewelry findings to your crocheted pieces for a unique handmade gift.
With a bit of imagination, your crochet cherries can brighten up almost any item and bring a touch of handcrafted charm to your world.
FAQ
Q: Is the crochet cherry pattern suitable for beginners?
A: Yes, the crochet cherry – Step by Step Tutorial uses basic crochet stitches like single crochet and working in rounds, making it accessible for beginners.
Q: What yarn is best for crocheting cherries?
A: Medium-weight acrylic or cotton yarn works best. Choose bright red for the cherry and green for the stem for classic colors.
Q: Can I make different sizes of cherries?
A: Absolutely! By adjusting the number of rounds and increases, you can create smaller or larger cherries to suit your project.
Q: How should I stuff my crochet cherry?
A: Use polyester fiberfill or scrap yarn. Stuff firmly but carefully to avoid overstretching your stitches.
Q: Can I add leaves or other details to my cherry?
A: Yes, small crocheted leaves or embroidered details add charm and personalize your cherry.
Q: How do I care for my crochet cherry?
A: Hand wash gently in cold water and air dry to keep its shape and colors vibrant.
Conclusion
This crochet cherry – Step by Step Tutorial has shown you how to create a delightful and vibrant cherry using simple crochet techniques.
You learned about the materials needed, the step-by-step construction of the cherry body, stem, and leaf, as well as tips for perfecting your work and creative ways to use your finished cherries. Crocheting cherries is not only a fun project but also a wonderful way to add personality to your handmade items.
We would love to hear your honest opinions and suggestions about this tutorial. Your feedback helps us improve and inspire others in the crochet community. Happy crocheting!