
If you’re looking for a beautiful and meaningful handmade decoration for the holidays, this Crochet Christmas Angel Ornaments – Step by Step Tutorial will inspire you to create something truly magical. Crocheted angel ornaments have long been a symbol of peace, love, and protection during Christmas. Making them yourself adds a personal touch to your decorations or makes a heartfelt gift for friends and family. Whether you’re a beginner or an experienced crocheter, this tutorial will walk you through each stage carefully and clearly.
Crochet angel ornaments are not only elegant but also versatile. You can hang them on your Christmas tree, use them to decorate gifts, or even place them on your holiday table as charming centerpieces. This Crochet Christmas Angel Ornaments – Step by Step Tutorial will show you how to use basic stitches to craft delicate wings, flowing gowns, and radiant halos that embody the spirit of Christmas. By following these steps, you’ll discover how easy it is to bring festive warmth to your home using just yarn, a hook, and a little creativity.
In this detailed Crochet Christmas Angel Ornaments – Step by Step Tutorial, you’ll learn all the essential techniques to create your own collection of angels. You’ll also find helpful tips on choosing yarn, hooks, and finishing touches to make your angels unique. Each part of this guide is designed to ensure that even if it’s your first time crocheting a holiday ornament, you’ll end up with a beautiful decoration you’ll cherish for years.
Materials Needed for Crochet Christmas Angel Ornaments
Before beginning your Crochet Christmas Angel Ornaments – Step by Step Tutorial, gather all the materials you’ll need. Preparation ensures your crafting experience goes smoothly and helps you achieve the best results. Start with choosing the right yarn. Cotton yarn is ideal for ornaments because it provides a clean, crisp stitch and holds its shape beautifully. White or cream colors are traditional, but you can experiment with gold, silver, or pastel shades for a unique look.
Next, select an appropriate crochet hook. A small-sized hook, such as 2.5 mm or 3 mm, works best with thin cotton yarn to create tight, detailed stitches. You’ll also need a tapestry needle for weaving in ends and some fine metallic thread if you wish to add a shimmering halo or border to your angel. Small embellishments like pearls or tiny ribbons can enhance the final look.
Other essential tools include scissors, a stitch marker, and stiffening spray or a homemade starch mixture to give your finished angel structure. Stiffening helps the ornament maintain its form when hanging or standing.
Choosing the right pattern size is also important. For beginners, start with a small angel, around 4–5 inches tall. Once you’re confident, you can create larger ones to use as tree toppers or wall decorations.
Before you start crocheting, read through all the steps of this Crochet Christmas Angel Ornaments – Step by Step Tutorial so you understand the sequence of stitches and assembly. Taking time to plan ahead helps prevent mistakes and saves time later.
Finally, create a cozy workspace with good lighting and your materials close at hand. Crocheting angels is a relaxing, creative activity, perfect for a winter evening with festive music playing in the background.
Step by Step Instructions to Crochet the Angel Ornament
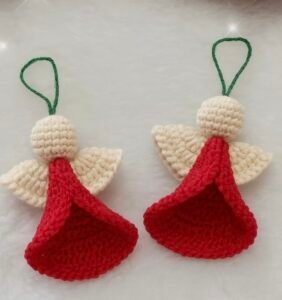
Let’s begin the exciting part of this Crochet Christmas Angel Ornaments – Step by Step Tutorial—making your angel! Start with the body. Begin by creating a magic ring and working several double crochets into it. Gradually increase the rounds to form a cone shape, which will serve as the angel’s gown. The shape should be slightly flared at the bottom to give the impression of flowing fabric.
Once the body is done, move on to the head. Using a smaller circle of single crochet stitches, form a round ball to represent the angel’s head. You can attach it to the body by slip stitching or sewing it securely. For a more refined look, use a flesh-toned or light-colored yarn.
Next comes the wings—perhaps the most important and symbolic part. Crochet two identical wing pieces using chain and treble crochet stitches to create an airy, delicate pattern. Attach the wings to the back of the angel’s body, ensuring they are symmetrical and evenly placed.
To make the halo, use metallic or glitter yarn. Crochet a small circle and attach it gently above the head using transparent thread or yarn. The halo adds a radiant touch and enhances the angelic appearance.
Once all parts are connected, use a tapestry needle to weave in any loose ends neatly. If you’d like your angel to stand upright, you can apply fabric stiffener or a starch solution. Allow it to dry completely before displaying.
Repeat this process to make several angels in different sizes or colors. Following this Crochet Christmas Angel Ornaments – Step by Step Tutorial ensures that each angel turns out beautifully detailed and perfectly festive.
Creative Decoration Ideas Using Crochet Angels
One of the best things about completing this Crochet Christmas Angel Ornaments – Step by Step Tutorial is how versatile your finished pieces are. You can use these charming ornaments in many creative ways to elevate your holiday décor.
First, hang them on your Christmas tree. The delicate wings and glowing halos reflect the lights beautifully, creating a magical effect. Add a small ribbon loop to the top for easy hanging.
Second, crochet multiple angels and attach them to a string or garland. This makes a stunning wall decoration or window hanging. It’s a simple way to fill your home with festive cheer.
You can also use smaller crochet angels as thoughtful gift toppers. Attach them to wrapped presents to give a handmade touch that friends and family will love.
Another great idea is to use these ornaments as table decorations. Place one at each setting with a name tag attached for a personalized and elegant Christmas dinner display.
If you enjoy giving handmade gifts, a set of crochet angels presented in a decorative box makes a meaningful and cherished present. It shows care and creativity, perfect for the holiday season.
Lastly, consider using your crochet angels as part of a nativity scene or as small hanging mobiles for children’s rooms. The possibilities are endless when you craft with love and imagination.
Tips and Tricks for Perfect Crochet Angels
While working through this Crochet Christmas Angel Ornaments – Step by Step Tutorial, a few helpful tricks can make your project smoother and more enjoyable. First, always maintain consistent tension in your yarn. Uneven tension can make your stitches look loose or lumpy, affecting the shape of your angel.
Blocking your work after finishing each section helps achieve a professional look. Pin your crochet pieces on a flat surface, spray lightly with water, and let them dry to hold their shape.
Using fine metallic thread can add an elegant shimmer without overwhelming the design. Try combining it with your main yarn while crocheting to create subtle sparkle throughout the piece.
Experiment with color combinations. While white and gold are traditional, pastel blue, pink, or silver angels bring a modern and fresh look to your holiday décor.
If you’re making several angels, create them assembly-line style: complete all bodies first, then all heads, and finally wings and halos. This method saves time and ensures uniform results.
Finally, store your finished crochet angels in a cool, dry place wrapped in tissue paper to protect them from dust and moisture. With care, your handmade ornaments will last for many Christmases to come.
FAQ about Crochet Christmas Angel Ornaments
Q1: What type of yarn works best for crochet angel ornaments?
Cotton yarn is recommended because it holds shape well and gives a clean, detailed finish. You can also use fine metallic thread for decorative accents.
Q2: Can beginners follow this Crochet Christmas Angel Ornaments – Step by Step Tutorial?
Absolutely! This tutorial is designed for all skill levels, including beginners. The instructions are simple and detailed, guiding you through each step.
Q3: How do I stiffen my crochet angel so it stands upright?
You can use commercial fabric stiffener or make your own using a mixture of cornstarch and water. Apply evenly and let the angel dry completely.
Q4: How long does it take to make one crochet angel ornament?
Depending on your experience level, one angel can take between 1–3 hours to complete, including assembly and stiffening.
Q5: Can I add beads or sequins to my crochet angels?
Yes! Adding small beads or sequins enhances the sparkle and makes your ornaments look even more festive. Just ensure they’re securely attached.
Q6: Are crochet angels washable?
They can be gently hand-washed if necessary, but avoid soaking or twisting to maintain their shape. Air drying is best.
Conclusion
In this Crochet Christmas Angel Ornaments – Step by Step Tutorial, you’ve learned how to create beautiful handmade decorations that bring warmth, peace, and elegance to your festive season. From choosing the right yarn to assembling the final details, every step contributes to making a cherished ornament full of meaning and charm.
Crochet angels are timeless symbols of love and joy, perfect for adorning your Christmas tree, gifting loved ones, or enhancing your home décor. Now that you’ve mastered the process, try experimenting with colors, textures, and embellishments to make each angel truly unique.
We hope this tutorial has inspired you to pick up your hook and yarn and start creating your own heavenly decorations. If you enjoyed this guide, please leave your honest opinion and share your suggestions—we’d love to hear how your crochet angels turned out!