
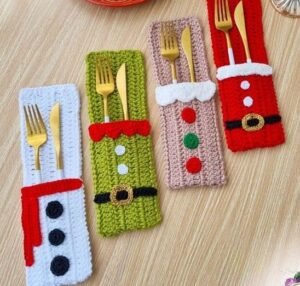
The Crochet Christmas Cutlery Holder-Step by Step Tutorial is the perfect guide for anyone looking to add handmade charm to their holiday table décor. Crochet cutlery holders are small details that make a big difference, transforming regular table settings into something warm, festive, and personal. By learning how to create a crochet Christmas cutlery holder, you not only enhance the beauty of your table but also bring a touch of handcrafted joy to your celebrations. This tutorial is suitable for beginners and experienced crocheters alike, and it offers endless possibilities for creativity.
Creating a crochet Christmas cutlery holder is a fantastic way to use leftover yarn from other holiday projects. These holders can be made in traditional Christmas colors such as red, green, white, or gold, or in any color scheme that matches your holiday theme. This Crochet Christmas Cutlery Holder-Step by Step Tutorial focuses on simple techniques that create a durable and visually appealing item. Whether you’re preparing your table for a family dinner, a holiday party, or a cozy celebration, these little crochet details will certainly impress your guests and elevate the festive atmosphere.
One of the best things about this Crochet Christmas Cutlery Holder-Step by Step Tutorial is that it allows for customization. You can choose the size, shape, and decorative elements, such as bows, stars, holly leaves, or miniature candy canes made of yarn. These holders are reusable, eco-friendly, and washable, making them a sustainable option for holiday decorating. As you read through this guide, you’ll discover how easy and enjoyable it is to create beautiful cutlery holders that reflect the spirit of Christmas and your own unique style.
Materials Needed for the Christmas Cutlery Holder
To begin this Crochet Christmas Cutlery Holder-Step by Step Tutorial, it’s important to gather all the necessary materials. Most projects require only a small amount of yarn, making them perfect for using scraps or leftover yarn from other Christmas crafts. Cotton yarn works wonderfully because it creates a sturdy fabric, but acrylic yarn can also be used, especially if you want bright and vibrant colors.
Next, choose a crochet hook that matches the weight of your yarn. For most cutlery holder projects, a hook between 3.5 mm and 4.5 mm works well. Using a slightly smaller hook helps the stitches stay tight, ensuring that your finished cutlery holder keeps its shape and securely holds the utensils. This guide will explain how to use simple stitches so that even beginners can follow along.
You will also need scissors to cut the yarn once your project is complete. A yarn needle is essential for weaving in the ends and attaching any decorative details like bows, stars, or Christmas appliqués. These finishing touches can really bring your crochet Christmas cutlery holder to life and add personality to each piece.
If you want to add embellishments, gather small accessories such as tiny wooden buttons, miniature bells, or felt stars. These optional items help enhance the Christmas theme and make your cutlery holders more festive. Just be sure to attach them securely so they stay in place during use and storage.
Another optional but helpful tool is a stitch marker. If you are new to crocheting in rounds or rows, markers can keep your work even and prevent mistakes. Following this Crochet Christmas Cutlery Holder-Step by Step Tutorial will be much smoother if you track your stitches carefully.
Once your materials are organized, you’ll be ready to move forward confidently and begin building the foundation of your Christmas cutlery holder.
Crocheting the Base Structure
The first step in the Crochet Christmas Cutlery Holder-Step by Step Tutorial is to create the base structure that will form the pocket for the utensils. Typically, this begins with a simple foundation chain that determines the width of your holder. The number of chains you use depends on the size you want, but most cutlery holders are about the width of your hand.
After completing your foundation chain, work the first row using basic stitches like single crochet or half double crochet. These stitches create a dense fabric that holds the utensils securely. The key to achieving a neat and sturdy cutlery holder is maintaining consistent tension throughout your stitches.
Continue crocheting row after row until you reach the desired height. The shape should resemble a small rectangle or square, depending on your design preference. This Crochet Christmas Cutlery Holder-Step by Step Tutorial encourages you to adjust the measurements based on the size of your cutlery and your preferred style. Some people like small minimalistic holders, while others prefer larger and more decorative versions.
Once you finish the rectangle, fold the bottom portion upward to create the pocket. Then, use slip stitches or single crochet to join the sides together. This forms the pouch where the spoon, fork, and knife will be placed. If you prefer a softer look, you can stitch the edges with a looser technique, while tighter stitching creates a sharper, more structured finish.
At this stage, your cutlery holder will already have its basic shape. However, you can enhance the design by adding rows of different colors or special stitch patterns like shells, clusters, or v-stitches. These details make the piece more interesting and festive. The crochet Christmas cutlery holder can be as simple or as elaborate as you want.
With the main body formed, the next step in this Crochet Christmas Cutlery Holder-Step by Step Tutorial is adding Christmas-themed decorations that reflect the joyful spirit of the season.
Adding Festive Decorations
This is where the Crochet Christmas Cutlery Holder-Step by Step Tutorial gets truly fun. Christmas decorations add character, charm, and holiday spirit to your handmade cutlery holders. One of the easiest decorations to add is a simple crocheted bow. You can make a bow using basic stitches and attach it to the front of the holder with a yarn needle.
Another popular decoration is a mini crochet Christmas tree or star attached to the top corner. These small appliqués are quick to make and instantly transform your holder into a festive accessory. Choose bright colors like gold, silver, or classic red and green to highlight the Christmas theme. When sewing appliqués, make sure they are firmly attached so they don’t come off during use.
If you prefer a more minimalistic design, you can add decorative borders instead of appliqués. A scalloped edge or picot border gives your crochet Christmas cutlery holder a refined finish. These borders are easy to make and add a delicate touch that complements holiday table décor beautifully.
You can also incorporate stripes or color blocks by switching yarn colors while crocheting the base structure. Red and white stripes resemble candy canes, while green and gold stripes create a more elegant Christmas look. This Crochet Christmas Cutlery Holder-Step by Step Tutorial encourages creativity, so feel free to experiment with different color combinations.
If you want something truly unique, consider adding small jingle bells or wooden Christmas buttons. These elements add texture and charm, though you should attach them securely to ensure safety and durability. Bells can create a subtle festive sound whenever someone picks up the holder, adding a playful touch to your table.
Once your decorations are attached, your cutlery holder will begin to resemble a beautifully crafted holiday accessory. Now it’s time to learn how to assemble and use your finished creation.
Final Assembly and Practical Use
In this final crafting stage of the Crochet Christmas Cutlery Holder-Step by Step Tutorial, you will bring your entire project together. Begin by double-checking that all loose ends are woven in securely. This prevents unraveling and helps the holder maintain its shape during use and storage.
Once the edges, decorations, and pocket are complete, test the holder by inserting your cutlery. Make sure the utensils fit comfortably without stretching the fabric too tightly. If you want a looser fit, you can add a row or two to increase the height or width. If the holder feels too spacious, you can tighten the sides by adding extra stitches.
These cutlery holders can be used not only for forks, knives, and spoons but also for chopsticks, dessert utensils, or even festive treats like candy canes. Their versatility makes them a functional addition to your holiday table. During Christmas dinners, they help organize the place setting and make the table look coordinated and elegant.
You can create multiple cutlery holders to match the number of guests you are expecting. Making them in sets also adds a professional touch to the overall presentation. This Crochet Christmas Cutlery Holder-Step by Step Tutorial is ideal for creating sets quickly, as each holder takes relatively little time to complete.
When the holidays are over, store your crochet cutlery holders in a dry, clean place. Cotton and acrylic yarns are easy to maintain and can be washed by hand if needed. Just allow them to air dry to maintain their original shape. Proper storage ensures they stay beautiful for many Christmas seasons to come.
With your holders completed and ready for use, let’s move on to the frequently asked questions about this Crochet Christmas Cutlery Holder-Step by Step Tutorial.
Frequently Asked Questions
1. Is the crochet Christmas cutlery holder suitable for beginners?
Yes. The project uses basic stitches and a simple construction method, making it ideal for beginners.
2. What type of yarn should I use for this project?
Cotton yarn is highly recommended due to its durability and clean look, but acrylic yarn works as well.
3. How long does it take to make a single cutlery holder?
Most people can complete one in 20 to 40 minutes, depending on experience.
4. Can I wash the cutlery holders?
Yes. Handwashing with mild soap is recommended. Let them air dry to avoid stretching.
5. Can I add personalized decorations?
Absolutely. You can add bows, appliqués, borders, or holiday-themed buttons for customization.
6. How many holders should I make for a standard dinner table?
Typically one per guest, but it depends on your table setting and design style.
Conclusion
This Crochet Christmas Cutlery Holder-Step by Step Tutorial has guided you through the entire process of making a festive, functional, and charming addition to your holiday table décor.
You learned how to choose materials, crochet the base structure, add decorative details, and assemble the final piece with confidence.
These handmade holders bring warmth and creativity to Christmas celebrations and are a beautiful way to personalize your table. I hope this tutorial has inspired you to explore new ideas and enjoy the process of crocheting for the holidays. Please leave your sincere opinion and share suggestions so I can continue improving future tutorials!