
Starting this Crochet Christmas Gift Card Holder-Step by Step Tutorial is a wonderful way to dive into the holiday spirit while creating something handmade, meaningful, and incredibly useful. Whether you enjoy making small festive crafts or want an easy project to gift to family and friends, this guide will walk you through every step in a clear and enjoyable way. The idea of crafting your own gift card holder adds a special touch to holiday gifting and transforms a simple card into a heartfelt present. By following this tutorial, you will learn how to combine creativity and practicality into one charming Christmas keepsake.
The Crochet Christmas Gift Card Holder-Step by Step Tutorial is perfect for beginners and experienced crocheters who want a quick yet beautiful project. These small holders can be made in different colors, decorated with appliqués, and personalized to match any holiday theme. They are also great stash-buster projects, allowing you to use leftover yarn to create mini handmade treasures. As you work through the pattern, you will see how simple stitches come together to form a perfectly sized pocket for gift cards, money, small treats, or notes. This guide emphasizes easy-to-follow instructions to ensure your crafting experience is smooth and enjoyable.
By following this Crochet Christmas Gift Card Holder-Step by Step Tutorial, you will also discover how this project can become part of your holiday traditions. Handmade items always carry a unique emotional value, and crocheting these thoughtful holders can create wonderful family moments. They can be used for Secret Santa exchanges, personalized stocking stuffers, or as part of the decoration on your Christmas tree. With this detailed tutorial, you’ll be able to make as many as you like, customizing each one with colors, buttons, or small appliqués to match your festive style.
Materials and Preparation
When starting this Crochet Christmas Gift Card Holder-Step by Step Tutorial, gathering your materials is the first essential step. You will typically need medium-weight yarn in festive colors, such as red, white, green, or gold. A 4.0 mm or 4.5 mm hook is commonly used, but you can adjust this depending on your yarn. It’s also important to have scissors, a yarn needle, and optional decorations like buttons or ribbons to finish your holder beautifully. Preparing everything ahead of time will help you enjoy a smooth and organized crafting process.
The yarn you choose will significantly influence the final appearance of your project. Acrylic yarn is a popular choice since it is easy to work with and holds its shape well. Cotton yarn is also an excellent option if you prefer a sturdier and more durable finish. For beginners following this Crochet Christmas Gift Card Holder-Step by Step Tutorial, a yarn that does not split easily will be easier to work with.
Once your materials are ready, take a few minutes to test your tension. This will help ensure that your stitches remain even and that the card holder comes out the right size. If your stitches are too tight, the pocket may end up too small. If they’re too loose, the holder may not hold its shape properly. Keeping your tension consistent is an essential part of this Crochet Christmas Gift Card Holder-Step by Step Tutorial.
Before moving to the next step, choose the color combination you want for your holder. Traditional holiday colors are always popular, but you can also choose pastel tones, metallic threads, or a combination of solid and variegated yarn. Customizing your color palette adds personality and helps your creation stand out. With this Crochet Christmas Gift Card Holder-Step by Step Tutorial, your creativity has no limits.
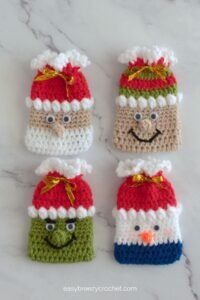
You should also consider any decorative elements you plan to add after finishing your crocheted piece. Buttons shaped like stars, snowflakes, gingerbread men, or classic wooden buttons can enhance the overall charm. A small bow or a crocheted appliqué adds a final festive touch. These optional details help personalize your project while keeping it aligned with the holiday theme of this Crochet Christmas Gift Card Holder-Step by Step Tutorial.
Finally, take a moment to organize your crafting area. Keep your yarn easily accessible and ensure good lighting so you can see your stitches clearly. A comfortable and tidy workspace contributes to a better crafting experience and helps you follow the Crochet Christmas Gift Card Holder-Step by Step Tutorial more efficiently.
Step-by-Step Instructions for the Card Holder Base
To begin the actual stitching process of this Crochet Christmas Gift Card Holder-Step by Step Tutorial, start by making a slipknot and chaining the initial foundation chain. The length of this chain will determine the width of the card holder, so be sure it measures slightly wider than a standard gift card. Once you reach the desired length, begin working single crochet stitches across the chain to form the first row.
After completing the first row, continue working in single crochet to build the height of the rectangle. This piece forms the main body of the card holder. It should be long enough to fold over and create a pocket. Throughout the Crochet Christmas Gift Card Holder-Step by Step Tutorial, maintaining a uniform stitch height ensures that the edges stay straight and neat.
As you continue adding rows, periodically place a gift card over the piece to check the sizing. This helps prevent the pocket from being too tight or too loose. A perfectly fitted card holder is one of the main goals of this Crochet Christmas Gift Card Holder-Step by Step Tutorial, so adjusting as you go is important.
Once your rectangle reaches the correct length, it’s time to fold the bottom portion upward to create the pocket. Use stitch markers to hold the sides in place. Then, using a slip stitch or whip stitch, join the edges together. This will securely form the pocket that will hold your gift card. This step is essential to achieve a clean and professional finish in your Crochet Christmas Gift Card Holder-Step by Step Tutorial.
After the sides are joined, fasten off and weave in all loose yarn ends. This helps tidy the project and prepares it for any additional decorative elements. An important tip emphasized in this Crochet Christmas Gift Card Holder-Step by Step Tutorial is to take your time weaving in ends so that they are not visible on the outside.
Now your base is complete, and you have created the fundamental structure of the card holder. From here, you can move on to adding embellishments, buttons, and decorative accents. The versatility of this project allows you to personalize each holder as you wish, making the Crochet Christmas Gift Card Holder-Step by Step Tutorial fun and creative.
Adding Decorative Elements
Adding decorations is one of the most enjoyable parts of this Crochet Christmas Gift Card Holder-Step by Step Tutorial. A simple button closure adds functionality and charm to your holder. Choose a festive button and sew it securely on the flap, making sure it aligns perfectly with the button loop. This small detail enhances the practicality and aesthetics of your creation.
You can also crochet small appliqués such as stars, hearts, Christmas trees, or snowflakes. These embellishments give your project a unique handmade touch. Adding appliqués is a great opportunity to express creativity while still following the techniques presented in the Crochet Christmas Gift Card Holder-Step by Step Tutorial.
Embroidery is another excellent way to decorate your card holder. Using contrasting yarn colors, you can stitch patterns or initials on the surface. This transforms each holder into a personalized gift. Embroidery adds texture and depth while keeping your work aligned with the festive theme of this Crochet Christmas Gift Card Holder-Step by Step Tutorial.
If you prefer a minimalist style, you can focus on textural elements instead of colorful decorations. Creating a border in crab stitch or reverse single crochet gives the edges a polished look. This small detail elevates the overall appearance without adding complex elements, keeping the Crochet Christmas Gift Card Holder-Step by Step Tutorial easy and accessible.
For a playful touch, consider making a small tassel or pom-pom to attach to the flap. These simple decorations add movement and charm, making your holder even more festive. The possibilities are endless, allowing you to combine different techniques while following this Crochet Christmas Gift Card Holder-Step by Step Tutorial.
Lastly, remember that decoration is entirely optional. If you want a clean and simple design, the basic holder alone can be beautiful. The goal of this step is to give you options so you can enjoy your crafting experience and personalize your project in a way that reflects your style. The Crochet Christmas Gift Card Holder-Step by Step Tutorial is meant to inspire creativity and joy during the holiday season.
Tips for Perfect Finishing
Perfect finishing is what truly elevates your handmade project, and this Crochet Christmas Gift Card Holder-Step by Step Tutorial emphasizes the importance of taking your time with the final touches. Begin by ensuring that all ends are neatly woven in. Even one loose thread can affect the appearance, so thoroughness is essential.
Another helpful tip is to lightly block the card holder. Although blocking is optional, it helps smooth out uneven edges, ensuring your project looks polished. Simply dampen the piece slightly and pin it into shape on a flat surface. This technique enhances the presentation of the final result in your Crochet Christmas Gift Card Holder-Step by Step Tutorial.
If you have added appliqués, buttons, or embroidery, double-check that each piece is secure. Weakly attached decorations can fall off over time, especially if the holder is handled frequently. Proper attachment preserves durability and keeps your Crochet Christmas Gift Card Holder-Step by Step Tutorial project looking new for longer.
Another key finishing tip is to test the functionality. Insert a gift card to ensure the pocket fits perfectly and the closure works smoothly. A functional and beautiful project is the main goal of this Crochet Christmas Gift Card Holder-Step by Step Tutorial, so making these small adjustments is essential.
Take a moment to evaluate the overall look. If you feel the edges need reinforcement, you can add a final border stitch to enhance durability. Borders also create contrast and add structure, improving the aesthetic of your handmade holder while staying aligned with the Crochet Christmas Gift Card Holder-Step by Step Tutorial.
Finally, store your finished holders in a clean, dry place until you are ready to use or gift them. Crocheted items last longer when properly cared for, ensuring your holiday creations can be reused or treasured for years. This final step completes your journey through the Crochet Christmas Gift Card Holder-Step by Step Tutorial and leaves you with a beautiful and practical holiday craft.
FAQ
1. Can beginners follow this Crochet Christmas Gift Card Holder-Step by Step Tutorial?
Yes! The tutorial is beginner-friendly and uses basic stitches that are easy to learn and repeat.
2. How long does it take to complete one gift card holder?
Most crafters can finish one in less than an hour, depending on skill level and decoration choices.
3. What yarn is best for this project?
Medium-weight acrylic or cotton yarn works very well, offering good structure and durability.
4. Can I make different sizes?
Absolutely. Simply adjust the foundation chain length and the number of rows to customize the size.
5. What decorations can I add?
You can add buttons, bows, tassels, appliqués, embroidery, or leave it plain for a minimalist look.
6. Are these holders reusable?
Yes! They are durable and make wonderful items to reuse year after year.
7. Can I use leftover yarn for this project?
Definitely. It’s a perfect stash-busting project.
8. Can children use these gift card holders?
Yes, but small decorations like buttons should be used with caution.
9. Can I sell the finished holders?
Yes, handmade items like this are popular at craft fairs and holiday markets.
10. Do I need to block the holder?
No, blocking is optional but can help improve the final appearance.
Conclusion
This Crochet Christmas Gift Card Holder-Step by Step Tutorial gives you everything you need to create a beautiful, thoughtful, and practical holiday craft.
From the base construction to the final decorative touches, each step helps you transform simple yarn into a festive keepsake that elevates your gift-giving experience.
Whether you’re making them for family, friends, or seasonal markets, these holders add a unique handmade charm to any Christmas celebration. I hope this tutorial inspires your creativity and holiday spirit. Please leave your honest opinion and suggestions so I can keep improving and creating tutorials you’ll love!