
If you have been looking for a Crochet Cover for Stones and Crystals- Step by Step Tutorial, you are in the right place. This project combines the beauty of natural stones and crystals with the creativity of crochet, resulting in decorative pieces that are both stunning and meaningful. Making a Crochet Cover for Stones and Crystals- Step by Step Tutorial is perfect for those who enjoy DIY crafts and want to add a personal touch to their home décor or spiritual tools.
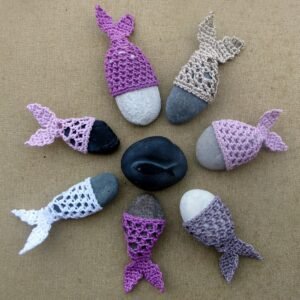
The popularity of crystals and healing stones has grown in recent years, and many people like to display them in beautiful and unique ways. A Crochet Cover for Stones and Crystals- Step by Step Tutorial allows you to transform simple stones into eye-catching decorative pieces while also protecting them from scratches and damage. The crochet cover adds a delicate, handmade charm that enhances the natural beauty of the crystals.
What makes this Crochet Cover for Stones and Crystals- Step by Step Tutorial even more special is how beginner-friendly it is. You don’t need advanced crochet skills to create these lovely covers. With basic stitches and simple patterns, you can make a variety of designs to fit stones and crystals of different shapes and sizes. Whether you want to create a display piece or a meaningful gift, this tutorial will guide you through every step with clear instructions.
Materials and Preparation for the Crochet Cover
Before starting the Crochet Cover for Stones and Crystals- Step by Step Tutorial, gather all the materials you will need. The main item is, of course, your chosen stones or crystals. Smooth, rounded stones work best for beginners because they are easier to cover evenly. Popular crystals for this project include amethyst, rose quartz, and clear quartz, but you can use any stone that speaks to you.
Next, you will need crochet thread or yarn. For small stones, thin crochet cotton works perfectly, while larger stones may require slightly thicker yarn for better coverage. The Crochet Cover for Stones and Crystals- Step by Step Tutorial often recommends natural fibers like cotton because they provide a delicate and neat look.
You will also need a crochet hook suitable for the thickness of your chosen thread. A smaller hook size is ideal because it creates tighter stitches, ensuring the crochet cover hugs the stone snugly. Following the Crochet Cover for Stones and Crystals- Step by Step Tutorial, you will learn to adjust the size of the cover by changing your hook or thread if needed.
Other basic supplies include scissors for cutting yarn and a tapestry needle for weaving in loose ends. These tools are essential for completing the Crochet Cover for Stones and Crystals- Step by Step Tutorial neatly and professionally.
Before starting, make sure your stones or crystals are clean and dry. You want the finished cover to look beautiful and fresh, so take a few moments to prepare everything properly before beginning the crochet process.
Once all your materials are ready, you can move on to learning the actual crochet techniques needed for this project.
Starting the Crochet Pattern
The Crochet Cover for Stones and Crystals- Step by Step Tutorial begins with a simple crochet circle. Start by making a small loop with your yarn, known as a magic ring. This technique allows you to close the center tightly, creating a neat base for the cover.
After forming the magic ring, work single or double crochet stitches into the loop to form the first round. The number of stitches you make depends on the size of your stone. The Crochet Cover for Stones and Crystals- Step by Step Tutorial recommends starting with six to eight stitches for small stones and increasing if needed.
Once the initial round is complete, you will begin to increase the stitches evenly in each round. This step helps the crochet piece grow in size while staying flat. The goal is to create a circle that will eventually wrap around one side of the stone. The Crochet Cover for Stones and Crystals- Step by Step Tutorial explains how to measure your work against the stone to ensure a proper fit.
As you continue crocheting, you can experiment with different stitch patterns to create unique textures and designs. Some people prefer simple single crochet stitches for a minimalist look, while others like to add decorative elements such as picots or shells for a more intricate style.
Once the crochet circle reaches the desired size, you will stop increasing stitches. The Crochet Cover for Stones and Crystals- Step by Step Tutorial will then guide you on how to work even stitches without increases, allowing the cover to start curving upward around the stone.
At this point, your crochet piece will begin taking shape, forming a little pocket where the stone will fit perfectly.
Shaping and Securing the Stone
With the basic crochet piece ready, the Crochet Cover for Stones and Crystals- Step by Step Tutorial moves on to shaping the cover around the stone. Place the stone inside the crochet pocket and continue working rounds around it. The stitches will gradually close over the top, securing the stone inside.
You can add decorative touches during this stage, such as creating mesh-like patterns with chain stitches. The Crochet Cover for Stones and Crystals- Step by Step Tutorial shows how to alternate between single crochet stitches and chains to create open, lacy designs that look elegant while still holding the stone securely.
As you approach the top of the stone, begin decreasing stitches to close the opening. This step ensures the stone stays firmly inside the cover. The Crochet Cover for Stones and Crystals- Step by Step Tutorial suggests leaving a small gap if you plan to add a loop or handle for hanging the stone later.
If you want your stone to hang as a pendant or window decoration, crochet a small chain loop before fastening off. This loop can be used to thread a cord or ribbon, turning your crochet-covered crystal into a piece of jewelry or home décor.
After finishing the final stitches, weave in any loose yarn ends with a tapestry needle. The Crochet Cover for Stones and Crystals- Step by Step Tutorial emphasizes neat finishing for a professional and beautiful result.
At this stage, your crochet-covered stone is complete and ready for display, gifting, or personal use.
Creative Ideas and Variations
One of the best things about the Crochet Cover for Stones and Crystals- Step by Step Tutorial is how customizable it is. You can use different colors of yarn to match your décor or the natural colors of the stones. Earthy tones look great for rustic styles, while bright colors add a cheerful, modern touch.
You can also experiment with different stitch patterns. For example, using open, lacy stitches creates a delicate look, while tighter stitches give a more solid, protective cover. The Crochet Cover for Stones and Crystals- Step by Step Tutorial encourages crafters to try various techniques to find their favorite style.
Adding beads or charms to the crochet cover can make the stones even more decorative. Thread small beads onto the yarn before crocheting and position them strategically as you work. This gives the Crochet Cover for Stones and Crystals- Step by Step Tutorial a creative and sparkling twist.
Another idea is to make themed sets of crochet-covered stones for special occasions. For example, you can create heart-shaped designs for Valentine’s Day or pastel colors for spring decorations. The possibilities are endless when following the Crochet Cover for Stones and Crystals- Step by Step Tutorial.
These projects also make thoughtful handmade gifts. Many people appreciate receiving crystals with a personal, handmade touch. A Crochet Cover for Stones and Crystals- Step by Step Tutorial creation can be customized for birthdays, holidays, or spiritual milestones.
Finally, you can create larger versions for bigger stones used in meditation spaces or smaller versions for jewelry pieces like pendants and keychains. This flexibility makes the Crochet Cover for Stones and Crystals- Step by Step Tutorial suitable for all skill levels and creative goals.
FAQ – Crochet Cover for Stones and Crystals
1. Do I need advanced crochet skills for this project?
No, the Crochet Cover for Stones and Crystals- Step by Step Tutorial is beginner-friendly and uses basic stitches.
2. Can I use any type of yarn?
Yes, but cotton yarn works best because it gives a neat finish and is easy to handle.
3. How do I make sure the cover fits my stone perfectly?
Measure your crochet piece against the stone as you work and adjust stitch counts if necessary.
4. Can I wash crochet-covered stones?
Yes, but hand washing is recommended to protect both the yarn and the stone.
5. Are crochet-covered stones only for decoration?
No, they can also be used as gifts, meditation tools, or jewelry pieces.
6. How long does it take to make one cover?
Most covers can be completed in under an hour, depending on size and complexity.
Conclusion
In this article, we explored the Crochet Cover for Stones and Crystals- Step by Step Tutorial in detail, from gathering materials to starting the crochet pattern, shaping the cover, and adding creative variations. We also provided answers to common questions to help you succeed with this fun and creative project.
Now it’s your turn to try making a crochet cover for your favorite stones and crystals. Follow the steps, add your personal touch, and enjoy the satisfaction of creating something handmade and beautiful.
We would love to hear your honest opinions and suggestions, so feel free to share your experiences after completing your project!