
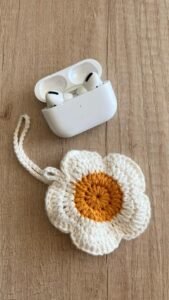
If you have been searching for a Crochet Crochet Air Pod Case- Step by Step Tutorial, you are in the right place. In this complete guide, we will show you how to create a functional and beautiful Air Pod case that is perfect for beginners and experienced crafters alike. This article will walk you through everything you need to know, from the materials to the finishing touches, all while ensuring your final product is as stylish as it is practical.
Making your own Crochet Crochet Air Pod Case not only gives your Air Pods extra protection but also adds a touch of personality to your everyday accessories. By following this Step by Step Tutorial, you can customize colors, patterns, and sizes to perfectly suit your style. Crochet projects like this one are also an excellent way to relax while creating something useful.
Before we dive into the instructions, remember that this guide is designed to be beginner-friendly. Each step is explained in simple language so you can follow along even if you have never tried crochet before. The goal of this Crochet Crochet Air Pod Case- Step by Step Tutorial is to help you create a case that looks professional while keeping the process fun and stress-free.
Materials and Tools Needed for the Crochet Crochet Air Pod Case
To start this Crochet Crochet Air Pod Case- Step by Step Tutorial, you need to gather the right materials and tools. Having everything ready before you begin will make the process smoother and more enjoyable.
First, you will need cotton yarn or any soft yarn that is easy to work with. Cotton yarn is highly recommended because it is durable and holds its shape well. Choosing your favorite colors will make your Air Pod case truly unique.
Next, you will need a crochet hook that matches the yarn weight. Most beginners prefer a 3.5mm or 4mm hook, but you can adjust this based on your yarn choice. The hook size plays an important role in how tight or loose your stitches will be.
You will also need a pair of scissors to cut the yarn neatly when finishing your project. A yarn needle is another essential tool for weaving in the loose ends to give your Air Pod case a polished look.
A stitch marker can be helpful, especially if you are new to crochet. It helps you keep track of your rounds and ensures your project remains even. This is particularly important in projects like the Crochet Crochet Air Pod Case, where symmetry is key.
Finally, you might want to have a small button or snap closure to keep your Air Pods secure inside the case. This adds both functionality and style to your final product.
Step by Step Instructions for the Crochet Crochet Air Pod Case
Now that you have all your materials ready, let’s begin the Crochet Crochet Air Pod Case- Step by Step Tutorial. These instructions are simple to follow, making them perfect for beginners.
Start by making a foundation chain that matches the width of your Air Pod case. This chain will determine the base size, so count your stitches carefully. The average case usually requires 10–12 chains, but you can adjust according to your needs.
Next, work single crochet stitches along the chain. Single crochet stitches are ideal for this project because they create a tight, dense fabric that will protect your Air Pods from scratches and dust.
When you reach the end of the chain, turn your work and continue crocheting along the other side. This will form a round shape, which is essential for creating the body of your Air Pod case.
Continue crocheting in rounds until the case reaches the desired height. Most cases require about 12–14 rounds, but this may vary depending on your Air Pod model. Remember to keep your tension consistent for a neat finish.
Once the main body is complete, you can create a small flap by chaining a few stitches and working back and forth in rows rather than rounds. This flap will fold over the top of the case and keep your Air Pods secure.
Finally, sew on a button or attach a snap closure to the flap. This is the last step in your Crochet Crochet Air Pod Case- Step by Step Tutorial, and it gives your project a functional and decorative touch.
Tips for Customizing Your Crochet Crochet Air Pod Case
One of the best things about the Crochet Crochet Air Pod Case- Step by Step Tutorial is that you can customize your case in endless ways. This section will give you some creative ideas to make your case truly one-of-a-kind.
You can experiment with different yarn colors to create stripes or patterns. Using two or three colors can give your case a playful and unique appearance.
Adding decorative stitches, such as puff stitches or shell stitches, can give texture and personality to your Air Pod case. These stitches are easy to learn and can completely change the look of your project.
If you enjoy embroidery, you can add small designs like hearts, stars, or initials to your case. Embroidery on crochet fabric looks beautiful and adds a personal touch.
Another fun idea is to crochet a small keychain loop on the side of the case. This way, you can attach it to your bag or keys for easy access and convenience.
You can also line the inside of your Air Pod case with a soft fabric for extra protection. While this is optional, it gives your case a professional and finished look.
Finally, consider making multiple cases in different colors. This way, you can change the look of your Air Pods whenever you want while keeping them safe and stylish.
Care and Maintenance of Your Crochet Crochet Air Pod Case
After completing the Crochet Crochet Air Pod Case- Step by Step Tutorial, you will want to keep your case looking clean and new. Proper care ensures it lasts a long time while maintaining its beauty.
Always use gentle hand washing when cleaning your crochet case. Avoid harsh detergents that can damage the yarn fibers or cause colors to fade.
Lay the case flat to dry instead of hanging it. Hanging can stretch the stitches and alter the shape of your Air Pod case.
If your case develops loose threads over time, use a yarn needle to carefully weave them back in rather than cutting them off. This prevents unraveling.
Keep your Air Pod case away from sharp objects that could snag or tear the yarn. Simple precautions like this will help maintain the durability of your project.
You can also refresh the look of your case by adding new embellishments, such as buttons or small charms, whenever you want a change.
Lastly, store your crochet case in a cool, dry place when not in use. Proper storage will keep it safe from dust and moisture.
FAQ About Crochet Crochet Air Pod Case
Q1: Is this project suitable for beginners?
Yes, this Crochet Crochet Air Pod Case- Step by Step Tutorial is perfect for beginners. It uses basic stitches and simple instructions.
Q2: How long does it take to make a crochet Air Pod case?
Most people can complete the case in two to three hours, depending on skill level.
Q3: Can I use different yarn types?
Yes, but cotton yarn is recommended because it is durable and holds its shape well.
Q4: How do I adjust the size for different Air Pod models?
Simply add or subtract stitches in the foundation chain and adjust the number of rounds accordingly.
Q5: Do I need a button closure?
It is optional, but a closure keeps your Air Pods secure and adds a decorative element.
Q6: Can I sell the Air Pod cases I make using this tutorial?
Yes, handmade crochet items are popular for selling at craft fairs or online shops.
Conclusion
By following this Crochet Crochet Air Pod Case- Step by Step Tutorial, you have learned how to make a practical and stylish accessory for your Air Pods.
From choosing materials to customizing your design, each step was explained in detail to help you succeed.
We hope this tutorial inspires you to create more crochet projects and experiment with your creativity. Please share your honest opinion about this guide and leave any suggestions for future tutorials in the comments. Your feedback helps us improve and bring you even better content in the future.