
If you love handmade accessories and are looking for a simple yet creative project, then this Crochet Daisy Keychain – Step by Step Tutorial is exactly what you need. Crocheting is not only a relaxing hobby but also a way to make personalized gifts and cute decorations. Among all crochet patterns, daisy motifs have always been a favorite because they symbolize freshness, joy, and positivity. With just a few materials and some patience, you can create a small and beautiful keychain that is both functional and charming.
The great thing about the Crochet Daisy Keychain is that it can be made by beginners and advanced crafters alike. If you are new to crochet, this tutorial will guide you through each stage, helping you practice essential stitches while making something useful. For experienced crocheters, this project offers a quick and satisfying craft that can be completed in a short time. This makes it perfect for gift-giving, craft fairs, or even personal use to add a handmade touch to your keys or bags.
This step by step tutorial will not only explain how to crochet the daisy shape but also how to attach it to a keyring securely. By the end of this article, you will have all the information you need to make your own Crochet Daisy Keychain from start to finish. Whether you want to make one for yourself or create several to give as gifts, this guide will make the process easy and enjoyable. Let’s get started on this creative journey.
Materials and Preparation for Crochet Daisy Keychain
To begin this Crochet Daisy Keychain – Step by Step Tutorial, you first need to gather the right materials. Having everything prepared in advance will make your crochet process much smoother. You will need a small amount of yarn in white for the daisy petals, yellow for the center, and possibly green if you want to add a small leaf. Using cotton yarn is highly recommended because it gives a clean look and holds its shape well.
Next, make sure you have the correct hook size for your chosen yarn. Usually, a 2.5mm to 3.5mm crochet hook works perfectly for small projects like keychains. Having a stitch marker can be very useful to keep track of rounds, especially when working in circular patterns like flowers. A yarn needle will also be necessary for weaving in ends and attaching the different parts together.
You will also need a simple metal keyring to transform your crochet daisy into a keychain. These can be found in craft stores, online, or even reused from old keychains you no longer use. A pair of small scissors will also help you cut the yarn neatly. Having all these materials ready before you start will allow you to focus on the crocheting process without interruptions.
Once you have gathered everything, take a few minutes to prepare your workspace. Choose a comfortable chair with good lighting, as working with small yarn details requires visibility. A small tray or box to hold your materials can keep things organized while you crochet. Preparing ahead of time helps you stay focused and makes your project more enjoyable.
It is also important to familiarize yourself with the stitches used in this Crochet Daisy Keychain – Step by Step Tutorial. Most daisy patterns use basic stitches such as chain stitch, slip stitch, single crochet, and double crochet. Practicing these stitches beforehand will make the process easier, especially if you are a beginner. Understanding these techniques ensures that your daisy will turn out neat and balanced.
Finally, keep in mind that crochet projects like this are meant to be fun and relaxing. Do not rush through the steps. Instead, enjoy each stage of the process, from creating the first chain to attaching your finished daisy to the keyring. With patience and practice, your Crochet Daisy Keychain will turn out beautifully.
Step by Step: Crocheting the Daisy Shape
Now that you are ready, let’s dive into the main part of this Crochet Daisy Keychain – Step by Step Tutorial. The daisy is made by creating a yellow center and surrounding it with white petals. This process is simple and rewarding once you get into the rhythm of crocheting.
Start by making a magic ring with the yellow yarn. Into this ring, crochet a small number of single crochets—usually around six to eight stitches. This will form the center of your daisy. Pull the ring tight to close the circle. Slip stitch into the first stitch to join the round, creating a neat and secure middle.
Next, change to the white yarn for the petals. Each petal is typically made by chaining a few stitches, then working double crochets back into the same stitch to form a rounded shape. Repeat this process around the circle until you have a complete flower with evenly spaced petals. The number of petals can vary, but usually six to eight petals create a balanced daisy shape.
As you finish each petal, make sure to slip stitch into the next base stitch to secure it. This will give your daisy a clean and consistent look. Continue this pattern until your flower is complete. Remember to keep your tension even, as this ensures the petals all look similar in size and shape.
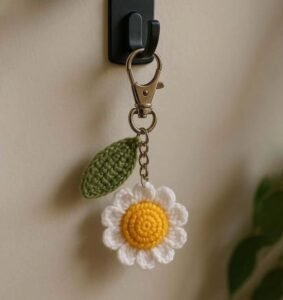
Once the flower is complete, cut the yarn and leave a tail long enough for sewing. Using your yarn needle, weave in any loose ends to keep the flower neat. If you want to add a green leaf for decoration, simply crochet a small chain and shape it into a leaf with single crochets before attaching it to the flower. This step is optional but adds extra charm.
At this point, your daisy is finished and ready to be transformed into a keychain. If you want your flower to be sturdier, you can also block it by lightly wetting and shaping it before letting it dry. Blocking helps the petals hold their shape better, especially if the yarn is soft.
Attaching the Daisy to a Keyring
With your crochet flower completed, the next step in this Crochet Daisy Keychain – Step by Step Tutorial is attaching it securely to a keyring. This step is crucial to ensure that your handmade accessory is not only pretty but also durable for daily use.
First, take the metal keyring and decide where you want to attach your daisy. The easiest way is to sew the top of the daisy directly onto the keyring using the yarn tail and a strong needle. Make sure to pass the yarn through several times so the flower stays firmly attached.
Another option is to create a small crochet loop with your yarn and use it to connect the daisy to the keyring. This gives your keychain more flexibility and a nice hanging effect. To do this, simply chain about ten stitches, then attach the ends to the daisy and slip the keyring through the loop.
If you want to make your keychain more decorative, you can add beads, tassels, or even a second smaller daisy to the same keyring. This adds personality and makes your accessory unique. Handmade details like these often make your crochet projects stand out even more.
While attaching the daisy, always check that it hangs straight and looks balanced. Adjust the position if necessary before securing it completely. The more careful you are during this step, the better the final result will be.
After everything is sewn in place, give your keychain a gentle tug to test its durability. This ensures it will withstand regular use without falling apart. Once you are satisfied, trim any excess yarn neatly. Your Crochet Daisy Keychain is now complete and ready to use.
Creative Uses and Gift Ideas for Crochet Daisy Keychain
One of the best things about this Crochet Daisy Keychain – Step by Step Tutorial is how versatile the finished product is. While it is primarily used as a keychain, there are many other creative ways to enjoy your handmade daisy.
For example, you can use the daisy as a bag charm. Attaching it to a purse, backpack, or tote bag instantly adds a touch of handmade style. This is especially popular among people who love bohemian or floral-inspired accessories.
Another creative use is making multiple daisy keychains in different colors. While the traditional daisy is white and yellow, you can experiment with pastel shades, bright colors, or even multicolored petals. This allows you to personalize the accessory to match your style or to create themed gifts for friends.
The Crochet Daisy Keychain also makes a wonderful handmade gift. Small yet thoughtful, it is perfect for birthdays, holidays, or simply as a token of appreciation. Because it is quick to make, you can create several keychains in one sitting, making it an ideal project for gift-giving seasons.
For those who sell handmade crafts, daisy keychains can also be a great addition to your product line. They are lightweight, inexpensive to make, and highly appealing to buyers who love handmade accessories. Since they do not take much time to create, they are also efficient for craft fairs or online shops.
Finally, making a Crochet Daisy Keychain is a fun way to practice and improve your crochet skills. Each time you make one, your stitches become neater, your petals more even, and your finishing cleaner. Over time, you will notice real progress in your crocheting technique.
FAQ – Crochet Daisy Keychain
1. Is the Crochet Daisy Keychain suitable for beginners?
Yes, this project is beginner-friendly since it mainly uses basic stitches like chain, single crochet, and double crochet.
2. How long does it take to make one Crochet Daisy Keychain?
On average, it takes about 30 minutes to 1 hour, depending on your skill level and speed.
3. What type of yarn is best for this tutorial?
Cotton yarn is recommended because it holds its shape well and looks neat in small projects like keychains.
4. Can I make the daisy in different colors?
Absolutely. You can experiment with any color combination you like, making it more personal and creative.
5. How do I ensure my keychain lasts a long time?
Make sure to attach the daisy securely to the keyring, weave in all yarn ends, and use durable yarn like cotton.
6. Can I sell Crochet Daisy Keychains that I make?
Yes, they are popular handmade items that can be sold at craft fairs or online shops. Just ensure your finishing is neat and professional.
Conclusion
In this article, you learned how to make a Crochet Daisy Keychain – Step by Step Tutorial from gathering materials, crocheting the daisy, attaching it to a keyring, and even exploring creative uses.
This project is simple, quick, and rewarding, making it perfect for both beginners and experienced crocheters.
Now it’s your turn to create your own beautiful Crochet Daisy Keychain. Try different colors, experiment with decorations, and enjoy the process of making something by hand. I’d love to hear your thoughts, so please leave your sincere opinion and suggestions about this tutorial. Your feedback helps improve future projects and keeps the creativity flowing.
