
If you are looking for a beautiful and simple crochet project, this Crochet Decorative Star – Step by Step Tutorial is the perfect place to start. A crochet decorative star is not only an elegant piece for home decoration but also a charming handmade gift idea. Whether you want to hang it on your Christmas tree, decorate a baby’s room, or use it as a festive ornament for special occasions, this project is fun, creative, and easy to follow. Even if you are a beginner, you will enjoy learning how to make this timeless piece.
The Crochet Decorative Star is a versatile project that can be adapted for many purposes. You can make it small and delicate for use as a keychain or large and bold to use as a wall hanging or garland. What makes this project special is that you can play with yarn colors, add embellishments like beads or glitter, and personalize it according to your taste. It’s a relaxing and rewarding project that allows you to express your creativity while practicing essential crochet skills.
In this Step by Step Tutorial, we’ll guide you through everything you need to know to create your own crochet decorative star. From choosing materials to completing the final stitches, you’ll learn techniques that you can apply to other crochet patterns as well. With patience, a few simple tools, and a bit of yarn, you can transform your space with handmade charm and warmth. So, let’s dive into the details of making this lovely crochet star that shines in every corner of your home.
Materials and Preparation for Your Crochet Decorative Star
Before starting your Crochet Decorative Star – Step by Step Tutorial, it’s important to gather all the materials you’ll need. Typically, you will use cotton or acrylic yarn, depending on the texture you want. Cotton gives a crisp and defined look, while acrylic offers a softer and fluffier finish. You will also need a crochet hook suited to your yarn weight, scissors, a yarn needle, and some optional decorative elements like ribbons, beads, or small bells.
Choosing the right yarn color can make your star stand out. For festive themes, gold, white, red, and silver are popular choices. For everyday decoration, pastel shades such as baby blue, cream, or lavender create a calm and cozy atmosphere. Experiment with colors that match your home decor or the occasion you’re making the star for.
Before crocheting, make sure your yarn and hook combination create even stitches. You can test this by making a small swatch to check the tension. Having consistent tension is important for creating a neat and balanced star shape. If your stitches are too tight, the star may curl; if too loose, it may not hold its form.
It’s also a good idea to prepare a small amount of stuffing if you want to make your crochet decorative star three-dimensional. This gives your star volume and makes it look more plush and charming. However, if you prefer a flat version, you can skip this step and make it double-sided instead.
Finally, create a comfortable workspace with good lighting and minimal distractions. Crochet projects like this one are meant to be relaxing, so take your time, enjoy the process, and let your creativity flow as you start your Crochet Decorative Star journey.
When everything is ready, you can move on to creating the base shape. This is where the fun truly begins, as you see your yarn transform into a shining star right before your eyes.
Step by Step Crochet Instructions
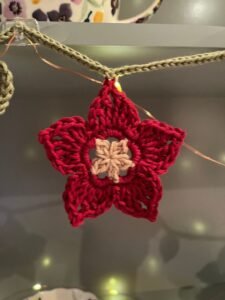
Now that your materials are ready, it’s time to begin the Crochet Decorative Star – Step by Step Tutorial. Start by making a magic ring, which will form the center of your star. Work five single crochets into the ring, then pull the yarn tight to close the circle. Join with a slip stitch to form a neat base.
In the next round, you’ll create the foundation for each star point. Chain five, skip one stitch, and slip stitch into the next. Repeat this process around until you have five chain loops evenly spaced. These loops will form the base for the star’s points.
Next, work into the first chain loop. Crochet one single crochet, one half double crochet, two double crochets, one half double crochet, and one single crochet all in the same loop. This combination of stitches forms one point of your star. Repeat this pattern in each chain loop around to complete all five points.
After finishing the first round of points, you can fasten off your yarn and weave in the ends. If you want your Crochet Decorative Star to look thicker or reversible, make another identical piece and sew or crochet them together around the edges. You can also insert a bit of stuffing before closing it to give it a soft, puffy look.
To add a hanging loop, make a small chain of 10–15 stitches, depending on how long you want the loop to be. Attach it to the top of one of the star points using a slip stitch. This will allow you to hang your star on doors, walls, or Christmas trees.
Once you’ve finished the main structure, take a moment to block your star gently. Blocking helps smooth out the stitches and keeps the star flat and even. You can do this by lightly spraying it with water, shaping it, and letting it dry naturally.
Decorating and Personalizing Your Crochet Star
One of the best parts of this Crochet Decorative Star – Step by Step Tutorial is adding your personal touch. Decorating your star makes it unique and special. You can use beads, small buttons, or embroidery thread to embellish it according to your style. For a festive look, add a touch of glitter yarn or metallic thread around the edges.
If you prefer a minimalist style, leave your star plain in a single color. The simplicity of crochet stitches gives it a delicate and elegant appeal. Alternatively, you can crochet each point in a different color to create a fun and playful design, perfect for kids’ rooms or party decorations.
Another great idea is to use your crochet stars to make garlands. By joining several stars with a long chain, you can create beautiful wall hangings or mantel decorations. Mixing different sizes and shades of stars creates a charming handmade display.
You can also turn your Crochet Decorative Star into a keychain or bag charm. Just attach a small metal ring or clip to one of the star’s points, and you’ll have a lovely accessory that makes your everyday items more personal.
For Christmas or holiday decorations, use red, green, and white yarns, and consider sewing small bells to the tips of each star point. When the star moves, it will jingle softly, adding an extra festive touch.
No matter how you decorate it, your crochet star will always carry a bit of your personality. Handmade items like these are timeless and can be passed down or gifted to loved ones as keepsakes.
Creative Uses for Crochet Decorative Stars
After following this Crochet Decorative Star – Step by Step Tutorial, you’ll find many creative ways to use your finished stars. They are incredibly versatile and can fit into almost any setting or occasion.
You can use them as Christmas tree ornaments. Their soft texture and unique designs make them safer alternatives to glass ornaments, especially if you have children or pets. Simply hang them using a small thread or ribbon, and your tree will have a cozy, handmade charm.
Crochet stars also make excellent gift decorations. Instead of traditional ribbons or bows, attach a small star to your wrapped gifts for a touch of creativity. It adds personality and shows extra effort and care.
For home decor, try making a set of stars in neutral tones like beige, white, and gray. Arrange them in a frame or hang them as a mobile for a minimalist, rustic aesthetic. They also work beautifully as nursery decorations, adding a peaceful and playful atmosphere.
Another lovely idea is to create a festive garland by stringing several stars together. This can be used for birthdays, baby showers, or even weddings. It’s a sustainable and reusable decoration that can be customized for any theme.
Lastly, if you enjoy making small accessories, you can turn your Crochet Decorative Star into earrings, brooches, or appliqués for clothing and bags. The possibilities are endless when it comes to creativity with crochet.
Crochet Decorative Star
1. Is the Crochet Decorative Star suitable for beginners?
Yes! This project is perfect for beginners because it uses basic stitches like single crochet and double crochet.
2. What type of yarn should I use for this project?
Cotton yarn is recommended for a firm shape, but acrylic or blended yarns also work well for softer finishes.
3. How long does it take to make one star?
Typically, it takes 30 minutes to an hour, depending on your skill level and design complexity.
4. Can I make a stuffed version of the crochet star?
Absolutely! Just make two stars, sew them together, and add some light stuffing before closing.
5. How can I make the star look shiny or festive?
Use metallic or glitter yarns, or add sequins and beads to the edges for extra sparkle.
6. What are some common mistakes to avoid?
Make sure your stitch tension is consistent, and count stitches carefully to ensure all five points are even.
Conclusion
This Crochet Decorative Star – Step by Step Tutorial has shown how simple yet rewarding it is to create a beautiful handmade ornament.
You learned how to gather materials, crochet the base shape, decorate your star, and explore creative ways to use it. Whether you’re crafting for home decoration, gifts, or personal projects, this crochet star adds warmth and personality to any space.
Now it’s your turn to pick up your hook, choose your favorite yarn, and start making your own Crochet Decorative Star. Don’t forget to share your thoughts, experiences, and suggestions below. Your feedback helps inspire others and keeps the crochet community growing with creativity and love.