
Crochet Easy Seashell Basket-Step by Step Tutorial projects are becoming popular among crafters who love creating decorative and functional handmade pieces. In this guide, you will learn how to make a beautiful seashell-inspired basket using simple stitches and easy techniques. This Crochet Easy Seashell Basket-Step by Step Tutorial is perfect for beginners who want to start crocheting unique and aesthetic home décor items. With patience and creativity, you can transform yarn into a textured and charming basket that resembles a seashell.
Crafting a crochet seashell basket allows you to experiment with shapes, textures, and colors while creating a practical item for everyday use. Whether you want to store small objects, organize your crafting tools, or decorate your home, this project is both relaxing and fulfilling. Throughout this Crochet Easy Seashell Basket-Step by Step Tutorial, you will learn how to build the base, work the sides using shell-like stitches, and finish with a sturdy and attractive rim. This approach ensures you understand every detail while developing your crochet skills.
This tutorial emphasizes comfort, clarity, and creativity. You will practice fundamental stitches and apply simple increases and pattern repeats that naturally form the seashell texture. With the guidance provided in this Crochet Easy Seashell Basket-Step by Step Tutorial, even beginners can complete this project confidently. Before diving into the first steps, let’s explore the essential materials you need to make your basket strong, stable, and visually striking.
Materials Needed to Begin Your Seashell Basket
To begin your Crochet Easy Seashell Basket-Step by Step Tutorial, you will need medium-weight yarn, preferably cotton or a cotton blend. Cotton is ideal because it provides structure, durability, and a clean look. Since the basket must hold its shape, choosing a yarn that is not too stretchy will help maintain stability. You can use neutral tones for a natural seashell style or select bright colors for a more playful design.
Select the appropriate crochet hook based on your yarn weight. Most seashell baskets work well with a 4.0 mm to 5.0 mm hook. A slightly smaller hook can give the basket a firmer texture, which is beneficial for maintaining the seashell pattern. This Crochet Easy Seashell Basket-Step by Step Tutorial recommends checking your tension before starting to ensure your stitches are even and consistent.
You will also need basic tools such as scissors, a stitch marker, and a tapestry needle. These items help with cutting yarn, keeping track of rounds, and weaving in ends neatly. Stitch markers are especially helpful in projects worked in the round because they prevent confusion as the basket begins to grow upward. Being organized from the beginning helps make the process enjoyable.
Before starting your project, prepare a comfortable and well-lit workspace. Working in rounds requires attention to detail, and good visibility ensures your stitches look clean and uniform. This Crochet Easy Seashell Basket-Step by Step Tutorial encourages beginners to take their time and enjoy the learning process. A relaxed environment helps you stay focused and confident.
If you are completely new to crochet, it may help to practice basic stitches such as chain stitch, single crochet, and double crochet. These fundamental stitches form the foundation of the basket. With these basics, you will find it easier to follow the seashell pattern that gives the basket its distinctive look. Practicing ahead ensures smoother progress once you begin the tutorial.
Finally, choose a color palette or yarn texture that matches the theme you want. Soft sandy tones, whites, pastels, and ocean-inspired shades look beautiful for seashell-themed décor. With your materials ready, you can now begin the enjoyable process of crafting your crochet seashell basket.
Creating the Base of the Seashell Basket
To start your Crochet Easy Seashell Basket-Step by Step Tutorial, create a slip knot and crochet a small number of chains, forming the center ring. Working in the round allows the base to expand evenly, giving your basket stability. The center ring is the foundation for the basket’s shape. Focus on keeping your tension steady so the base remains flat as it grows.
Once the ring is formed, begin working single crochets around the circle. Each round will require strategic increases to ensure that the base expands smoothly without curling. By evenly spacing your increases, you allow the shape to remain perfectly round. This tutorial teaches how to space increases correctly so the structure stays firm and stable.
As you complete each round, check that the base is lying flat. If it begins to curl upward, it may indicate tight tension. Trying to relax your stitches slightly will help correct the shape. The Crochet Easy Seashell Basket-Step by Step Tutorial emphasizes small adjustments that beginners can easily follow to ensure accurate results.
Using a stitch marker is helpful for keeping track of the first stitch of each round. Since the base grows gradually, losing track of your starting point can lead to uneven increases. A stitch marker ensures precision and allows you to maintain the correct pattern throughout the project. This is especially useful when working with thicker yarn or tighter stitches.
As the base expands, you will notice its shape forming into a perfect circle. Continue adding rounds until the base reaches the desired diameter. The size of your seashell basket depends on how many rounds you choose to make. Some prefer a small decorative piece, while others enjoy larger baskets for storage. This tutorial provides flexibility as you learn to adapt the pattern to your needs.
Once the base is complete, the next step is transitioning from the flat circle to the sides of the basket. This marks the beginning of the seashell texture that gives this Crochet Easy Seashell Basket-Step by Step Tutorial its name.
Building the Seashell Sides and Texture
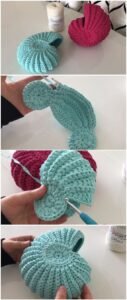
The seashell texture is the highlight of this project. To create it, you will use a combination of basic stitches arranged in a repeating pattern. This Crochet Easy Seashell Basket-Step by Step Tutorial guides you through these steps carefully, ensuring beginners can achieve the desired effect easily. Texture stitches add beauty and dimension while maintaining the basket’s shape.
Begin by working a round of single crochet stitches without increases. This helps the sides of the basket begin to rise naturally. Once the walls start forming, you can introduce the shell stitch or a variation of it. Shell stitches involve working multiple stitches into the same space to create a fan-like shape reminiscent of seashells. This technique is simple but visually stunning.
Continue repeating the shell stitch around the basket, ensuring your placement is consistent. The repeating clusters create a textured pattern that resembles layered seashells. Take your time with this step, as the texture greatly influences the final appearance of your basket. Working slowly also helps maintain even stitch height and tension.
Each round of shell stitches builds upon the previous one, gradually forming the height of your basket. Depending on how deep you want the basket, you can add more or fewer rounds. The tutorial encourages creativity, allowing you to customize the height and shape according to your taste. This flexibility is one of the joys of following a Crochet Easy Seashell Basket-Step by Step Tutorial.
If you prefer a more structured look, you can alternate shell stitch rounds with single crochet rounds. This technique provides extra firmness and makes the pattern stand out more. Mixing textures also adds visual interest, making your basket look more intricate while remaining beginner-friendly.
As you approach the final height, check the overall shape. Make sure the basket stands upright and the sides are even. Minor adjustments can be made by tightening or loosening stitches as needed. Once you are satisfied, you are ready to finish the top edge.
Adding the Rim and Finishing the Basket
The rim is an important part of your Crochet Easy Seashell Basket-Step by Step Tutorial because it adds structure and gives the basket a clean, polished finish. To begin the rim, switch back to single crochet stitches. These tighter stitches help support the top of the basket and keep it from stretching or collapsing.
Work one or two rounds of single crochet, depending on the thickness and firmness you want. The rim should feel sturdy while complementing the seashell texture below. This step brings balance to the design by combining decorative stitches with functional structure.
Once the desired rim height is reached, finish your final stitch and cut the yarn, leaving a small tail. Pull the yarn through the last stitch to secure it. The tutorial explains how to do this neatly so your basket remains strong and durable.
Next, use a tapestry needle to weave in any loose ends. This is especially important in textured projects because exposed yarn tails can disrupt the visual pattern. Weaving in ends carefully ensures that your finished basket looks clean and professional.
If you want to enhance your basket further, you may add embellishments such as a small crochet bow, a braided handle, or a decorative charm. These additions are optional but can give a personal touch to your project. The key is to keep decorations simple so they do not overwhelm the seashell texture.
Once all final touches are completed, your beautiful crochet seashell basket is ready to use. Whether displayed on a shelf or used for organizing small items, it will add charm and personality to your space. This tutorial helps beginners create a practical and stylish project that showcases creativity and craftsmanship.
FAQ About the Crochet Easy Seashell Basket
1. Is this Crochet Easy Seashell Basket-Step by Step Tutorial suitable for total beginners?
Yes, the tutorial uses simple stitches and clear instructions, making it beginner-friendly.
2. What yarn works best for seashell baskets?
Cotton yarn is ideal because it provides structure and durability.
3. How long does it take to complete the basket?
Most beginners finish it in a few hours, depending on size and stitch speed.
4. Can I make the basket larger or smaller?
Absolutely. Increase or decrease the number of rounds in the base and sides.
5. What crochet hook should I use?
A 4.0 mm or 5.0 mm hook works well for most medium-weight yarns.
6. Can I change the stitch pattern?
Yes, you can experiment with other texture stitches as long as you maintain even tension.
7. Do I need to block the basket?
Blocking is optional, but it can help even out the shape and improve structure.
Conclusion
This Crochet Easy Seashell Basket-Step by Step Tutorial has shown you how to create a charming, textured, and functional crochet basket from start to finish.
You learned how to select materials, construct the base, build the seashell-themed sides, and complete the rim with a neat finish.
This project is beginner-friendly, relaxing, and incredibly rewarding. Feel free to share your honest opinion and suggestions—your feedback helps improve future tutorials and inspires new creative ideas!