
Starting a new handmade project can be both exciting and rewarding, especially when it combines functionality with creativity. That is exactly what the Crochet Fish Dish Towel Holder – Step by Step Tutorial offers. This pattern is not only charming but also practical for any kitchen, adding a unique handmade touch to your daily routine. Whether you are a beginner looking to practice basic stitches or an experienced crocheter wanting to create something fun and useful, this project is perfect. Throughout this guide, we will explore every detail so you can easily follow along and enjoy the process.
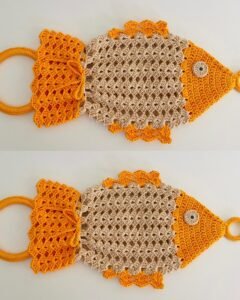
When it comes to crochet, simple projects that serve a real purpose tend to become favorites. The Crochet Fish Dish Towel Holder – Step by Step Tutorial is designed to teach you how to transform yarn into a playful fish-shaped holder that keeps your dish towels neatly in place. This type of project is wonderful because it requires only basic stitches, making it beginner-friendly, yet results in something that looks unique and professional. Plus, it is a great way to use up leftover yarn while still creating a stylish home accessory.
If you are searching for a handmade piece that combines creativity, organization, and charm, this tutorial is ideal. Not only will you learn how to crochet a fish-shaped towel holder, but you will also develop skills that can be applied to many other crochet projects. The Crochet Fish Dish Towel Holder – Step by Step Tutorial will guide you through each stage, from gathering materials to finishing touches, ensuring you feel confident with every step. Now let’s dive into the process and explore how to make this delightful project come to life.
Materials Needed for the Crochet Fish Dish Towel Holder
To begin this fun project, you will need to prepare a few essential supplies. Using the correct materials will make your work smoother and ensure your finished piece is durable and visually appealing. Since the fish towel holder will be used in the kitchen, choosing sturdy yarn is important.
Start by selecting a medium-weight cotton yarn. Cotton is the best choice for this type of project because it is durable, easy to wash, and maintains its shape well even with daily use. You can choose any color that suits your kitchen décor, from natural tones to bright and playful shades. For a classic fish look, blue, orange, or yellow yarn works beautifully.
Next, you will need a crochet hook suitable for the yarn you choose. Most medium-weight cotton yarns work well with a 4.0 mm to 5.0 mm hook. Make sure to check the yarn label for recommendations. The correct hook size helps you achieve neat and even stitches.
Additional supplies include scissors for cutting yarn, a yarn needle for weaving in ends, and a small metal or wooden ring. The ring will serve as the base for holding the dish towel, making the project not only decorative but also functional. Rings can be found at craft stores and are inexpensive.
Optional items include stitch markers to help you keep track of your work, especially if you are still practicing consistency in stitch count. You may also want to add embellishments like small buttons for eyes or embroidery thread for extra details on the fish.
Gathering these materials before you start ensures that you can work smoothly without interruptions. Having everything ready also helps you stay motivated and enjoy the process more, as you can focus entirely on crocheting.
Step by Step Instructions to Make the Fish
Now that you have your materials ready, it is time to start working on the fish shape itself. The Crochet Fish Dish Towel Holder – Step by Step Tutorial focuses on making the body, tail, and finishing details so the final result is both sturdy and attractive.
Begin by creating a slip knot and chaining enough stitches to form the base length of the fish body. For a medium-sized holder, 12–15 chains are ideal. Once you have your foundation, work single crochet stitches across the chain to create the first row. Repeat this process for several rows to build the body shape.
To give the fish a rounded appearance, gradually increase stitches on one side of the body. You can do this by adding two single crochet stitches in one stitch at the ends of certain rows. This creates a subtle curve that mimics the natural outline of a fish.
After the body is shaped, focus on the tail section. From one end of the body, chain a few stitches outward, then work back with double crochet stitches to create a triangular fin. Repeat on the opposite side so the fish looks balanced. The tail is a defining feature and makes the project instantly recognizable.
Once the main body and tail are complete, you can add small details. Crochet a tiny circle for the fish eye and sew it onto the head. You may also embroider scales using contrasting yarn for extra decoration. These finishing touches bring the fish to life and make it more playful.
Finally, attach the fish body to the ring. Secure it by crocheting around the ring while joining it to the fish’s underside. This step ensures that the ring is tightly connected and strong enough to hold a dish towel.
Tips for Success and Customization
One of the best things about this Crochet Fish Dish Towel Holder – Step by Step Tutorial is that it allows for plenty of customization. You can easily adapt the size, shape, and colors to suit your personal taste or kitchen style.
For example, if you want a larger towel holder, simply increase the number of foundation chains and rows when making the fish body. Likewise, you can adjust the size of the ring depending on how thick your dish towels are. A bigger ring will hold heavier towels, while a smaller one works well for lightweight cloths.
Color choice plays a big role in the overall look. While natural colors like beige and gray create a subtle and elegant design, bright colors like turquoise, red, or orange make the fish look cheerful and fun. If you want to add extra creativity, consider using variegated yarn that changes color as you crochet, giving the fish a unique multicolor effect.
Adding embellishments can make your fish even more special. Buttons, beads, or safety eyes can be used to add expression and personality. You might also want to crochet small fins along the sides for more detail.
Another tip is to keep your stitches tight and even. Because this project will be used frequently, it is important that the stitches are secure and the structure is strong. Cotton yarn already helps with durability, but consistent tension will ensure the piece lasts longer.
Finally, do not be afraid to experiment. This project is beginner-friendly, which makes it a great opportunity to practice creativity and personal expression. Each fish you make can be unique, and they also make thoughtful handmade gifts for friends and family.
Benefits of Making a Crochet Fish Dish Towel Holder
There are many reasons why crafters love projects like the Crochet Fish Dish Towel Holder – Step by Step Tutorial. It combines creativity with practicality, which makes it a very satisfying project to complete.
The first benefit is organization. Dish towels often end up misplaced or falling from counters. With a fish towel holder, you always have a designated spot for your towel, keeping your kitchen neat and functional.
The second benefit is that it enhances your home décor. Handmade accessories bring warmth and character to any space. A fish-shaped towel holder is both cute and functional, making it a conversation starter whenever guests visit your kitchen.
Another great benefit is skill development. Beginners who follow this tutorial will gain confidence in basic stitches, increasing, and shaping. Experienced crocheters can use the project to practice decorative techniques or explore new color combinations.
It is also a cost-effective project. Since it requires very little yarn, you can make it using leftover skeins from other projects. This reduces waste and allows you to create something new without spending much.
Lastly, the project is portable and quick. You can complete it in just a few hours, making it ideal for busy schedules or for crocheting while traveling. The sense of accomplishment that comes with finishing a project so quickly is very rewarding.
FAQ About Crochet Fish Dish Towel Holder
1. Can beginners follow this Crochet Fish Dish Towel Holder – Step by Step Tutorial?
Yes, this project is perfect for beginners because it only requires basic stitches like chain, single crochet, and double crochet. The instructions are easy to follow and can be adapted as needed.
2. What type of yarn is best for this project?
Cotton yarn is the best choice because it is durable, easy to wash, and holds its shape well. Acrylic yarn can also be used but may stretch more over time.
3. How long does it take to make the fish towel holder?
On average, it takes about 2–3 hours, depending on your skill level and speed. Beginners may take a little longer, but it is still a quick and fun project.
4. Can I make the towel holder without a ring?
Yes, although the ring helps keep the towel secure. Without it, you can create a crocheted loop instead, but it may not be as sturdy for heavy towels.
5. Is this project safe for kids to use?
Yes, as long as you avoid using small embellishments like buttons that could be a choking hazard. For a child-friendly version, use embroidered details instead of buttons.
6. Can I sell the towel holders I make from this tutorial?
Absolutely! Handmade towel holders make wonderful gifts and can be sold at craft fairs or online shops. Just remember to add your own unique touch for originality.
Conclusion
The Crochet Fish Dish Towel Holder – Step by Step Tutorial is a wonderful project that combines creativity, functionality, and fun. By following the instructions, you can make a charming fish-shaped holder that keeps your dish towels neatly organized while adding a touch of handmade beauty to your kitchen.
This project is beginner-friendly, customizable, and quick to complete, making it a favorite among crafters.
If you enjoyed this guide, I encourage you to share your thoughts. Leave a sincere opinion about the tutorial and suggest any ideas for future crochet projects you would like to see. Your feedback helps keep creativity flowing and inspires more handmade creations.