
If you love combining classic crochet techniques with modern style, then this Crochet granny rectangle scarf – Step by Step Tutorial is perfect for you. The granny stitch is one of the most iconic patterns in the crochet world, and when transformed into a rectangular scarf, it creates a piece that’s both cozy and stylish. Whether you are an experienced crocheter or a complete beginner, this tutorial will walk you through the process of making a beautiful scarf that you’ll be proud to wear or gift.
When I first made this crochet granny rectangle scarf, I was surprised by how easy and relaxing it was to work on. The rhythmic repetition of the granny stitch makes it almost therapeutic, while the rectangular shape gives you plenty of room to play with colors and textures. You can make it as long or as wide as you want, creating a truly personalized accessory that fits your wardrobe perfectly.
In this Step by Step Tutorial, we’ll cover everything — from choosing materials to creating the perfect granny rectangle foundation and adding finishing touches. With the right yarn, color combination, and patience, you can create a handmade masterpiece that stands out in any season. So grab your crochet hook and let’s start crafting this lovely Crochet granny rectangle scarf together!
Materials You Will Need
Before you begin this Crochet granny rectangle scarf – Step by Step Tutorial, make sure you have all the essential materials ready. Having everything prepared will help the process go smoothly and make crocheting more enjoyable. For this project, you’ll need a medium-weight yarn, which is ideal for creating a soft and warm scarf that’s not too heavy. Acrylic or cotton yarns are both great options depending on your personal preference.
Choose a 4.5 mm or 5 mm crochet hook, as these sizes work well with most medium-weight yarns. The hook size affects the overall texture and flexibility of your scarf, so feel free to experiment to get your desired result. If you’re using thicker yarn, you might want to switch to a larger hook to make the stitches looser and airier.
Scissors and a yarn needle are also must-haves. The scissors will help you cut yarn neatly when changing colors or finishing the project, while the needle will be used for weaving in ends and joining sections neatly.
One of the best parts about making a crochet granny rectangle scarf is experimenting with color combinations. You can choose a single solid color for a minimalist look, or go for multiple shades to create a bold, vibrant statement piece. Many crocheters love using leftover yarn scraps to create a patchwork effect, which gives the scarf a charming handmade appeal.
To begin, you’ll also need a measuring tape to ensure your scarf reaches the desired length and width. A standard scarf is usually between 5 to 8 inches wide and about 60 inches long, but the beauty of handmade crochet is that you can customize it to your liking.
Finally, make sure you’re working in a comfortable and well-lit space. Crocheting is a creative and relaxing activity, and setting up a cozy workspace helps you enjoy every moment of making your Crochet granny rectangle scarf.
Step by Step Instructions
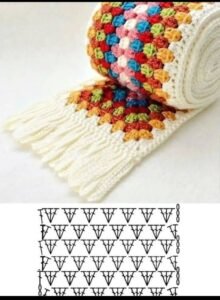
To start your Crochet granny rectangle scarf – Step by Step Tutorial, make a foundation chain that measures the width of your desired scarf. The number of chains should be a multiple of three plus one extra chain. For example, you can start with 31 chains if you want a medium width. This extra chain will help maintain the pattern’s symmetry as you crochet.
Once your chain is ready, work a double crochet (dc) into the fourth chain from the hook. Skip two chains, then crochet three double crochets into the next chain space — this forms your first granny cluster. Repeat this pattern of skipping two chains and crocheting three double crochets across the row. When you reach the end, chain three and turn your work.
For the second row, create one granny cluster in each space between clusters from the previous row. Continue this pattern, chaining three at the end of each row before turning your work. You’ll notice the classic granny texture forming as you go, creating an airy, beautiful fabric.
As you continue crocheting, keep checking the length of your scarf. You can make it shorter for a trendy accessory or longer for a more traditional wrap-around scarf. One of the best features of this Crochet granny rectangle scarf is that it grows quickly, making it perfect for crafters who enjoy seeing fast progress.
Once you’ve reached your desired length, you can add a decorative border to give your scarf a polished finish. A simple single crochet border around the entire edge works well, but if you want something more decorative, try a scalloped or picot edge. This small detail adds elegance and highlights your craftsmanship.
Finally, weave in all loose ends with your yarn needle to prevent unraveling. Take your time to do this neatly, as it will give your scarf a professional look. Your handmade crochet granny rectangle scarf is now ready to wear, gift, or even sell!
Customization Ideas for Your Granny Rectangle Scarf
The Crochet granny rectangle scarf – Step by Step Tutorial gives you endless room for creativity and personalization. You can change up the pattern, mix colors, or even incorporate unique textures to make your scarf one-of-a-kind.
If you’re going for a vintage look, try using soft pastel shades such as mint, lavender, or cream. For a more modern vibe, bold colors like mustard yellow, teal, and burgundy create stunning contrasts. The granny stitch works beautifully with color changes, allowing you to design eye-catching patterns effortlessly.
You can also add fringe to both ends of your scarf for a playful and stylish finish. Cut several strands of yarn about 8 inches long and attach them evenly across the edge using a crochet hook. This gives the scarf extra movement and texture, perfect for boho-inspired outfits.
Another great idea is to incorporate different types of yarn within one project. For instance, alternating between smooth acrylic yarn and fluffy mohair creates a unique tactile experience and gives your crochet granny rectangle scarf a luxurious feel.
If you enjoy experimenting, you can also turn your scarf into a shawl by making it wider and longer. Simply continue crocheting until it reaches the desired dimensions. The granny rectangle pattern adapts beautifully to different shapes, making it a versatile choice for multiple projects.
Lastly, consider adding small decorative touches like crochet flowers, appliqués, or even buttons. These embellishments personalize your scarf even more and make it a perfect handmade gift for someone special.
Helpful Tips for Beginners
If you’re new to crochet, this Crochet granny rectangle scarf – Step by Step Tutorial is an excellent place to start. The granny stitch is beginner-friendly and repetitive, helping you build confidence while creating something functional and pretty.
One common mistake beginners make is starting with uneven tension. If your stitches feel too tight or too loose, take a moment to adjust your grip on the yarn. Consistency is key to achieving an even and professional-looking texture.
Counting stitches is also crucial. Skipping stitches or adding extras can alter the shape of your scarf. It’s a good idea to count your clusters at the end of each row to keep everything aligned.
Don’t worry about perfection — crochet is all about creativity and relaxation. Even small imperfections add charm and character to handmade items. As you gain experience, your technique will naturally improve.
Blocking your scarf at the end is another helpful tip. Wet blocking or steam blocking helps even out your stitches and gives your crochet granny rectangle scarf a smooth, elegant drape. Simply pin it to shape on a flat surface, spray lightly with water, and let it dry completely.
Finally, take breaks and enjoy the process. Crocheting is not just a craft; it’s a form of mindfulness. Each stitch brings you closer to completing something beautiful that reflects your time, patience, and creativity.
FAQ
1. What is the best yarn for a crochet granny rectangle scarf?
A medium-weight yarn, such as acrylic or cotton, works best. It provides warmth, softness, and structure to your scarf.
2. Can beginners make this pattern?
Absolutely! This Step by Step Tutorial is simple enough for beginners while still fun for experienced crocheters.
3. How long does it take to finish the scarf?
It usually takes between 6 to 10 hours depending on your skill level and how long you want the scarf to be.
4. Can I use leftover yarn scraps?
Yes! This is one of the best ways to make your crochet granny rectangle scarf colorful and eco-friendly.
5. How do I make the scarf longer or wider?
Just add more rows for length or start with a longer foundation chain for width. It’s fully customizable.
6. How should I care for my finished scarf?
Handwashing in cool water and laying flat to dry will help maintain its shape and texture.
Conclusion
This Crochet granny rectangle scarf – Step by Step Tutorial has guided you through every stage of creating a timeless, handmade accessory.
From choosing yarn and mastering the granny stitch to adding personal touches, you now have the knowledge to make a scarf that’s uniquely yours. The joy of crocheting lies not only in the final product but also in the peaceful process of creation.
I hope this tutorial inspires you to start your own crochet granny rectangle scarf today. Whether you’re making it for yourself, a friend, or as a thoughtful gift, you’ll find the experience deeply rewarding. Don’t forget to share your results and leave a sincere opinion or suggestion — I’d love to hear how your project turned out!