
If you’ve been searching for a fun, relaxing, and creative project, learning how to make a crochet hat for beginners – step by step tutorial is the perfect place to start. Crocheting is a versatile craft that allows you to create beautiful, functional items with just a hook, some yarn, and a bit of patience. A crochet hat is one of the easiest and most satisfying projects for those just starting their crochet journey. It’s not only a great skill-building project but also results in something you can proudly wear or gift to a loved one.
This guide will walk you through the process of creating a crochet hat for beginners – step by step tutorial in an easy-to-follow way. You’ll learn the basics of choosing the right yarn, understanding simple stitches, and shaping your hat so it fits perfectly. No prior experience is required — all you need is the willingness to try and enjoy the process. By the end, you’ll have a beautiful handmade hat and the confidence to start your next crochet project.
One of the best things about making your own hat is the ability to customize it. You can select your favorite colors, adjust the size to fit different head shapes, and even add decorative touches like pom-poms or stripes. This crochet hat for beginners – step by step tutorial is designed to be adaptable, so once you learn the basics, you can experiment with your own creative ideas. Plus, crocheting is a wonderful way to relax, reduce stress, and enjoy some mindful crafting time.
Choosing the Right Materials
The first step in making a crochet hat for beginners – step by step tutorial is gathering the right materials. Selecting the right yarn and hook will make your project easier and ensure a better final result.
Soft, medium-weight yarn (often labeled as “worsted weight”) is perfect for beginners. It’s thick enough to work up quickly but not so bulky that it becomes difficult to handle. Acrylic yarn is a popular choice because it’s affordable, comes in a wide range of colors, and is easy to wash. However, if you want a softer, warmer finish, you might consider using wool or a wool blend.
The crochet hook size will depend on your yarn choice. Most yarn labels include a recommended hook size, but for beginners, a 5mm (H-8) hook works well with worsted weight yarn. Make sure to choose a hook that feels comfortable in your hand, as this will make a big difference during longer crochet sessions.
You’ll also need a pair of scissors to cut the yarn and a yarn needle to weave in the ends once your hat is complete. While these tools are small, they’re essential for a neat and professional finish. A measuring tape can also help you ensure your hat is the right size.
If you want to add a personal touch, you can purchase extra embellishments like faux fur pom-poms, buttons, or decorative patches. While optional, these can turn a simple hat into a stylish accessory. Remember, the more you enjoy the look of your project, the more motivated you’ll be to finish it.
Before starting, it’s helpful to practice a few basic stitches, such as the chain stitch, single crochet, and double crochet. These stitches form the foundation for most beginner hat patterns and are easy to master with a bit of repetition.
Understanding Basic Crochet Stitches
To follow this crochet hat for beginners – step by step tutorial, you’ll need to know a few basic stitches. The good news is that crochet uses a relatively small set of stitch types, and once you’ve learned them, you can create a wide variety of patterns.
The chain stitch (ch) is the most basic stitch in crochet. It forms the foundation for most projects. To make a chain, you create a loop on your hook, yarn over, and pull the yarn through the loop repeatedly until you have the desired length.
The single crochet (sc) is the next stitch to learn. Insert your hook into the desired stitch, yarn over, pull through a loop, yarn over again, and pull through both loops on the hook. This stitch creates a dense, sturdy fabric perfect for warm hats.
The double crochet (dc) is taller than the single crochet and creates a looser, more flexible fabric. Yarn over before inserting your hook into the stitch, pull through, yarn over again, and pull through two loops twice. This stitch is great for adding height to your work quickly.
The slip stitch (sl st) is a simple stitch used for joining rounds, moving across stitches without adding height, or creating a decorative edge. Insert your hook, yarn over, and pull the yarn through both the stitch and the loop on your hook in one motion.
Once you understand these stitches, you can combine them in different ways to create patterns. For example, alternating single and double crochet stitches can add texture and interest to your hat.
Practicing these stitches on a small swatch before starting your hat will help you feel confident and comfortable with your tension, making the actual project more enjoyable.
Step-by-Step Guide to Making a Basic Crochet Hat
Now that you’re familiar with the basic stitches and materials, let’s dive into the actual process of making a crochet hat for beginners – step by step tutorial. We’ll create a simple beanie-style hat worked in the round from the top down.
Start with a magic ring (or a chain of four joined into a circle with a slip stitch). Work 10 to 12 double crochet stitches into the ring, then join with a slip stitch to the first stitch. This forms the crown of your hat.
In the next round, increase by placing two double crochet stitches in each stitch around. This will help the hat expand evenly. Continue increasing in each round by adding an extra stitch between increases until the crown is wide enough to fit the head measurement you want.
Once the crown is the right size, stop increasing and work evenly in double crochet stitches for several rounds to build the body of the hat. This is where you can experiment with color changes, stripes, or textured stitch patterns.
When the hat is almost the desired length, switch to single crochet stitches for the final few rounds. This creates a snug, stretchy edge that helps the hat stay in place.
Finish by cutting the yarn, leaving a tail of about 6 inches. Thread this tail onto a yarn needle and weave it securely into the stitches to prevent unraveling.
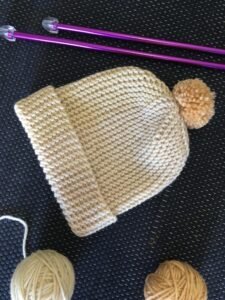
If you’d like, attach a pom-pom to the top for a fun finishing touch. This step is optional but adds personality to your handmade hat.
Tips for Customizing Your Crochet Hat
One of the joys of following a crochet hat for beginners – step by step tutorial is the ability to customize your project. Even small changes can make your hat unique and special.
Changing yarn colors is one of the easiest ways to personalize your hat. You can create stripes by switching colors every few rounds or use a variegated yarn for a naturally colorful effect.
You can also adjust the size of your hat by adding or removing rounds in the crown or body. This allows you to make hats for children, teens, or adults with a perfect fit every time.
Experimenting with stitch patterns can also add interest. For example, using half double crochet stitches instead of double crochet will create a slightly denser fabric, while puff stitches or shell stitches can add decorative texture.
Adding embellishments is another fun option. Buttons, appliqué patches, or even small crochet flowers can give your hat a unique flair.
If you want extra warmth, consider lining your hat with fleece fabric. This is especially useful for winter hats in colder climates and can be sewn in with a few simple stitches.
Finally, don’t be afraid to mix and match techniques you learn from different patterns. Crocheting is a flexible craft, and your creativity is the only limit.
FAQ – Crochet Hat for Beginners
1. How long does it take to crochet a hat for beginners?
A simple crochet hat can take anywhere from 2 to 5 hours to complete, depending on your speed and the complexity of the pattern.
2. Do I need special yarn for my first crochet hat?
Not necessarily. A soft, medium-weight acrylic yarn is great for beginners because it’s affordable, easy to work with, and widely available.
3. Can I make a hat without knowing all crochet stitches?
Yes. You can make a basic hat using just chain stitches and single or double crochet stitches. More advanced stitches can be added later.
4. How do I make my crochet hat fit perfectly?
Measure the intended wearer’s head circumference and adjust the crown size and hat length accordingly. This ensures a comfortable fit.
5. Is it possible to crochet a hat without a pattern?
Absolutely. Once you understand the basics of increasing and working in the round, you can design your own hat without a written pattern.
6. How do I wash a crochet hat?
Follow the care instructions on your yarn label. Most acrylic hats can be machine washed on a gentle cycle, while wool hats may need hand washing.
Conclusion
Creating a crochet hat for beginners – step by step tutorial is an enjoyable and rewarding way to start your crochet journey. From choosing your yarn and mastering basic stitches to shaping your hat and adding personal touches, each step builds your skills and creativity. Crocheting offers endless possibilities, and a handmade hat is both practical and stylish.
I hope this guide has given you the confidence to pick up your hook and yarn and start crafting your own beautiful hats.
If you try this tutorial, I’d love to hear your thoughts, experiences, and any suggestions you might have. Your feedback helps make future guides even better — so please share your honest opinion!