
If you love creating beautiful and unique accessories by hand, this Crochet heart bag – Step by Step Tutorial is the perfect project for you. Combining charm, creativity, and practicality, this bag is not just a fashion item—it’s a lovely expression of your craft and style. The crochet heart bag is ideal for everyday use, gifts, or even as a decorative item. Whether you’re an experienced crocheter or a beginner looking to challenge yourself, this tutorial will guide you through every detail to make your very own crochet heart bag from start to finish.
Making a crochet heart bag is a rewarding experience because it blends the warmth of handmade crochet with a trendy and eye-catching design. Its heart shape symbolizes love, making it a perfect gift for Valentine’s Day, birthdays, or any occasion where you want to show affection through something handmade. What’s even better is that this project allows you to experiment with colors, textures, and patterns to create a bag that perfectly matches your personality and style.
In this Crochet heart bag – Step by Step Tutorial, you’ll learn how to choose the right yarn, crochet the heart-shaped panels, assemble your bag neatly, and add finishing touches like a strap or buttons. Each step is explained clearly, making it easy to follow even if you’re new to crochet. By the end of this tutorial, you’ll have a stunning and functional heart-shaped bag that you’ll be proud to carry or gift.
Materials You’ll Need to Make a Crochet Heart Bag
Before starting your Crochet heart bag, it’s important to gather all the necessary materials. Having everything prepared in advance helps you stay organized and enjoy a smooth crocheting experience. For this project, you’ll need yarn, a crochet hook, scissors, a tapestry needle, and some optional accessories for decorating your bag.
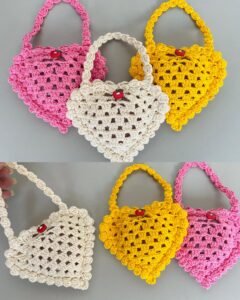
Choose a medium-weight yarn for structure and durability. Cotton or acrylic yarns are great options because they hold their shape well and come in a variety of colors. You can use classic shades like red or pink for a traditional look, or experiment with pastel or neutral tones for a more subtle design. Mixing two colors can also create a beautiful effect, such as a red heart with a white border.
For your crochet hook, use the size recommended on your yarn label—usually between 3.5mm and 5mm. The correct hook size ensures your stitches are even and the bag maintains its shape. You’ll also need a yarn needle for sewing the heart panels together and weaving in the ends.
If you’d like to add personal touches, consider using buttons, beads, or a zipper to close your bag. A chain or crocheted strap can also enhance its style and make it more practical for daily use. Having a small lining fabric is optional but can help the bag hold items securely without stretching.
Lastly, make sure you have good lighting and a comfortable workspace. The process of creating your Crochet heart bag should be enjoyable and relaxing, so take your time and enjoy each step as your heart-shaped creation comes to life.
Step-by-Step Guide to Making the Crochet Heart Bag
Now let’s dive into the Crochet heart bag – Step by Step Tutorial. The heart shape may look complex, but it’s actually made from simple stitches and patterns that gradually take form as you work. Follow these steps carefully to ensure your bag turns out perfectly.
Start by making a magic ring or chain 4 and slip stitch to form a circle. This will be the base of your heart. Work several rounds of single crochet or half double crochet stitches, increasing evenly to create a circular base. Once the circle is large enough, you’ll begin shaping the heart.
To form the top curves of the heart, create two semicircles using double crochet stitches. Then, for the pointed bottom, decrease stitches evenly to create the heart shape. You’ll need to make two identical heart panels—one for the front and one for the back of the bag.
After completing both panels, it’s time to join them together. Place the two hearts with the right sides facing out and crochet around the edges using single crochet stitches. Leave the top part open for the bag’s opening. This step gives your crochet heart bag a neat, sturdy finish.
For the strap, you can crochet a long chain and work single crochet stitches across to make it thicker and stronger. Alternatively, you can use a leather or chain strap for a stylish contrast. Attach the strap securely to both sides of the heart with strong stitches.
Finally, you can add decorative details such as buttons, tassels, or embroidered initials. These elements give your bag a personal and unique touch, making it a true one-of-a-kind accessory.
Decorating and Customizing Your Crochet Heart Bag
Once your crochet heart bag is complete, it’s time for the most creative and enjoyable part—decoration! Personalizing your bag makes it truly yours and allows you to express your unique style. Whether you prefer a minimalist look or something more colorful and playful, there are endless ways to customize your crochet creation.
Start by choosing a color theme. You can create a solid-colored bag for elegance or experiment with ombré yarns for a gradient effect. If you want to make your bag stand out, add a contrasting color border around the edges of the heart using slip stitches or single crochet.
Another fun idea is to add appliqués. Small crochet flowers, stars, or even mini hearts can be attached to the surface for an adorable touch. You can also sew on beads, sequins, or small fabric patches to give your Crochet heart bag more character and sparkle.
Adding lining is a great way to give your bag a more professional finish. Choose a fabric that complements your yarn color, and sew it inside the bag carefully using a needle and thread. The lining also helps your bag keep its shape and makes it easier to clean.
For closing the bag, consider using buttons, snaps, or a zipper. A small decorative button shaped like a flower or heart adds both functionality and charm. If you prefer a drawstring closure, crochet a chain cord and weave it through the top edges.
Lastly, you can experiment with different strap styles. A short strap makes the bag perfect for hand-carrying, while a long strap turns it into a crossbody bag. Crocheting the strap in a pattern that matches or contrasts with the main bag design enhances the overall look.
Tips for a Perfect Crochet Heart Bag
To make sure your Crochet heart bag turns out beautiful and long-lasting, here are some helpful tips and tricks you can follow during your crafting process.
First, always check your tension. Even tension ensures that both heart panels match in size and shape. If one panel is slightly larger, your bag might look uneven when joined. Take your time to make sure every stitch is consistent.
Use high-quality yarn to improve the durability of your bag. Since it will be used often, sturdy yarn will help maintain the shape and prevent stretching. Cotton yarn is ideal because it’s soft yet firm.
When assembling your bag, pin the panels together before joining them. This keeps everything aligned and helps you visualize the final shape. Using stitch markers at key points (like the top curves and bottom tip of the heart) will make this process much easier.
If you want your bag to hold heavier items, you can reinforce the strap by crocheting two layers or using a fabric lining. This prevents stretching over time and keeps your bag comfortable to carry.
Lastly, block your finished bag by lightly wetting it and shaping it flat to dry. This step smooths out uneven stitches and helps define the heart shape more clearly. A well-blocked crochet piece always looks more polished and professional.
By following these simple yet effective tips, your Crochet heart bag will look elegant, sturdy, and ready to impress.
Crochet Heart Bag – Step by Step Tutorial
1. Is the Crochet heart bag suitable for beginners?
Yes! Even beginners can make this bag by following basic crochet stitches. The tutorial explains each step clearly, making it accessible for all skill levels.
2. How long does it take to make a Crochet heart bag?
It depends on your experience. On average, it can take between 4 to 6 hours to complete, including assembly and decoration.
3. What is the best yarn for making a Crochet heart bag?
Cotton or acrylic yarns are ideal because they provide structure and durability. They also come in vibrant colors suitable for any design.
4. Can I make the bag in different sizes?
Absolutely! You can easily adjust the size by changing your hook size or adding more rounds before shaping the heart.
5. How can I wash my crochet heart bag?
Hand wash gently in cold water with mild soap. Avoid wringing or machine washing to keep its shape intact.
6. Can I sell the Crochet heart bag I make?
Yes, handmade crochet bags are very popular and can be sold online or at craft fairs. Just make sure to give credit if you followed a specific pattern.
Conclusion
Creating a Crochet heart bag is a fun, rewarding, and stylish way to express your love for handmade crafts.
Throughout this Step by Step Tutorial, you’ve learned how to gather materials, crochet the heart panels, assemble the bag, and add personal touches to make it uniquely yours. Each step contributes to a charming accessory that’s both practical and meaningful.
Whether you make it for yourself, as a gift, or even to sell, your Crochet heart bag will always stand out as a symbol of creativity and care. Now it’s your turn—try this project and let your imagination shine! Don’t forget to share your honest opinion and suggestions about this tutorial in the comments. Your feedback helps inspire more beautiful crochet creations for everyone to enjoy!