
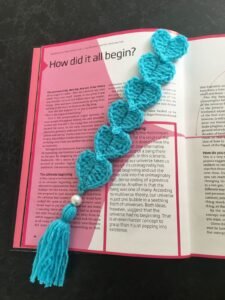
The Crochet Heart Bookmark-Step by Step Tutorial is a wonderful project for anyone who loves creating handmade pieces that are both beautiful and practical. This charming bookmark is not only a great way to practice your crochet skills, but it also makes a heartfelt gift for friends, family, students, or anyone who enjoys reading. In this article, you will discover how simple it is to craft your own crochet heart bookmark, using beginner-friendly stitches and easy-to-follow techniques. With patience and creativity, you can transform a small piece of yarn into something truly meaningful.
Making a crochet heart bookmark is also an excellent opportunity to experiment with different colors, yarn types, and hook sizes. Whether you choose a soft pastel, a bright shade, or a classic red, your handmade bookmark will add a special touch to any book. Throughout this Crochet Heart Bookmark-Step by Step Tutorial, you will learn essential tips that help improve your technique and ensure that your final piece comes out neat, sturdy, and visually appealing. This project is a great way to use leftover yarn, making it both economical and sustainable.
Before we begin this Crochet Heart Bookmark-Step by Step Tutorial, it is important to gather the right materials and prepare yourself for an enjoyable crafting experience. A cozy environment, good lighting, and comfortable seating will help you stay focused and relaxed during your creative process. As you follow the upcoming instructions and tips, remember that practice leads to perfection. Even if your first heart does not look exactly the way you imagined, each attempt will bring more confidence and skill. Now, let’s explore the details that will guide you through this lovely crochet project.
Materials Needed for the Crochet Heart Bookmark
To start this Crochet Heart Bookmark-Step by Step Tutorial, you will need a few simple materials that most crocheters already have at home. Choosing the right yarn is essential for achieving a clean and elegant finish. Light-weight cotton yarn is highly recommended because it creates a smooth texture that fits well between book pages without causing bulk. Cotton also helps the bookmark maintain its shape over time.
A crochet hook that matches your yarn weight is equally important. Most crafters prefer sizes between 2.5 mm and 4 mm for delicate projects like this one. A smaller hook creates a tighter and more defined stitch, which is ideal for a clean, heart-shaped design. If you are unsure which hook to choose, check the yarn label or try a few stitches to see which combination works best for you.
You will also need scissors to trim excess yarn and a yarn needle to weave in the loose ends once your heart is complete. These small details make a big difference in the overall look of the bookmark, especially when you want a polished finish. A well-woven end prevents unraveling and keeps your bookmark looking neat even after repeated use.
Using stitch markers is optional but can be helpful, especially for beginners who want to keep track of their rounds or stitch counts. They ensure that your heart shape remains symmetrical, even if you are still learning the pattern. Beginners often find it easier to maintain consistency with the help of markers.
Another important material is your workspace. A clean, comfortable area allows you to work without distractions. The smoother your workflow, the better your stitches will look. If possible, work in natural light so you can easily see the details of your stitches.
With all your materials prepared, you are ready to continue this Crochet Heart Bookmark-Step by Step Tutorial and begin crafting a bookmark that is both practical and filled with personal charm.
How to Crochet the Heart Shape
The heart is the central piece of this Crochet Heart Bookmark-Step by Step Tutorial, and its shape is created using basic stitches arranged in a specific sequence. Begin by forming a magic ring, which serves as the foundation for your heart. The magic ring technique ensures a tight and clean center without gaps. If you are new to this method, take your time and practice forming the ring until it feels comfortable.
Once the magic ring is complete, you will start working stitches directly into it. These stitches usually include chains, double crochets, and half-double crochets, depending on the pattern you prefer. Each stitch adds volume to the heart and helps define its curves. Follow the stitch counts carefully to maintain balance on both sides of the shape.
As you continue building the heart, you will notice that its structure becomes clearer. The top arches of the heart form from specific stitch combinations, while the bottom point is shaped through decreases or tighter stitches. It is important to keep your tension consistent so that the heart does not look uneven or lopsided.
After completing all the stitches inside the magic ring, you will gently pull the yarn tail to close the ring. This brings the heart together and completes its rounded form. At this stage, you can already see the basic shape and make small adjustments if needed. Sometimes, blocking the heart lightly with your fingers can help smooth the edges.
Once the heart shape is complete, you can fasten off your work and weave in the ends using a yarn needle. A neatly woven end enhances durability and ensures that your bookmark survives regular use without coming undone. This step may seem small, but it plays a crucial role in achieving a clean finish.
With your heart ready, the next part of this Crochet Heart Bookmark-Step by Step Tutorial will teach you how to add the bookmark tail, which completes the design and makes it functional.
Adding the Bookmark Tail
In this part of the Crochet Heart Bookmark-Step by Step Tutorial, you will create the simple yet elegant tail that extends from the heart shape. This tail is what allows the bookmark to rest beautifully between the pages of your book. Many crocheters choose to make a chain tail because it is lightweight and flexible, making it perfect for reading materials of any size.
Start by attaching your yarn to the bottom point of the heart. From there, you will crochet a chain of the desired length. The number of chains depends on how long you want your bookmark to be. A typical length works well at around 25 to 35 cm, but you can adjust it to fit small notebooks or large textbooks.
Once your chain is finished, you can leave it as is or add a small decorative charm at the end. Some crocheters make a tiny heart, star, or circle to give the bookmark a more personalized touch. These small additions make the bookmark even more special, and they also help weigh the tail slightly so it stays in place.
If you choose to add a charm, follow a small pattern and attach it securely using a slip stitch. Make sure the charm is well-positioned and lies flat. This detail brings an extra element of beauty to your bookmark and adds to the handmade quality of your project.
After completing the tail and charm, fasten off your yarn and weave in the ends carefully. Keeping your finish clean and tidy is essential for durability, especially if you plan to give the bookmark as a gift. A properly secured finish ensures that your bookmark can be used daily without fraying.
Your bookmark now has both the heart and the tail, completing the essential steps of this Crochet Heart Bookmark-Step by Step Tutorial. Only one more stage remains to make your bookmark truly polished.
Finishing and Customizing Your Bookmark
The final part of this Crochet Heart Bookmark-Step by Step Tutorial focuses on adding personal touches and ensuring that your work has a smooth, professional appearance. Even small adjustments can enhance the look of your bookmark and make it feel more refined. One of the simplest ways to improve the appearance of your heart is gentle blocking.
Blocking involves shaping your crochet heart with your fingers and letting it rest under a light weight or pinning it to a soft surface. Cotton yarn responds well to blocking, which helps define the curves and point of the heart. You do not need to use water or steam for small projects unless you want an even more precise shape.
Color customization is another wonderful way to personalize your bookmark. You can create hearts in a variety of colors—each one representing a mood, season, or personality. Bright colors can energize, while soft pastels offer a more calming effect. If you enjoy gifting handmade items, matching the bookmark color to the recipient’s favorite shade is always a thoughtful idea.
You can also decorate your bookmark by adding simple embellishments. Small beads, embroidery details, or delicate stitching around the edges can enhance the overall look. Just remember to keep embellishments flat so they do not damage book pages or cause discomfort when the bookmark is in use.
Some crafters enjoy making themed bookmarks for holidays or special events. For example, red hearts for Valentine’s Day, white hearts for weddings, or multicolored hearts for children’s books. This versatility makes the Crochet Heart Bookmark-Step by Step Tutorial useful for a wide range of creative projects.
Before considering your project complete, carefully inspect all your stitches and woven ends. A neat finish not only improves durability but also boosts your confidence as a crafter. When everything looks polished, your bookmark is ready to use, gift, or photograph for your collection.
Frequently Asked Questions
1. Is the Crochet Heart Bookmark suitable for beginners?
Yes, this project is beginner-friendly. The stitches are simple, and the heart shape is easy to learn with practice.
2. What type of yarn is best for this bookmark?
Light-weight cotton yarn works best because it provides structure and does not stretch too much.
3. How long does it take to make a crochet heart bookmark?
Most people complete it within 20–40 minutes, depending on experience.
4. Can I use leftover yarn for this project?
Absolutely. This is a great way to use small amounts of yarn from past projects.
5. Do I need to block the finished heart?
Blocking is optional but can help improve the shape and smoothness of the heart.
6. Can I sell bookmarks made using this tutorial?
Yes, handmade bookmarks are popular craft fair and online shop items.
Conclusion
In this Crochet Heart Bookmark-Step by Step Tutorial, you learned how to create a beautiful and functional handmade bookmark using simple materials and beginner-friendly techniques.
From shaping the heart to adding the tail and making final adjustments, each step helps you develop your crochet skills while producing a charming piece you can proudly use or gift.
I hope this guide inspired you to create your own bookmarks. Please leave a sincere opinion and share your suggestions so I can continue bringing helpful tutorials like this one!