
If you’re looking for a charming and practical crochet project, this Crochet Heart Placemat – Step by Step Tutorial is exactly what you need. Creating a heart-shaped placemat is a wonderful way to bring warmth and handmade elegance to your dining table. Whether you’re making it for Valentine’s Day, a special dinner, or simply to brighten up your kitchen, this pattern offers beauty and functionality in every stitch. Handmade crochet projects like this one are timeless pieces that add love and creativity to any space.
The Crochet Heart Placemat – Step by Step Tutorial is designed to be beginner-friendly while still engaging for experienced crocheters. The pattern allows you to practice shaping techniques, color changes, and finishing touches that result in a beautiful decorative piece. You can make one placemat or a whole set to create a coordinated table theme. Plus, these placemats make wonderful handmade gifts for friends and family who appreciate thoughtful crafts.
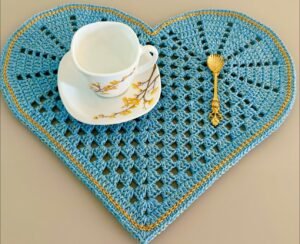
One of the best parts of this tutorial is how customizable it is. You can use your favorite yarn colors to match your home decor or the theme of a special occasion. From bright reds and pinks for a romantic look to neutral or pastel tones for everyday charm, your crochet heart placemat can reflect your personal style. Now, let’s explore this delightful project in detail and learn how to make it from start to finish.
Materials You’ll Need
Before starting the Crochet Heart Placemat – Step by Step Tutorial, it’s essential to gather all the materials. The right tools and yarn will ensure your project comes out beautifully and lasts for years. Luckily, this project doesn’t require any complicated supplies, making it perfect for all levels of crocheters.
First, you’ll need cotton yarn, which is ideal for placemats because it’s durable, washable, and heat resistant. Choose medium-weight yarn for the best structure. You can pick one or more colors depending on whether you want a single-color or multicolored heart design.
Next, select an appropriate crochet hook size for your yarn. Typically, a 4mm or 5mm hook works well for medium-weight yarn. You’ll also need scissors to trim excess yarn and a tapestry needle to weave in your ends neatly. Having a stitch marker can be helpful, especially if you’re new to crochet or working in rounds.
Consider preparing a clean, flat workspace with good lighting. Crochet projects, especially detailed shapes like hearts, require attention to detail. Having a calm and organized environment helps make your crafting session more enjoyable.
If you want to give your crochet heart placemat a stiffer, more durable texture, you can use a fabric stiffener or lightly block the finished piece once completed. This will help the heart shape stay perfectly flat.
Now that you’ve gathered your supplies, you’re ready to move on to the fun part—creating your beautiful Crochet Heart Placemat – Step by Step Tutorial.
Step by Step Instructions
Follow these easy steps to bring your crochet heart placemat to life. This tutorial is designed to guide you through the process from start to finish, ensuring that even beginners can achieve a professional-looking result.
Step 1: Begin with a magic ring or a chain of four joined into a circle. This will serve as the starting point for your heart shape. Crochet a few double crochets into the ring to form the bottom of the heart.
Step 2: Build the foundation rows by increasing stitches on each side while maintaining symmetry. This helps shape the curve of the heart. Use single, half-double, and double crochets as instructed to create smooth edges.
Step 3: Once you have the base, start forming the top curves of the heart. You’ll need to crochet into specific stitches to form the two rounded sections that give the heart its iconic shape.
Step 4: Continue to adjust your stitches as needed to make sure the heart remains even. Take your time during this stage—it’s what gives your crochet heart placemat its beautiful form.
Step 5: After finishing the main body of the heart, crochet a final border around the edge. This not only strengthens the placemat but also gives it a neat and polished appearance. You can use a simple single crochet border or try a decorative edging stitch for an extra touch of elegance.
Step 6: When finished, fasten off your yarn, weave in the ends, and gently block the placemat if needed to flatten it perfectly. Congratulations! You’ve completed your Crochet Heart Placemat – Step by Step Tutorial and now have a lovely handmade decoration ready to use or gift.
Decorating and Customizing Your Crochet Heart Placemat
Once you’ve completed the main heart shape, you can make your crochet heart placemat even more special with creative decorations and custom touches. Crochet is an art form that allows endless possibilities for personalization.
One easy idea is to add a border in a contrasting color. This can make the heart stand out and add a festive touch, especially for holidays like Valentine’s Day or anniversaries. For example, a red placemat with a white border gives a romantic look, while pastel combinations work beautifully for spring or everyday decor.
You can also embroider small details directly onto your placemat using yarn or embroidery thread. Try stitching initials, small flowers, or delicate lines that follow the heart’s outline. These tiny details add depth and character to your finished piece.
Another great option is to add appliqués—small crocheted flowers, leaves, or even tiny hearts. These can be sewn onto the placemat for a layered look that enhances its handmade charm.
If you’re creating multiple placemats, try using a different color palette for each one. This creates a lively, coordinated set that can be used for special dinners or as gifts. Handmade sets are always appreciated and add a personal touch to any home.
Finally, consider pairing your crochet heart placemat with matching coasters or napkin rings for a complete table set. This way, you can turn your crochet project into a beautiful theme that elevates your dining experience.
Tips for Perfect Results
Even though the Crochet Heart Placemat – Step by Step Tutorial is easy to follow, a few helpful tips can ensure your project turns out perfect every time. Paying attention to small details can make your final piece look more professional and refined.
First, always check your tension. Consistent stitch tension ensures your placemat has an even texture and symmetrical shape. Loose stitches may cause the heart to lose definition, while overly tight ones can make it stiff and uneven.
Second, count your stitches carefully in each row. The heart shape depends on symmetry, so a missed or added stitch can alter the design. Use a stitch marker if needed to keep track of rows or specific points.
Third, when working with multiple colors, change yarns cleanly and weave in the ends securely to maintain a tidy finish. Small details like this make a big difference in presentation.
Another helpful tip is to block your finished placemat. Lightly dampen it, then pin it to a flat surface in the correct shape. Once dry, it will hold its heart form beautifully.
Finally, don’t rush. Crochet is not only about the result but also about the relaxing process of crafting. Enjoy every stitch and appreciate the joy of creating something with your hands. The satisfaction of finishing your crochet heart placemat will make all your effort worthwhile.
FAQ
1. Can beginners follow this Crochet Heart Placemat – Step by Step Tutorial?
Yes! This tutorial is beginner-friendly, with clear instructions that make it easy to follow even if you’re new to crochet.
2. What yarn should I use for a placemat?
Cotton yarn is the best choice because it’s durable, washable, and heat-resistant—perfect for kitchen and dining use.
3. How long does it take to make a crochet heart placemat?
Depending on your speed, it usually takes 2 to 3 hours to complete one placemat.
4. Can I make the placemat bigger or smaller?
Absolutely! You can adjust the size by adding or removing rows or using thicker or thinner yarn.
5. How do I clean my crochet placemat?
Hand wash gently with mild detergent and let it air dry flat to maintain its shape.
6. Can I sell the placemats I make using this tutorial?
Yes, handmade items like these are perfect for selling at craft fairs or online. Just remember to credit your handmade work.
7. What colors work best for heart placemats?
Red, pink, white, and pastel shades are popular, but you can experiment with any color palette to suit your decor.
Conclusion
In this Crochet Heart Placemat – Step by Step Tutorial, you learned how to create a beautiful handmade placemat shaped like a heart. From selecting materials to following each step and adding personalized details, this project combines creativity, functionality, and love in every stitch. Crochet allows you to turn simple yarn into something meaningful and beautiful that brightens your home.
Now that you know the process, try experimenting with different yarn colors, borders, or matching table accessories. The possibilities are endless, and every variation you make will be uniquely yours.
We hope this Crochet Heart Placemat – Step by Step Tutorial has inspired you to pick up your crochet hook and start creating today. Please leave your honest opinion and suggestions below—your feedback helps make each tutorial even better and keeps the crafting community growing with creativity and passion!