
Creating a Crochet heart with tin seal- Step by Step Tutorial is a unique and creative way to combine crochet techniques with upcycling. This project allows you to take something as simple as a tin seal, often discarded after opening a can, and turn it into the base of a charming crochet heart. The blend of crochet and recycling makes it a sustainable craft that also provides a heartfelt handmade piece that can be used as decoration, a keychain, or even a small gift.
One of the best things about a Crochet heart with tin seal- Step by Step Tutorial is how accessible it is. You don’t need expensive materials or advanced skills to create something beautiful. The tin seal provides structure and durability, while the crochet stitches add softness and personality. Beginners can practice basic stitches while experienced crocheters can explore creative variations. It’s the kind of craft that invites experimentation and personalization.
This project is also a wonderful way to give new life to materials that would otherwise go to waste. By combining crochet yarn and a recycled tin seal, you create a meaningful piece that carries both sustainability and charm. A Crochet heart with tin seal can be used for various purposes: it makes a lovely gift for Valentine’s Day, a decoration for your home, or even a keepsake. The versatility of this project is what makes it so rewarding.
Materials Needed for Crochet Heart with Tin Seal
To begin the Crochet heart with tin seal- Step by Step Tutorial, you’ll need a few simple supplies. The main items are crochet yarn, a crochet hook, a tin seal, and scissors. Cotton yarn works best because it holds its shape well and is easy to work with. You can choose red or pink yarn for a classic heart look, or experiment with other colors for a playful effect.
The tin seal is the unique part of this project. These are usually found on coffee cans, powdered milk, or other food tins. Make sure the seal is clean and free of sharp edges before starting, as you’ll be crocheting directly onto it. Using recycled items like this not only helps the environment but also makes the project affordable.
You will also need a tapestry needle to weave in the ends of the yarn and to secure the stitches. If you want to decorate your heart further, you can add small embellishments like beads, sequins, or ribbons. These are optional but can give your crochet heart extra personality.
It’s important to have the right crochet hook size for your chosen yarn. Usually, a 3.5 mm or 4 mm hook works well with cotton yarn. If the hook is too large, the stitches may look loose, while a smaller hook will make the work tighter and more compact.
Having a pair of sharp scissors on hand will make trimming yarn easier and ensure clean finishes. The tapestry needle is essential for closing any gaps and securing your stitches neatly. While these may seem like small details, they make a big difference in the overall quality of your finished piece.
Once you gather all the necessary materials, you’re ready to start preparing your tin seal and crocheting the base of your heart. With everything at hand, the process will flow smoothly, and you can focus on enjoying the craft.
Preparing the Tin Seal for Crochet
The next step in this Crochet heart with tin seal- Step by Step Tutorial is to prepare the tin seal so it’s safe and ready for use. This stage is important because you’ll be handling the seal closely while crocheting, and you want it to be comfortable to work with.
Start by cleaning the tin seal thoroughly. Wash it with soap and water to remove any residue and let it dry completely. A clean surface ensures that the yarn stays neat and that your project looks professional. If the edges of the seal feel sharp, you can gently sand them with fine sandpaper or cover them with masking tape.
Once the tin seal is ready, decide how you want to position it. Typically, the round shape is the foundation, and you will crochet around it to form the heart. The seal serves as both a base and a structural support, which makes the heart sturdy and durable.
The next step is to insert your crochet hook into the outer edge of the seal. Depending on the design of the seal, you may have small ridges or edges that make it easy to anchor your yarn. If the seal is smooth, you can use a tapestry needle to pre-punch small holes around the edge, making it easier to insert your hook.
Attach the yarn to the seal with a slipknot and start crocheting single crochets around the edge. This creates the foundation for building the heart shape. Work your way evenly around the entire seal so that the stitches look balanced and symmetrical.
Preparing the tin seal properly not only makes the crochet process easier but also ensures that your final piece is safe and durable. Taking the time to do this step carefully will set the stage for a beautiful crochet heart.
Crocheting the Heart Shape
Now comes the most exciting part of the Crochet heart with tin seal- Step by Step Tutorial: crocheting the actual heart shape. Once your tin seal is covered with single crochet stitches, you can start forming the curves and point that define a heart.
Begin at the top center of the seal and create the first curve of the heart by crocheting a series of double crochets in the same stitch. This will form a rounded edge. Then, move to the next section and repeat the process to create the second curve. The tin seal gives stability, while your stitches shape the recognizable heart outline.
To form the bottom point of the heart, work a series of decreases along the stitches as you move downward. Single crochet decreases help pull the yarn together, creating a tapered point. This step transforms the round seal into a heart.
Keep adjusting the stitches as needed to ensure symmetry. Hearts look best when both curves are even and the point is centered. If one side looks larger than the other, add or reduce stitches to balance it out. Crochet is flexible, so don’t be afraid to experiment.
Once the basic heart shape is complete, you can crochet an additional border around the edges. A row of single crochet or picot stitches adds texture and reinforces the shape. Borders also give the heart a polished, finished look.
At this stage, your crochet heart should be fully formed. The combination of the tin seal and yarn creates a sturdy and charming piece that can be decorated or used as it is.
Adding Details and Creative Uses
The finishing steps of this Crochet heart with tin seal- Step by Step Tutorial are where you can let your creativity shine. Adding details and experimenting with uses makes the project even more enjoyable.
You can embellish your heart with beads, sequins, or small embroidery designs. For example, stitching a tiny flower in the corner of the heart can give it a delicate touch. You can also add a ribbon loop at the top to turn it into a hanging ornament.
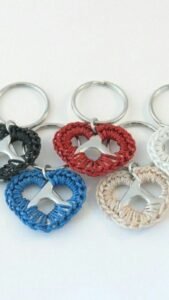
Another idea is to attach a keychain ring to the top of the heart. This transforms it into a practical accessory that you can carry every day. Handmade keychains make thoughtful gifts, and the fact that it’s made from recycled material makes it extra special.
If you prefer home décor, crochet hearts can be strung together to make a garland. Several hearts in different colors create a festive and cheerful decoration for special occasions or everyday use.
These crochet hearts can also be used as appliqués. You can sew them onto bags, cushions, or clothing to add a personalized handmade detail. This versatility is what makes the project so rewarding—it can be adapted to many creative ideas.
Most importantly, each crochet heart you make will be unique. The combination of yarn colors, embellishments, and the natural variations of tin seals ensures that no two hearts will ever look exactly the same.
FAQ about Crochet Heart with Tin Seal
1. Is the Crochet heart with tin seal project beginner-friendly?
Yes, the Crochet heart with tin seal- Step by Step Tutorial is suitable for beginners. It uses basic crochet stitches and simple techniques.
2. What type of yarn is best for this project?
Cotton yarn is ideal because it provides structure and holds shape well. You can also use acrylic yarn for a softer look.
3. How do I make the tin seal safe to crochet with?
Clean it thoroughly and sand any sharp edges. You can also cover the edges with masking tape for extra safety.
4. Can I hand the crochet heart as a gift?
Absolutely. A handmade crochet heart makes a meaningful and sustainable gift for special occasions like Valentine’s Day, anniversaries, or birthdays.
5. What other uses does a crochet heart with tin seal have?
It can be used as a keychain, ornament, garland, or appliqué for bags and clothing. Its versatility makes it suitable for many purposes.
6. Can children participate in this project?
Children can help with choosing yarn colors and decorating, but adults should handle the tin seal preparation and crocheting for safety reasons.
Conclusion
In this Crochet heart with tin seal- Step by Step Tutorial, we explored how to create a charming and eco-friendly craft by combining yarn with recycled tin seals.
From preparing the materials, crocheting the heart shape, to adding creative details, this project is both enjoyable and meaningful. It’s beginner-friendly, sustainable, and versatile, making it a perfect craft for all ages.
We hope this tutorial has inspired you to try making your own crochet hearts. Each one will be unique, carrying your personal touch and creativity. Now that you know the steps, we’d love to hear your feedback. Please leave a sincere opinion and share any suggestions for future tutorials. Your input is always appreciated!