
A crochet hook holder for glass jar-Step by Step Tutorial is the perfect project for those who love organization and creativity. This unique handmade accessory allows you to keep your crochet hooks neatly stored while giving a plain glass jar a decorative and stylish new purpose. By adding a crocheted cover, you transform an ordinary jar into a beautiful and practical item for your craft space.
The beauty of making a crochet hook holder for glass jar lies in its versatility. You can customize it with different yarn colors, stitches, and patterns to match your personal style or home décor. Not only does it serve as a functional storage solution, but it also adds charm to your desk, shelf, or crochet corner. Unlike store-bought holders, this handmade design carries a personal touch and uniqueness that makes it extra special.
Another great reason to try this Step by Step Tutorial is that it is beginner-friendly. Even if you are new to crochet, this project is simple enough to complete while giving you valuable practice with basic stitches. At the same time, experienced crocheters will enjoy the creative freedom it provides. Whether you keep it for yourself or gift it to a fellow crafter, a crochet hook holder made with love and care is always appreciated.
Choosing the Right Materials for Your Crochet Hook Holder
The first step in creating a crochet hook holder for glass jar-Step by Step Tutorial is selecting the right materials. Yarn choice plays a huge role in the final look and feel of your project. Cotton yarn is often recommended because it provides a sturdy structure and holds its shape well, which is perfect for a jar cover. Cotton also offers a clean, neat finish and comes in a wide range of vibrant colors.
The crochet hook size should match the yarn you choose. If you use medium-weight cotton yarn, a 4mm or 5mm crochet hook will usually work well. Using the correct hook size ensures the stitches are tight enough to grip the jar securely but flexible enough to allow easy adjustments. Beginners should always check the yarn label for hook size recommendations to avoid mistakes.
Next, you will need a clean glass jar. You can recycle any jar you already have at home, such as those used for sauces, jams, or candles. Make sure the jar is washed thoroughly and dried before you begin your project. The size of the jar will determine how many stitches and rows you’ll need, so having the jar nearby as you work is important.
Additional tools include scissors, a yarn needle for weaving in ends, and possibly stitch markers to help you keep track of rounds. Having all your supplies prepared before you start will make the process smoother and more enjoyable. Preparation is key when working on a handmade crochet project like this.
Color choices are another exciting part of the process. You can make your crochet hook holder in one solid color for a simple, minimalist look or combine multiple shades for a fun, playful design. Bright colors add cheer to your workspace, while neutral tones blend seamlessly into any home décor.
By carefully selecting yarn, hook, and jar size, you set the foundation for a successful project. Materials may seem like small details, but they directly influence both the functionality and aesthetic of your crochet hook holder for glass jar.
Step by Step Tutorial: How to Crochet the Jar Holder
To begin your crochet hook holder for glass jar-Step by Step Tutorial, start with a slip knot and create a chain that fits snugly around the base of your jar. Join the chain into a ring with a slip stitch, making sure it is not twisted. This ring forms the foundation of your holder and should fit tightly enough to stay in place.
Next, work single crochet stitches into the ring to create the first round. Continue working in the round, building up the sides of the holder. Depending on the jar size, you may need to adjust the number of stitches. The goal is to keep the crochet fabric snug against the jar to prevent slipping.
As you build height, you can choose between simple stitches like single crochet for a solid look or experiment with decorative stitches such as shells, bobbles, or clusters for added texture. This is where you can get creative and personalize your project. The stitches you choose will define the style of your crochet hook holder.
Keep crocheting upward until you reach just below the jar’s rim. At this stage, many crafters like to add a decorative edge. You can use picot stitches for a delicate, lacy border or create ribbing for a classic, structured finish. This final touch enhances the beauty of your handmade piece.
Once the crocheting is done, cut the yarn and weave in the ends securely with a yarn needle. Proper finishing ensures that the yarn won’t unravel over time and that the cover stays neat and tidy. Attention to these details makes your work look polished and professional.
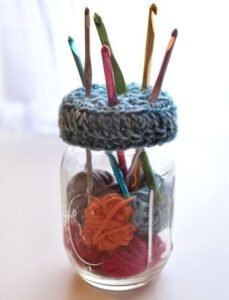
Finally, slip the finished crochet cover onto the glass jar. It should fit snugly and stay in place without sliding. Now your plain glass jar has been transformed into a functional and stylish crochet hook holder.
Tips and Tricks for Beginners
Making a crochet hook holder for glass jar-Step by Step Tutorial is not complicated, but a few tips can make the process even easier. First, always measure your jar carefully before starting. Creating a chain that fits snugly around the base is crucial to avoid a cover that is too loose or too tight.
Beginners should stick to simple stitches like single crochet or half double crochet at first. These stitches are easy to master and create a dense, stable fabric. Once you gain confidence, you can experiment with textured or openwork stitches for a decorative touch.
Using stitch markers is a smart way to keep track of rounds. This ensures your stitch count remains even and your cover maintains its shape. Skipping or adding stitches by accident can cause uneven edges or a lopsided design, so markers help prevent mistakes.
Another useful tip is to test the cover on the jar as you go. After a few rounds, slip it onto the jar to check the fit. This allows you to adjust stitch count or tension early in the project, avoiding the need to unravel a large section later.
Don’t rush the process. Crocheting is meant to be a relaxing, creative activity. Take your time, focus on making consistent stitches, and enjoy the meditative rhythm of the craft. The more relaxed you are, the better your stitches will look.
Finally, remember that every mistake is a learning opportunity. Even if your first crochet hook holder for glass jar is not perfect, it will still serve its purpose and reflect your effort and creativity. Over time, your skills will improve, and each project will get better.
Styling and Using Your Crochet Hook Holder
One of the most enjoyable parts of creating a crochet hook holder for glass jar-Step by Step Tutorial is deciding how to use and style it. This handmade item can brighten up your craft room, desk, or even a living space. By mixing yarn colors, textures, and patterns, you can make each holder unique.
Your crochet hook holder doesn’t have to be limited to storing hooks. It can also be used to hold pencils, paintbrushes, scissors, or even makeup brushes. Its versatility makes it a valuable and stylish addition to any room.
You can create themed designs for different occasions. For example, use red and green yarn for a holiday-themed jar, or pastel shades for spring. This allows you to decorate your space seasonally while keeping it functional.
Adding embellishments is another fun way to personalize your project. Consider attaching crochet flowers, appliqués, or small charms to the cover. These little extras make your handmade crochet hook holder truly one-of-a-kind.
These holders also make wonderful gifts. Handmade presents are always meaningful, and a crochet hook holder is both thoughtful and practical. Whether given to a fellow crafter, a student, or a loved one, it’s a gift that blends beauty with function.
Lastly, remember that these projects are eco-friendly. By reusing glass jars and decorating them with crochet, you are upcycling and reducing waste. It’s a sustainable way to combine creativity and environmental care.
Frequently Asked Questions (FAQ)
1. What size jar works best for a crochet hook holder?
Medium-sized jars, such as those used for sauces or jams, are ideal. They are tall enough to hold crochet hooks securely without tipping over.
2. Do I need special yarn for a crochet hook holder?
Cotton yarn is recommended because it creates a sturdy fabric that holds its shape. However, you can use other yarn types depending on your desired texture and look.
3. Can beginners make a crochet hook holder?
Yes, this is a great project for beginners. The stitches are simple, and the project is small enough to complete quickly while still being useful.
4. How do I make sure the crochet cover fits the jar?
Measure the jar before starting and check the fit as you go. Adjust the stitch count if needed to keep the cover snug.
5. Can I wash the crochet cover if it gets dirty?
Yes, most cotton yarns are machine washable. Simply remove the cover from the jar and wash according to the yarn label’s instructions.
6. What else can I use a crochet jar holder for?
Besides crochet hooks, you can store pens, brushes, scissors, or any small items that need organizing. It’s a versatile and stylish storage solution.
Conclusion
Creating a crochet hook holder for glass jar-Step by Step Tutorial is a fun, practical, and creative project. From selecting the right yarn to crocheting the cover and styling it to fit your décor, this tutorial walks you through every step.
The end result is a functional and beautiful item that keeps your tools organized while adding handmade charm to your space.
Now that you know how to make your own, why not give it a try? I’d love to hear your honest opinions and suggestions. Have you ever crocheted a jar cover before? What colors or styles would you choose? Share your ideas and let’s keep inspiring each other with creative handmade projects.