
If you have ever searched for a Crochet horn headband tutorial- Step by Step Tutorial, you are in the right place. This fun and creative project combines style, comfort, and a touch of whimsy, making it a perfect accessory for costumes, themed parties, or even as a unique fashion statement. Crocheting your own horn headband is not only affordable but also gives you the chance to personalize the colors, size, and style according to your taste.
Crochet lovers around the world enjoy crafting accessories that showcase their personality, and this Crochet horn headband tutorial- Step by Step Tutorial will guide you through the entire process. Whether you are a beginner or an experienced crocheter, the instructions here are designed to be easy to follow while ensuring professional-looking results. Plus, this project requires only basic crochet materials, making it beginner-friendly and budget-conscious.
Before diving into the step-by-step instructions, we will first explore the tools, materials, and techniques you need to master. This article is divided into clear sections so that you can move smoothly from preparation to crafting, with practical tips along the way. By the end, you will have a complete guide to creating a stylish and comfortable crochet horn headband that you will be proud to wear or gift to someone special.
Materials and Preparation for the Crochet Horn Headband Tutorial
When starting any crochet project, preparation plays a huge role in achieving the best results. For the Crochet horn headband tutorial- Step by Step Tutorial, you will need to gather all the necessary materials before you begin. This ensures a smooth crafting experience without interruptions.
First, you will need yarn in the colors of your choice. Many people prefer neutral tones for a subtle look, while others choose bright or pastel shades to make their headbands stand out. Cotton or acrylic yarn works best because it is soft, durable, and comfortable to wear for long periods.
Next, you will need a suitable crochet hook that matches your yarn’s thickness. Most yarn labels indicate the recommended hook size, so follow those guidelines to ensure the stitches come out neat and even. Using the wrong hook size can result in either too tight or too loose stitches, affecting the overall look of the horns and headband.
You will also need some additional tools, such as scissors for cutting yarn, a tapestry needle for weaving in the ends, and possibly some lightweight stuffing material to give the horns their shape and structure. Some crafters even use pipe cleaners or craft wire inside the horns for extra firmness, but this step is optional depending on your preference.
Finally, it is helpful to have a measuring tape to ensure the headband fits comfortably around your head. Since everyone’s head size varies, measuring before you start crocheting helps you avoid creating a band that is too tight or too loose.
Taking time to prepare everything in advance will make the entire process smoother. Many beginners skip this step and end up frustrated later when they realize they are missing a key item. Proper preparation ensures your Crochet horn headband tutorial- Step by Step Tutorial runs smoothly from start to finish.
Step-by-Step Instructions for the Crochet Horn Headband
Now that you have your materials ready, let’s dive into the crafting process. The Crochet horn headband tutorial- Step by Step Tutorial can be broken down into two main parts: creating the headband itself and crafting the horns. Each part is simple, but together they create a beautiful and functional accessory.
Start with the headband base. Using your chosen yarn and crochet hook, create a chain that matches the measurement of your head circumference. Make sure the chain is not too tight; it should have a bit of stretch for comfort. Once you reach the correct length, join the chain ends together to form a circle and secure it with a slip stitch.
Next, crochet several rows around this base chain to create the width of the headband. Many people prefer about 4–6 rows for a comfortable yet stylish width. Using half double crochet or double crochet stitches works well here, as they create a neat, flexible fabric. Remember to keep your tension consistent throughout.
Once the band reaches the desired width, fasten off and weave in the ends using your tapestry needle. This completes the base of the headband, which should now fit snugly but comfortably around your head.
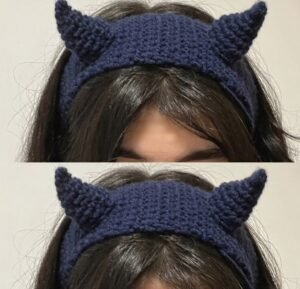
Now, let’s move on to the horns. To create each horn, start with a magic ring and work in the round, gradually increasing stitches to form a cone shape. As you progress, you can add some stuffing material to give the horns their characteristic three-dimensional look. Keep crocheting until the horn reaches your preferred size, then fasten off and leave a long tail for sewing.
Finally, use the yarn tail to sew each horn securely onto the headband. Position them symmetrically for a balanced look, and double-check that they are firmly attached before wearing your new accessory.
Tips and Tricks for a Perfect Crochet Horn Headband
One of the best things about the Crochet horn headband tutorial- Step by Step Tutorial is that it allows plenty of room for creativity and personalization. Here are some tips to make your project even more special.
Consider using multicolored or self-striping yarn for a fun, whimsical look. This can give your horns a unique pattern without requiring complicated color changes. If you prefer a classic style, stick to solid colors that match your wardrobe or costume theme.
Experiment with horn sizes and shapes. Some people like small, subtle horns for a cute and playful look, while others prefer longer, more dramatic horns for a bold statement. You can adjust the number of increase rounds in your crochet pattern to customize the shape.
If you are making the headband for children, use soft, lightweight yarn and ensure there are no sharp or uncomfortable elements inside the horns. Comfort and safety should always be priorities when crafting accessories for kids.
Adding embellishments can take your crochet horn headband to the next level. Consider sewing on small flowers, beads, or ribbons to give it a festive or decorative touch. Seasonal variations, like red and green for Christmas or orange and black for Halloween, can also be fun.
Blocking your finished project can help improve its shape and appearance. Lightly misting the headband with water and letting it dry flat can smooth out uneven stitches and give it a more polished look.
Lastly, practice makes perfect. Your first Crochet horn headband tutorial- Step by Step Tutorial might not be flawless, but each attempt will help you improve your skills and confidence.
Creative Uses for Crochet Horn Headbands
The versatility of the Crochet horn headband tutorial- Step by Step Tutorial means that your finished piece can be used for a variety of occasions and purposes. Here are some creative ideas to inspire you.
These headbands are perfect for costumes, whether for Halloween, cosplay events, or themed parties. They can instantly transform a simple outfit into a playful and eye-catching ensemble.
Crochet horn headbands also make thoughtful handmade gifts. Since you can customize colors and designs, they become one-of-a-kind presents that show effort and creativity.
For children, crochet horn headbands can be used in imaginative play. Kids love dressing up as magical creatures, and these accessories can spark hours of creative fun.
They also work well as photoshoot props. Whether for family portraits, holiday cards, or social media posts, a colorful crochet horn headband can add a touch of whimsy to your pictures.
Some people even sell their handmade headbands at craft fairs or online marketplaces. If you enjoy making them, this could turn into a small side business.
Lastly, wearing your crochet horn headband just for fun can brighten your day and bring smiles to those around you. Sometimes, a little playfulness is all you need to lift your spirits.
FAQ About Crochet Horn Headband Tutorial
1. Is this project suitable for beginners?
Yes, the Crochet horn headband tutorial- Step by Step Tutorial is beginner-friendly. Basic stitches like chain, slip stitch, and single crochet are all you need to get started.
2. How long does it take to make a crochet horn headband?
Most people can complete it in 2–3 hours, depending on their skill level and how detailed they want the horns to be.
3. What type of yarn is best for this project?
Soft cotton or acrylic yarn works best since it is comfortable, easy to handle, and widely available in various colors.
4. Can I make the horns removable?
Yes, you can attach them with buttons or snaps if you want the option to remove or swap them out later.
5. How do I wash my crochet horn headband?
Hand washing in cold water and air drying is recommended to maintain the shape and quality of your handmade accessory.
Conclusion
In this article, we covered the Crochet horn headband tutorial- Step by Step Tutorial from start to finish, including materials, instructions, tips, and creative uses.
With this guide, you can now create a fun, stylish, and customizable crochet accessory that suits any occasion.
We hope this tutorial inspires you to try new designs and share your results with others. Please leave your honest opinions and suggestions in the comments—we would love to hear about your experience and ideas for future projects!