
If you are a fan of The Nightmare Before Christmas and love crochet projects, then this Crochet Jack Skellington – Step by Step Tutorial is the perfect creative adventure for you. Making your very own Jack Skellington brings a sense of fun and accomplishment, as you combine your crafting skills with a beloved character. Whether you want to make him as a gift, a decoration for Halloween, or simply as a personal collectible, this tutorial will guide you through every stage of the process in a simple and approachable way.
The beauty of this Crochet Jack Skellington – Step by Step Tutorial is that it caters to both beginners and intermediate crafters. Even if you have never attempted amigurumi before, this guide breaks things down into manageable steps so you can enjoy the process without feeling overwhelmed. As you progress through the pattern, you will see Jack come to life with each stitch, from his iconic round head to his charming suit and spooky grin.
Before diving into the instructions, we will start by covering the basic materials and techniques required for this Crochet Jack Skellington – Step by Step Tutorial. This ensures that you have everything you need ready before you begin and understand the fundamental stitches and terms that will appear throughout the tutorial. Once you are prepared, we will move step by step through the process, allowing you to create your own Jack Skellington masterpiece with confidence.
Materials and Tools for Crochet Jack Skellington
When following this Crochet Jack Skellington – Step by Step Tutorial, the first thing you need to do is gather the right materials. You will need yarn in classic colors such as white for Jack’s head, black for his suit, and a small amount of black embroidery thread for the facial features. Using high-quality cotton or acrylic yarn is recommended for durability and a smooth finish.
A crochet hook that matches your yarn weight is essential. Most patterns for Crochet Jack Skellington – Step by Step Tutorial use a 2.5 mm to 3.5 mm hook for creating tight stitches, which is important for amigurumi projects so the stuffing does not show through. A smaller hook size also helps maintain the shape and detail of the character.
You will also need fiberfill stuffing to give your Jack Skellington his form. The stuffing should be soft yet firm enough to hold the shape of the head, body, and limbs. In this Crochet Jack Skellington – Step by Step Tutorial, we will explain exactly how and when to add the stuffing as you crochet each part.
Scissors and a yarn needle are necessary for trimming and sewing the different parts together. The needle will also be used for embroidering Jack’s signature facial features, such as his stitched mouth and hollow eyes. Having all these tools prepared before starting the Crochet Jack Skellington – Step by Step Tutorial will make the process smoother and more enjoyable.
Optional materials include safety eyes if you prefer a three-dimensional look instead of embroidered ones. Some crafters like to add wire inside the arms and legs for poseability, though this is not required. This Crochet Jack Skellington – Step by Step Tutorial focuses on a simple, beginner-friendly version that does not require extra materials unless you want to customize it further.
Finally, choose a comfortable, well-lit space to work on your project. Crocheting Jack Skellington should be a relaxing and creative activity, so make sure you have everything set up before diving into the Crochet Jack Skellington – Step by Step Tutorial.
Learning the Basic Stitches
This Crochet Jack Skellington – Step by Step Tutorial uses basic crochet techniques that are common in amigurumi projects. If you are a beginner, do not worry – we will explain each stitch so you can follow along easily.
The first stitch to master is the magic ring, which is used to start crocheting in the round. The magic ring allows you to create a tight, adjustable loop so there is no hole in the center of your work. For the Crochet Jack Skellington – Step by Step Tutorial, the head, body, and limbs all begin with a magic ring for a clean, professional look.
Single crochet stitches form the foundation of the entire project. This simple stitch creates a dense, sturdy fabric that is perfect for amigurumi. Throughout the Crochet Jack Skellington – Step by Step Tutorial, you will be using single crochet stitches in continuous rounds to shape the character’s body parts.
Increases and decreases are also essential for shaping. An increase simply means making two single crochet stitches in the same stitch to widen the piece, while a decrease combines two stitches into one to narrow it. Following the Crochet Jack Skellington – Step by Step Tutorial, you will use increases for shaping the head and decreases for tapering limbs and finishing off sections neatly.
The slip stitch is another simple but useful technique. It is often used to close rounds or move your yarn to a different point without adding height. In this Crochet Jack Skellington – Step by Step Tutorial, slip stitches help create smooth transitions between sections of the pattern.
Finally, basic embroidery skills will come in handy for adding Jack’s facial details. His stitched smile, round eyes, and small nostrils give him his iconic look. We will explain exactly how to add these features at the right stage in the Crochet Jack Skellington – Step by Step Tutorial so your final piece captures his quirky charm.
Step by Step Instructions
Now that you have the materials ready and understand the basic stitches, let’s move on to the actual Crochet Jack Skellington – Step by Step Tutorial. We will start with the head, as it is the most recognizable part of the character.
Begin with a magic ring and six single crochet stitches. Work in continuous rounds, increasing evenly in each round until you have a perfectly round sphere. The head should be firm but not overstuffed to maintain a smooth shape. Following the Crochet Jack Skellington – Step by Step Tutorial, you will then decrease gradually to close the head once the stuffing is added.
The body is crocheted in a similar way but shaped into a narrow oval rather than a sphere. The Crochet Jack Skellington – Step by Step Tutorial uses increases at the bottom and decreases at the top to create a torso shape that balances well with the head size.
For the arms and legs, work in continuous rounds again, creating long, thin tubes. These are stuffed lightly so they remain flexible. The Crochet Jack Skellington – Step by Step Tutorial explains how to attach them securely to the body so they stay in place without flopping around.
Jack’s iconic bat-shaped bow tie can be crocheted separately using black yarn. The Crochet Jack Skellington – Step by Step Tutorial provides simple instructions for shaping the wings and center knot, which are then sewn to the front of his body for that signature look.
Once all the parts are completed, use a yarn needle to sew them together neatly. Following the Crochet Jack Skellington – Step by Step Tutorial, embroider the eyes, nose, and stitched smile to bring Jack’s face to life. At this stage, you can also add any optional details, like a tiny Santa hat if you want a Christmas version of Jack.
With all the parts assembled and details added, your handmade Jack Skellington is complete. This Crochet Jack Skellington – Step by Step Tutorial ensures that each step builds on the previous one, so even beginners can achieve great results.
Customizing and Finishing Touches
One of the best things about this Crochet Jack Skellington – Step by Step Tutorial is that it allows for plenty of creativity. You can easily customize your Jack to suit different themes or occasions.
For example, changing the color scheme can transform Jack into a unique character. A purple suit instead of black or a red-and-green Christmas outfit can give your Crochet Jack Skellington – Step by Step Tutorial a festive twist.
Adding accessories is another fun option. A small crochet pumpkin, ghost, or even a Christmas tree can be created separately and placed with Jack as part of a themed display. This Crochet Jack Skellington – Step by Step Tutorial encourages you to experiment with small props for extra charm.
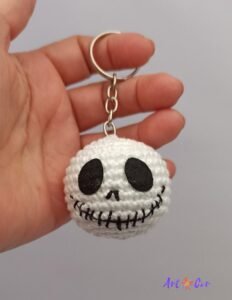
Some crafters like to make mini versions of Jack using thinner yarn and smaller hooks. This creates cute keychains or ornaments. The Crochet Jack Skellington – Step by Step Tutorial can easily be adapted by simply adjusting the yarn weight and hook size.
If you want Jack to be poseable, you can insert craft wire inside the arms and legs before sewing them onto the body. This allows you to bend and pose him in different positions. The Crochet Jack Skellington – Step by Step Tutorial keeps this as an optional step for those who want more advanced customization.
Finally, consider making a whole set of characters from The Nightmare Before Christmas using similar techniques. Once you master this Crochet Jack Skellington – Step by Step Tutorial, creating Sally, Zero the ghost dog, or even Oogie Boogie becomes much easier.
FAQ about Crochet Jack Skellington – Step by Step Tutorial
Q1: Is this Crochet Jack Skellington – Step by Step Tutorial suitable for beginners?
Yes, it uses basic stitches and provides clear instructions, making it ideal for those new to crochet.
Q2: How long does it take to make Jack Skellington?
On average, it takes 6–8 hours, depending on your skill level and speed.
Q3: What size will the finished Jack Skellington be?
Using standard yarn and hook sizes, he will be about 10–12 inches tall, but you can adjust the size by changing materials.
Q4: Can I wash the finished crochet Jack Skellington?
Yes, but handwashing with mild soap and air-drying is recommended to maintain the shape.
Q5: Do I need special yarn for this project?
No, regular cotton or acrylic yarn works fine, as long as it matches the recommended hook size.
Q6: Can I sell items made using this Crochet Jack Skellington – Step by Step Tutorial?
Yes, handmade items can usually be sold, but always credit the original pattern if applicable.
Conclusion
This Crochet Jack Skellington – Step by Step Tutorial has guided you through gathering materials, learning basic stitches, assembling Jack’s body, and adding those finishing details that make him come to life.
By following these steps, you can create a handmade version of this beloved character to decorate your home or give as a thoughtful gift.
We hope you enjoyed this tutorial and feel inspired to start your own crochet project. Please share your honest opinion and suggestions for future tutorials—we would love to hear your feedback and ideas!