
If you are looking for a beautiful and eye-catching project, this Crochet Jewel Centerpiece – Step by Step Tutorial is exactly what you need. This decorative piece combines elegance, creativity, and skill, making it perfect for enhancing any table or special event. Whether you are a beginner or an experienced crocheter, learning how to create a jewel-like crochet centerpiece can be both rewarding and inspiring. In this tutorial, we will walk through the process with clear explanations and practical tips so you can confidently make your own masterpiece.
A crochet jewel centerpiece is more than just a decoration—it’s a statement piece that can transform a space. Made with fine yarns and intricate patterns, it can be designed to match any color scheme or theme, whether it’s for a wedding, holiday, or everyday home décor. This guide will not only explain each step but also help you understand the techniques behind the stitches, so you can customize your design and create something truly unique.
By following this Crochet Jewel Centerpiece – Step by Step Tutorial, you will discover how to choose the right materials, prepare your tools, work through the pattern, and add the finishing touches. The goal is to ensure you feel confident and excited about making this piece, while also having fun in the process. With practice and patience, you can turn a few simple supplies into a work of art that will impress anyone who sees it.
Choosing the Right Materials and Tools
Before you start the Crochet Jewel Centerpiece – Step by Step Tutorial, it is important to gather the correct materials. The quality and type of yarn you choose will greatly influence the final look and feel of your project. For a jewel-like shine, many crocheters prefer to use mercerized cotton or fine silk threads, as these have a natural sheen that catches the light beautifully. Thicker yarns can also be used, but they will result in a more casual look.
In addition to yarn, selecting the right hook size is essential. Smaller hooks create tighter, more delicate stitches that are perfect for intricate centerpieces. Larger hooks, on the other hand, make looser stitches that work better for bigger, less detailed designs. It’s a good idea to match your hook size to the yarn label’s recommendation, but don’t be afraid to experiment for different effects.
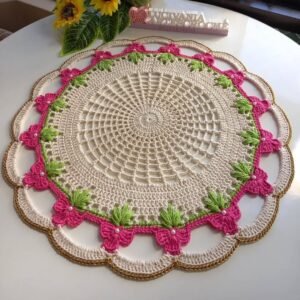
Another important consideration is color. Jewel tones such as emerald green, sapphire blue, ruby red, and amethyst purple create a luxurious feel, especially when combined with metallic threads or beads. You can also choose neutral colors like cream or white for a timeless, elegant look. The key is to pick shades that complement your space or event theme.
Accessories such as stitch markers, scissors, and a tapestry needle will make your work easier. Stitch markers help keep track of pattern repeats, while the tapestry needle is essential for weaving in ends neatly. If you plan to add embellishments like beads or sequins, make sure you have a small beading needle that can pass through the yarn easily.
When working on a centerpiece, tension control is crucial. Uneven stitches can distort the shape of the design, so take your time to keep a steady rhythm. Practicing a few sample rows before starting the actual project can help you get comfortable with the yarn and hook combination.
Finally, choose a comfortable, well-lit space to work in. Since this project involves intricate stitches and possibly small beads, good lighting will help you avoid mistakes and reduce eye strain. A comfortable chair and table setup will also make longer crochet sessions more enjoyable.
Understanding the Pattern
The Crochet Jewel Centerpiece – Step by Step Tutorial often starts with a foundation ring or magic circle, which forms the base of the design. This circular starting point allows the pattern to expand outward in rounds, creating the symmetrical look that is characteristic of crochet doilies and centerpieces. If you’re new to the magic circle technique, it’s worth practicing before beginning the full project.
Once the center is established, you will work in repeating stitch patterns to build the design. Common stitches include chains, single crochet, double crochet, treble crochet, and slip stitches. Some patterns may also include picots or cluster stitches for added texture and visual interest. Reading through the entire pattern before starting will help you understand the sequence and prevent mistakes.
Many jewel centerpieces incorporate openwork lace designs, which are achieved by combining chains and skipped stitches. This creates an airy, delicate effect that pairs beautifully with the jewel-like colors of the yarn. The placement of these open spaces is crucial for maintaining the symmetry and flow of the pattern.
Counting stitches accurately is one of the most important skills when following this tutorial. Even one missed stitch can throw off the entire round, leading to ripples or warping. Using stitch markers at regular intervals can help you keep track without constantly recounting.
It’s also common to work increases in each round to keep the piece flat. Without these increases, the edges may curl or cup. The pattern will specify exactly where and how many stitches to increase, so following the instructions closely is key to success.
Lastly, patience is your best friend when learning a new crochet pattern. The first few rounds may feel slow, but as you become familiar with the stitch sequence, your speed and confidence will grow. Remember, the beauty of a Crochet Jewel Centerpiece – Step by Step Tutorial is in the details, so take your time.
Adding Decorative Elements
One of the most enjoyable parts of the Crochet Jewel Centerpiece – Step by Step Tutorial is personalizing it with decorative touches. Beads are a popular choice for adding sparkle. You can either thread them onto your yarn before starting or sew them on after the piece is complete. The placement of beads can highlight certain sections of the pattern and give the finished product a true jewel-like appearance.
Sequins are another option for adding shine. These can be incorporated directly into the crochet stitches or sewn on later for a more scattered, random effect. Using metallic threads in gold, silver, or copper can also create a subtle shimmer without the need for additional embellishments.
Some crocheters like to combine multiple yarn colors in a single piece. This can be done through planned color changes or by using variegated yarn that naturally shifts shades. Color gradients can create a stunning gemstone effect, making your centerpiece look like it’s radiating light from the center outward.
Blocking is a crucial step in finishing any crochet centerpiece. This process involves wetting the piece and pinning it to the correct dimensions, allowing it to dry flat. Blocking not only sets the stitches but also opens up the lacework, making the design more visible and crisp.
If your centerpiece is intended for special occasions, consider adding a fabric backing to protect it from spills or stains. A sheer fabric can maintain the delicate appearance while providing a layer of practicality. You can hand-sew the backing to the finished piece with invisible thread for a seamless look.
Finally, remember that the beauty of a jewel centerpiece lies in its individuality. Don’t be afraid to experiment with different embellishments, colors, and yarn types. Each change will result in a unique creation that reflects your personal style.
Care and Maintenance
After investing time and effort into your Crochet Jewel Centerpiece – Step by Step Tutorial, you’ll want to keep it looking its best. Proper care begins with understanding the yarn’s washing instructions. Most delicate yarns like cotton and silk should be hand-washed in cool water with a mild detergent to prevent damage.
When drying, lay the piece flat on a clean towel rather than hanging it, as hanging can cause the fabric to stretch out of shape. Gently press out excess water with another towel before letting it air-dry completely. Avoid direct sunlight for extended periods, as it can fade vibrant colors over time.
If your centerpiece becomes wrinkled or loses its shape, you can lightly steam it or re-block it. Be cautious when applying heat, especially with synthetic fibers, as they can melt or become misshapen.
Store your centerpiece in a cool, dry place away from direct sunlight. If you need to fold it, place tissue paper between the folds to prevent creases. You can also store it rolled around a cardboard tube for long-term preservation.
For pieces that include beads or sequins, handle them gently to prevent the embellishments from loosening. If any decorations do come off, they can be sewn back on with a fine needle and matching thread.
Regular care will ensure your jewel centerpiece remains a cherished part of your home décor for years to come. Treat it as the work of art it is, and it will continue to bring beauty and joy to your space.
FAQ – Crochet Jewel Centerpiece
Q1: Is a jewel centerpiece suitable for beginners?
Yes, with patience and careful attention to instructions, beginners can successfully complete this project. Start with simpler patterns before attempting very intricate designs.
Q2: How long does it take to make a crochet jewel centerpiece?
The time required varies based on size, complexity, and skill level. On average, it can take anywhere from a few days to a week.
Q3: Can I use acrylic yarn for this project?
Yes, although cotton or silk provides a more elegant finish, acrylic can be a good choice for affordability and easy care.
Q4: Do I need to block my centerpiece?
Blocking is highly recommended as it enhances the shape, definition, and symmetry of the design.
Q5: How do I add beads to my crochet?
Beads can be pre-strung onto the yarn before starting or sewn onto the finished piece using a fine needle.
Q6: Can I machine wash a jewel centerpiece?
It’s best to hand-wash to preserve the stitches and embellishments, even if the yarn is machine washable.
Conclusion
Creating a Crochet Jewel Centerpiece – Step by Step Tutorial is a wonderful way to express your creativity while crafting something that can be cherished for years.
From selecting materials and mastering the pattern to adding decorative elements and caring for your piece, each step brings you closer to a beautiful, jewel-like creation. By following these tips and taking your time, you can produce a unique work of art that will brighten any table.
We hope this guide has inspired you to start your own project—please share your honest opinions and suggestions so we can continue creating helpful and inspiring crochet tutorials.