
A crochet kitchen towel rack set – Step by Step Tutorial is one of the most enjoyable and functional crochet projects you can create for your home. Not only does it add a handmade charm to your kitchen, but it also serves a practical purpose by keeping your towels organized and within easy reach. Handmade crochet items carry a special touch of love and creativity, making your kitchen feel cozier and more inviting. With this tutorial, you will learn everything you need to know to craft your very own crochet towel rack set.
Crochet kitchen accessories are more than just decorative items. They help in organizing daily tasks and give your kitchen a personalized look. By following this Step by Step Tutorial, even beginners can learn how to make a towel rack set that is both useful and stylish. Whether you prefer neutral tones to match a minimalist space or bright, bold colors to highlight your personality, crochet allows endless possibilities for customization. This versatility makes crochet projects perfect for gifting as well as for personal use.
This article will guide you through the process in detail, starting from the materials you need to the final touches that give your set a polished look. You will also find helpful tips for making your crochet kitchen towel rack set durable and long-lasting. By the end of this tutorial, you will not only have learned a new crochet skill but also created something that will bring warmth and charm into your home every single day.
Materials and Tools for Crochet Kitchen Towel Rack Set
To begin your crochet kitchen towel rack set – Step by Step Tutorial, gathering the right materials and tools is essential. The type of yarn and hook you use will directly affect the durability and design of your project. Choosing cotton yarn is highly recommended, as it absorbs moisture well and is easy to wash, making it ideal for kitchen accessories.
You will need a crochet hook that matches the yarn weight. Most patterns for towel racks recommend sizes between 4mm and 5.5mm, depending on the thickness of your yarn. Having a pair of scissors, stitch markers, and a tapestry needle on hand will make the process smoother and more organized. A small wooden or plastic ring can also be used if you want your towel rack to hang sturdily on a hook or cabinet handle.
The color palette is another important choice. Many crocheters prefer using earthy shades or neutral colors to blend in seamlessly with kitchen décor. However, adding pops of bright color can make your rack set a standout piece. You can even use multiple colors to create stripes or simple patterns that enhance the charm of your work.
Before you start crocheting, it is a good idea to test your gauge with a small swatch. This ensures your towel rack will have the correct dimensions and won’t turn out too loose or too stiff. Gauge swatches help beginners understand how their tension affects the final result. Adjust your hook size if necessary to match the pattern’s recommendations.
Another tip when preparing your materials is to prewash your yarn if it’s 100% cotton. This prevents any shrinkage after the first wash and keeps your project looking neat over time. Washing the yarn also softens it slightly, making it easier to work with during the crochet process.
By being well-prepared, you set yourself up for success. Having all your tools ready and knowing what yarn and hook sizes to use will make the rest of this Step by Step Tutorial enjoyable and stress-free.
Step by Step Instructions for Crochet Kitchen Towel Rack Set
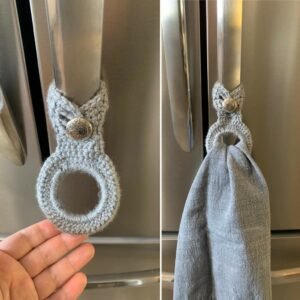
The first step in making your crochet kitchen towel rack set is to create the base ring or holder. This is where your towel will pass through, so it needs to be sturdy. You can crochet directly around a wooden ring, or if you don’t have one, you can make a crochet loop by chaining a circle and slip stitching it closed. This forms the foundation of your rack.
Next, begin working the strap or hanger portion. This part will connect the ring to the top piece of your towel rack. The strap is usually made with simple stitches like single crochet or half-double crochet, which provide strength and durability. Continue working in rows until the strap reaches the desired length for hanging.
Once your strap is complete, you can start on the decorative top portion. Many crocheters like to add buttons, flowers, or textured stitches to this section. For beginners, sticking to double crochet or half-double crochet rows is a great way to create a neat rectangle that can be folded over and secured with a button.
Attaching the strap and the top piece is a crucial step. Fold the top piece over and sew a button in place, leaving enough space for the buttonhole to fit comfortably. This allows you to attach the towel rack securely to a kitchen handle or drawer knob. The button also makes it easy to remove and wash the set whenever needed.
For the towel itself, you can crochet a matching piece or simply use a store-bought kitchen towel. If you decide to crochet your own, choose a stitch pattern that provides good texture and absorbency, such as the waffle stitch or moss stitch. This adds to the handmade charm while ensuring functionality.
By following these Step by Step Instructions, you will complete a functional and stylish towel rack set. Each stage is beginner-friendly but also offers room for creativity for more experienced crocheters.
Design Variations and Creative Ideas
One of the best aspects of making a crochet kitchen towel rack set is the ability to customize it according to your taste. You can make simple designs for everyday use or add decorative touches for festive seasons and special occasions. For example, using orange and black yarn can create a Halloween theme, while red and green tones are perfect for Christmas.
Adding embellishments is another way to enhance your design. Crochet flowers, leaves, or appliqués can be sewn onto the strap or top portion, giving your towel rack a unique and personalized look. Small details often make a big difference, and they can transform a simple set into a beautiful piece of handmade art.
Texture is also a fun area to explore. Instead of plain stitches, try using shell stitches, puff stitches, or even cables to add depth to your work. This not only improves the look but also gives the towel extra grip, preventing it from slipping out of the rack.
Another creative idea is to make a full matching set that includes a towel rack, dishcloths, and pot holders. This way, your kitchen has a coordinated, handmade theme that guests are sure to notice and admire. Matching sets also make excellent gifts for housewarmings, weddings, or holidays.
Experimenting with different yarns can also create interesting results. While cotton is the most practical, blending it with bamboo or linen yarn can produce a softer and shinier finish. Just be sure that the yarn you choose is machine washable, as kitchen items need frequent cleaning.
The freedom to mix and match styles, textures, and colors is what makes crochet so rewarding. With just a few small changes, your crochet kitchen towel rack set can become a true reflection of your creativity and personality.
Care, Maintenance, and Tips for Longevity
After finishing your crochet kitchen towel rack set, it’s important to take care of it properly so it lasts a long time. Since kitchen items are exposed to spills, stains, and frequent washing, using durable yarn is essential. Cotton yarn is the best choice because it withstands high temperatures and retains its shape after multiple washes.
When washing your towel rack set, always follow gentle care instructions. Use mild detergent and wash on a delicate cycle if you’re using a washing machine. Hand washing is another excellent option to extend the life of your crochet project. Avoid bleach or harsh chemicals, as they can weaken the fibers and cause fading.
Drying your crochet towel rack set correctly is also important. Lay it flat to dry to prevent stretching and maintain its shape. If you’re in a hurry, you can use a dryer on a low heat setting, but air drying is always the safest method.
Another tip for longevity is to check your stitches regularly. If you notice a loose stitch or small unraveling, repair it right away before it becomes a bigger problem. Keeping a tapestry needle handy helps with quick fixes.
If your towel rack set includes buttons or decorative pieces, make sure they are securely attached. Kitchen items experience constant use, and buttons can loosen over time. Reinforcing them occasionally ensures the set remains sturdy and functional.
With the right care, your crochet kitchen towel rack set will not only stay beautiful but also remain a reliable part of your kitchen for years. Proper maintenance highlights the value of handmade creations and preserves the effort you invested in this project.
FAQ about Crochet Kitchen Towel Rack Set
1. Is the crochet kitchen towel rack set suitable for beginners?
Yes, this project is beginner-friendly because it uses simple stitches and straightforward construction. With patience and practice, even new crocheters can complete it successfully.
2. What type of yarn is best for making a crochet towel rack set?
Cotton yarn is the most recommended choice because it absorbs moisture, is durable, and easy to wash. It also holds its shape better than other fibers when used frequently.
3. Can I make the towel rack without a wooden or plastic ring?
Yes, you can crochet your own ring by chaining a loop and slip stitching it closed. This creates a sturdy and flexible base that works just as well as a purchased ring.
4. How can I make my crochet towel rack set more decorative?
You can add crochet flowers, appliqués, or textured stitches to personalize your set. Using multiple colors or themed designs for holidays also makes it more decorative.
5. Can I crochet the towel itself to match the rack set?
Absolutely! Crocheting your own towel allows you to match the style and colors perfectly. Stitches like moss stitch or waffle stitch are great for making absorbent towels.
6. How do I attach the towel rack to my kitchen furniture?
The towel rack is designed with a button closure that allows it to be fastened securely to handles, knobs, or hooks. This makes it both practical and easy to remove for washing.
Conclusion
Creating a crochet kitchen towel rack set – Step by Step Tutorial is both a fun and rewarding project. Not only does it add style and personality to your kitchen, but it also provides a functional solution for keeping towels organized.
Throughout this guide, we explored the necessary materials, step by step instructions, creative design ideas, and tips for proper care and maintenance.
By following this tutorial, you now have the skills to create a handmade kitchen accessory that will last for years and bring a personal touch to your home. We hope you enjoyed this guide and feel inspired to start your own project. Please share your honest opinion and suggestions in the comments—we’d love to hear your thoughts and see how your crochet towel rack set turns out!