
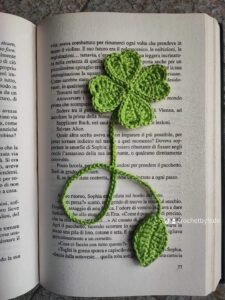
If you are looking for a simple yet charming crochet project, this Crochet leaf bookmark- Step by Step Tutorial is perfect for you. A crochet leaf bookmark is not only a beautiful accessory for your favorite books but also an excellent way to practice and improve your crochet skills. With just a few materials and some basic stitches, you can create a delicate and functional piece in no time.
One of the best things about this Crochet leaf bookmark- Step by Step Tutorial is that it is beginner-friendly. Even if you have never crocheted before, the steps are easy to follow, and the final result is always impressive. Plus, you can make these bookmarks in different colors, sizes, and patterns to match your personal style or to give as handmade gifts to your loved ones.
Another advantage of following this Crochet leaf bookmark- Step by Step Tutorial is that it requires minimal materials and very little time. You can finish a bookmark in less than an hour, making it a great project for relaxation or for using up leftover yarn from other projects. Let’s start learning how to create this lovely crochet accessory step by step.
Materials Needed for Crochet leaf bookmark- Step by Step Tutorial
Before we begin crocheting, it is important to gather all the necessary materials for this Crochet leaf bookmark- Step by Step Tutorial. Having everything ready will make the process smooth and enjoyable.
First, you will need some yarn. Cotton yarn works best because it gives a neat finish and holds its shape well. You can choose a single color for a simple look or combine two shades to add more depth to your leaf bookmark.
Next, you will need a crochet hook suitable for the yarn weight. For most cotton yarns, a 3 mm or 3.5 mm hook is ideal, but always check the yarn label for recommendations. Using the right hook size ensures your stitches are consistent and your leaf has the correct structure.
Scissors are essential for cutting the yarn once your project is finished. A small pair of sharp craft scissors works best to get clean cuts without fraying the ends.
You will also need a yarn needle or tapestry needle to weave in the loose ends after finishing your leaf. This step gives your bookmark a professional look and prevents unraveling.
Finally, you might want to have a stitch marker handy if you are a beginner. It helps you keep track of your rounds or stitches, especially when working on the central vein of the leaf.
Having all these materials organized before starting this Crochet leaf bookmark- Step by Step Tutorial will make your work easier and more enjoyable.
Step by Step Instructions for Crochet leaf bookmark- Step by Step Tutorial
Now that you have your materials ready, let’s dive into the main part of the Crochet leaf bookmark- Step by Step Tutorial. These instructions are simple, beginner-friendly, and easy to follow.
Start by making a slip knot on your hook and chain 12 stitches. This chain will form the central vein of your leaf and serve as the base for all the stitches that create its shape.
Once your chain is ready, work single crochets along the chain until you reach the end. When you get to the last stitch, work three single crochets into the same stitch to create a rounded tip for the leaf.
Now, continue working along the other side of the chain, mirroring the stitches you made on the first side. This way, both edges of the leaf will look symmetrical and balanced.
For a more detailed texture, you can use a combination of half double crochets and double crochets on each side of the chain. This variation adds volume to the leaf and makes it look more realistic.
When you reach the beginning of the chain again, slip stitch to join the round. At this point, your leaf shape is complete, and you can adjust the edges with your fingers to make it perfectly even.
Finally, chain about 25 to 30 stitches from the base of the leaf to create the stem. This long chain will act as the bookmark tail that rests between the pages of your book. Fasten off the yarn and cut the excess.
Adding Details and Variations to Your Crochet leaf bookmark- Step by Step Tutorial
One of the most enjoyable parts of this Crochet leaf bookmark- Step by Step Tutorial is personalizing your design. Small changes can make your bookmark unique and special.
You can experiment with different yarn colors to create seasonal themes. For example, green yarn gives a fresh spring look, while orange or brown tones create an autumn vibe.
Adding small decorative stitches along the central vein can make your leaf look more detailed. Surface slip stitches or embroidery with contrasting yarn work well for this purpose.
If you want a thicker bookmark, you can crochet two identical leaves and join them together using single crochets around the edges. This technique gives the bookmark a more solid structure.
Another creative idea is to attach a small crochet flower or bead at the end of the stem. It adds a playful touch and makes your bookmark look like a tiny piece of art.
You can also change the leaf shape by using longer chains or different stitch patterns. Pointed leaves, rounded leaves, or even heart-shaped leaves can all be created with small adjustments.
Finally, blocking your leaf bookmark after finishing helps it keep its shape. Simply dampen it lightly, pin it to a flat surface in the desired shape, and let it dry completely.
Tips for Beginners Following Crochet leaf bookmark- Step by Step Tutorial
If this is your first time following a Crochet leaf bookmark- Step by Step Tutorial, here are some tips to make the process easier and more enjoyable.
Start with smooth cotton yarn rather than textured or fluffy yarns. Smooth yarn shows your stitches clearly, making it easier to learn.
Keep your tension relaxed. Many beginners crochet too tightly, which makes it hard to insert the hook into stitches and can distort the shape of the leaf.
Practice the basic stitches such as chain, single crochet, and double crochet before starting the project. Familiarity with these stitches will make the tutorial easier to follow.
Use a light-colored yarn for your first project. Dark colors can make it difficult to see where to insert the hook, especially in low light conditions.
Do not rush the process. Take your time with each step of the Crochet leaf bookmark- Step by Step Tutorial to ensure neat and even stitches.
Finally, remember that mistakes are part of learning. If something goes wrong, simply unravel the yarn and try again. Crochet is very forgiving, and practice will quickly improve your skills.
FAQ about Crochet leaf bookmark- Step by Step Tutorial
Q1: How long does it take to make a crochet leaf bookmark?
Most people can finish one bookmark in about 30 to 45 minutes, depending on their skill level.
Q2: What type of yarn is best for this project?
Cotton yarn is ideal because it holds its shape well and provides a neat finish.
Q3: Can I make the bookmark bigger or smaller?
Yes, simply adjust the starting chain length and the number of stitches on each side to change the size.
Q4: Is this project suitable for complete beginners?
Absolutely. The Crochet leaf bookmark- Step by Step Tutorial uses basic stitches that are easy to learn and follow.
Q5: Do I need any special tools?
No special tools are required beyond basic crochet supplies like a hook, yarn, scissors, and a needle.
Q6: Can I sell the bookmarks I make?
Yes, handmade crochet bookmarks are popular at craft fairs or as small gifts for friends and family.
Conclusion
By following this Crochet leaf bookmark- Step by Step Tutorial, you have learned how to create a simple yet beautiful crochet accessory using basic materials and stitches.
We explored the materials needed, step-by-step instructions, personalization ideas, and beginner tips to make the process easy and fun.
We hope this tutorial inspires you to try more crochet projects and share your creations with others. Please leave your honest opinion about this guide and share any suggestions for future tutorials. Your feedback helps us continue creating useful and creative content for crochet lovers everywhere.
