
If you have been looking for a simple yet beautiful crochet project, then Crochet maple leaf- Step by Step Tutorial is perfect for you. Making crochet maple leaves is not only fun but also very rewarding. These little leaves can be used as coasters, appliqués for clothing, autumn decorations, or even as part of a bigger crochet project like a blanket or a garland. The best part is that this project is beginner-friendly, and with just a few materials, you can create something truly stunning.
The Crochet maple leaf- Step by Step Tutorial is a fantastic way to practice basic crochet stitches while creating a decorative item that can be used in many creative ways. Whether you are preparing for fall decorations, looking for a handmade gift idea, or simply want to improve your crochet skills, this guide will walk you through the entire process from start to finish.
In this tutorial, we will explain all the materials you need, break down each step clearly, and provide helpful tips to ensure your leaves look beautiful every time. By the end, you will feel confident making as many crochet maple leaves as you want for yourself, your friends, or your home decor projects.
Materials Needed for Crochet Maple Leaf- Step by Step Tutorial
Before starting the Crochet maple leaf- Step by Step Tutorial, it is important to gather all the materials so the process goes smoothly. Luckily, this project requires only basic crochet supplies, which most crafters already have at home.
The first thing you need is yarn. For a realistic look, choose yarn in shades of red, orange, yellow, or brown to match the colors of autumn leaves. Cotton yarn works well because it provides good stitch definition, but acrylic yarn is also fine if that’s what you have available.
Next, you will need a crochet hook. The hook size will depend on the yarn you are using. Typically, a 3.5 mm or 4 mm hook works perfectly for this type of project. Using the correct hook size ensures your leaf has the right shape and doesn’t turn out too loose or too stiff.
You will also need a pair of scissors to cut the yarn after you finish crocheting the leaf. A yarn needle is essential for weaving in the loose ends neatly so your leaf looks polished and professional.
For beginners following this Crochet maple leaf- Step by Step Tutorial, having stitch markers on hand can be helpful. They make it easier to keep track of rounds or important stitches, especially when creating the points of the leaf.
Finally, a little bit of patience and practice is required. Crochet projects become easier the more you work on them, and this tutorial is designed to help you succeed even if it is your very first time making a maple leaf.
Step-by-Step Instructions for Crochet Maple Leaf- Step by Step Tutorial
Now that you have all the materials ready, let’s begin the Crochet maple leaf- Step by Step Tutorial. We will go step by step to make sure you can follow along easily and create a beautiful maple leaf on your first try.
Start by making a slip knot and chaining six stitches. Then, join the last chain to the first with a slip stitch to form a small ring. This will be the center of your maple leaf where all the stitches will be built around.
In the next step, chain three to count as your first double crochet. Then work eleven more double crochets into the center of the ring. You should now have twelve stitches in total. Join with a slip stitch to the top of the starting chain.
For the second round, chain three again, then double crochet in the same stitch. Work two double crochets into each stitch around. This will give you a total of twenty-four stitches, forming a nice round base for your leaf.
Next, we will create the leaf’s points. Start by chaining ten, then slip stitch into the second chain from the hook. Work single crochet, half double crochet, double crochet, treble crochet, and then double crochet again down the chain. Slip stitch into the next two stitches on the round to secure the point. Repeat this process five times to make all the points of the leaf.
Finally, finish the leaf by chaining a few stitches to create the stem. Slip stitch back down the chain, fasten off the yarn, and use the yarn needle to weave in any loose ends. Your first maple leaf is now complete!
Tips for Perfect Crochet Maple Leaf- Step by Step Tutorial
While the Crochet maple leaf- Step by Step Tutorial is beginner-friendly, a few tips can help you achieve the best results and make your leaves look even better.
First, keep your tension consistent. If your stitches are too tight, the leaf might curl; if too loose, it might not hold its shape. Practicing on a small sample before starting the actual leaf can help you find the right balance.
Second, blocking your finished leaves can make a big difference. To block, simply dampen the leaf lightly, shape it properly, and let it dry flat. This helps the points of the leaf stay sharp and defined.
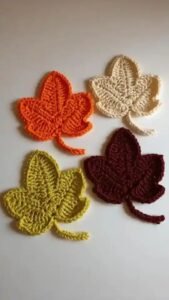
Another tip is to experiment with different yarn colors. Using a mix of red, orange, and yellow yarns can create a stunning set of autumn leaves. You can even use variegated yarn for a natural-looking color blend.
If you want to make the leaf larger, you can add more stitches in the second round before forming the points. Likewise, to make a smaller leaf, start with fewer chains or stitches in the beginning rounds.
Consider making several leaves in different sizes and sewing them together into a garland, table runner, or even attaching them to a crochet blanket for a seasonal theme.
Finally, don’t rush the process. Take your time to count stitches carefully, especially when forming the points, so your leaf turns out symmetrical and neat.
Creative Ways to Use Crochet Maple Leaf- Step by Step Tutorial
Once you have mastered the Crochet maple leaf- Step by Step Tutorial, there are many creative ways to use your handmade leaves.
One popular idea is to make coasters. Crochet maple leaves are the perfect size for small drink coasters, adding a cozy autumn touch to your home decor.
You can also use them as appliqués. Sew a few leaves onto a plain tote bag, pillow, or blanket to create a unique, seasonal look that is both personal and stylish.
Another idea is to turn them into a festive garland. String multiple leaves together with a simple chain or ribbon and hang them across your fireplace, window, or wall for a beautiful fall decoration.
If you enjoy making greeting cards, consider attaching small crochet maple leaves to the front of handmade cards for a special, three-dimensional design.
They also make great bookmarks. Simply attach a long chain to one point of the leaf, and you have a beautiful, practical bookmark for your favorite book.
Finally, crochet maple leaves can be used as gift toppers. Instead of using store-bought bows, tie a crochet leaf onto a wrapped gift for a thoughtful, handmade touch.
FAQ About Crochet Maple Leaf- Step by Step Tutorial
1. Is the crochet maple leaf project beginner-friendly?
Yes, this tutorial is designed for beginners and uses only basic stitches like chains, double crochets, and slip stitches.
2. How long does it take to make one leaf?
Most people can finish a single leaf in 20–30 minutes after some practice.
3. Can I use leftover yarn for this project?
Absolutely! This is a great way to use up small amounts of leftover yarn from other projects.
4. How do I make the leaves look flat and neat?
Blocking the leaves after finishing helps them stay flat and hold their shape nicely.
5. Can I make the leaves in different sizes?
Yes, you can adjust the starting chains and the number of stitches to make smaller or larger leaves.
6. What can I do with a set of crochet maple leaves?
You can use them for coasters, decorations, appliqués, garlands, bookmarks, or gift embellishments.
Conclusion
In this article, we explored Crochet maple leaf- Step by Step Tutorial in detail, covering materials, step-by-step instructions, tips for perfect results, and creative ways to use the finished leaves.
This project is simple, beginner-friendly, and highly customizable, making it ideal for anyone who enjoys crochet.
Now it’s your turn to gather your materials, follow the steps, and create your own set of beautiful crochet maple leaves. We would love to hear your honest opinion and suggestions, so feel free to share your experience and ideas for future tutorials.