
The Crochet Mini Mouse Tutorial-Step by Step Tutorial is a delightful and creative project designed for crafters who enjoy making small, adorable amigurumi pieces. Right from the beginning, this guide focuses on clear instructions, beginner-friendly explanations, and helpful tips to ensure your mini mouse turns out beautifully. These tiny mice are perfect as keychains, gifts, decorations, or collectable items. By using the phrase Crochet Mini Mouse Tutorial-Step by Step Tutorial throughout the text, this article remains highly optimized for SEO while keeping a natural and humanized tone.
Creating a mini crochet mouse is more than just crafting; it is a relaxing and enjoyable experience that allows your creativity to shine. Each stitch contributes to a charming handmade piece that can bring joy to children and adults alike. This guide begins by helping you understand the materials you need, the techniques you will use, and the structure of the pattern. With the Crochet Mini Mouse Tutorial-Step by Step Tutorial, even beginners can follow along smoothly and learn new skills as they work through each section.
The versatility of this project makes it appealing to crocheters who want quick yet rewarding results. Whether you prefer bright colors, classic shades, or playful combinations, your mini mouse can take on any style you imagine. Throughout the Crochet Mini Mouse Tutorial-Step by Step Tutorial, you will learn how to create a neat body shape, add charming ears, embroider a cute face, and assemble the final toy with care. With patience and practice, your mouse will look polished and professional.
Materials and Preparation
To begin the Crochet Mini Mouse Tutorial-Step by Step Tutorial, you will need only a few basic materials that many crochet enthusiasts already have at home. Start by selecting your yarn. Lightweight cotton or acrylic yarn works best to give the mouse a defined shape and smooth texture. You can choose traditional gray shades or experiment with pinks, blues, whites, or any color you like.
A small crochet hook is essential for this project. Most crafters prefer hooks in the 2.0 mm to 3.0 mm range when working on miniature amigurumi. Using a small hook ensures tight stitches that keep the stuffing neatly inside. This helps maintain the mouse’s structure and prevents gaps between stitches, resulting in a cleaner finish.
Stuffing materials, such as polyester fiberfill, are needed to give volume to your mini mouse. Stuffing should be added gradually and shaped evenly to avoid lumps. This will help create a smooth and adorable toy. The Crochet Mini Mouse Tutorial-Step by Step Tutorial emphasizes the importance of proper stuffing since it influences the overall appearance.
You will also need a yarn needle for sewing the pieces together. This includes attaching the ears, tail, limbs, and embroidering facial features. A pair of scissors will help you trim ends neatly. If you prefer safety eyes rather than embroidered eyes, choose a size appropriate for your miniature piece. However, if the toy will be used by children, embroidered eyes remain the safest option.
A stitch marker can help keep track of rounds, especially when working in continuous spirals. This prevents mistakes and makes the process more organized. Having all your materials ready before starting the Crochet Mini Mouse Tutorial-Step by Step Tutorial ensures a smooth crafting experience from beginning to end.
Preparing your workspace is also essential. Choose a comfortable, well-lit spot where you can keep your yarn and tools organized. A small tray or basket can help prevent materials from rolling away. Once everything is set, you are ready to begin crocheting your adorable mini mouse.
Crocheting the Body and Head
The body and head are the main structures of the Crochet Mini Mouse Tutorial-Step by Step Tutorial, and they are usually worked in one continuous piece. This seamless technique ensures a smoother shape and makes the final mouse look more polished. Start with a magic ring, a common technique in amigurumi that creates a tight and secure center.
After forming the magic ring, work your increases gradually to shape the head. Each round must be counted carefully to ensure the shape stays symmetrical. Using a stitch marker at the beginning of each round helps keep track of your progress. As the head takes form, you will notice how each stitch contributes to a rounded, cute silhouette.
Once the head is large enough, continue working downward to form the body. The Crochet Mini Mouse Tutorial-Step by Step Tutorial encourages a steady pace, ensuring stitches remain even. Consistency is key to creating a professional-looking piece. If tension varies too much, the shape may appear uneven. Practicing your stitch tension can make a big difference.
Before closing the body, stuffing must be added. Add small amounts at a time, pressing gently to create an even shape. Avoid overstuffing, as this can stretch the yarn and distort the mouse’s figure. Proper stuffing ensures the mouse is soft yet maintains its adorable structure.
Decreases will help shape the bottom of the mouse. Work carefully to avoid gaps. Once the final stitches are completed, weave the yarn end securely to close the piece. This ensures durability and prevents stuffing from escaping. At this point, the basic structure of your mini mouse is complete.
With the main body done, you can now focus on the fun details that bring the mouse to life. The Crochet Mini Mouse Tutorial-Step by Step Tutorial moves on to the ears, limbs, and facial expressions that give your mouse its personality and charm.
Adding Ears, Arms, Tail, and Facial Details
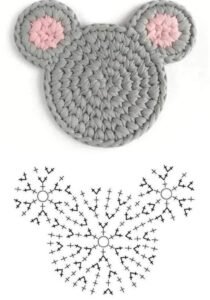
This part of the Crochet Mini Mouse Tutorial-Step by Step Tutorial focuses on adding the features that make your mini mouse instantly recognizable. The ears are typically crocheted as small circles or slightly oval shapes. They should be firm enough to stand upright once sewn onto the head. Choose matching yarn or create a playful contrast by using a lighter shade for the inner ear.
The arms and tail are made separately and sewn on later. Arms can be simple chains with single crochet stitches or tiny tubes. The tail is usually a thin chain stitch that curls naturally. These small details add charm and character to your mini mouse. Taking your time with these pieces ensures they complement the body proportionally.
Once the ears, arms, and tail are done, you can begin assembling. Using a yarn needle, sew each piece carefully onto the body. The Crochet Mini Mouse Tutorial-Step by Step Tutorial emphasizes precision at this stage. Proper placement ensures a balanced and cute appearance. Avoid rushing, as thoughtful assembly greatly enhances the final result.
Facial features are the heart of the mouse’s personality. Embroider small eyes using black thread or yarn. A tiny stitched nose, placed slightly above the center, gives the mouse a sweet and expressive face. Adding a small smile can enhance its charm. If you prefer safety eyes, insert them before stuffing and closing the head.
You can also add whiskers using thin yarn or embroidery thread. Keep them short and neat to avoid tangling. Whiskers add a realistic touch while keeping the design playful and gentle. This step makes your mini mouse even more adorable and expressive.
Once all features are completed and sewn securely, your mouse starts to come alive. The Crochet Mini Mouse Tutorial-Step by Step Tutorial helps ensure each element is placed thoughtfully, resulting in a beautifully crafted miniature toy.
Final Assembly, Keychain Option, and Finishing Touches
The final stage of the Crochet Mini Mouse Tutorial-Step by Step Tutorial is assembling everything and completing any decorative touches. If you want to turn your mini mouse into a keychain, simply create a small loop on top of the head. Attach it to a metal ring or clasp. Ensure the loop is strong and secure so the mouse can withstand daily handling.
Trim any excess yarn and check for loose ends. Weaving in the yarn neatly ensures the toy looks polished and tidy. A clean finish is essential for durability and appearance. Carefully inspect all parts to make sure everything is stitched tightly and securely.
Adding optional accessories can give your mini mouse its own personality. A tiny bow, scarf, hat, or even a miniature bag can make your mouse unique. These accessories are completely optional but allow you to customize your creation further.
If you want your mouse to have a firm shape, gently mold the stuffed body with your hands. Small adjustments can make a big difference in appearance. The Crochet Mini Mouse Tutorial-Step by Step Tutorial encourages crafters to enjoy this creative freedom.
Your mouse is now complete and ready to be displayed, gifted, or used as a keychain. Each stitch reflects care and creativity, making the result even more meaningful. The satisfaction of completing a handcrafted piece makes the entire tutorial worthwhile.
As you gain confidence, you can create a whole family of mini mice in different colors and styles. The Crochet Mini Mouse Tutorial-Step by Step Tutorial is just the beginning of your creative exploration into miniature amigurumi.
Crochet Mini Mouse
1. Is this project suitable for beginners?
Yes, the Crochet Mini Mouse Tutorial-Step by Step Tutorial is easy to follow and great for beginners learning basic amigurumi techniques.
2. How long does it take to make a mini mouse?
Most crocheters finish one in about 1 to 2 hours, depending on experience and details added.
3. Can I use thicker yarn?
You can, but the mouse will be larger. For a true mini effect, thinner yarn works best.
4. Are safety eyes safe for all ages?
Safety eyes are secure, but embroidered eyes are better for young children.
5. Can I sell the mice I make?
Yes, handmade crochet mice are popular items. Just make sure your pattern source allows it.
6. Can I customize the mouse’s colors?
Absolutely. Using different colors adds personality and makes each mouse unique.
Conclusion
The Crochet Mini Mouse Tutorial-Step by Step Tutorial gives you everything you need to create an adorable miniature mouse from start to finish. You learned how to choose materials, crochet the body, add details, assemble the toy, and personalize your creation.
With practice, you can create a whole collection of charming mice. I hope this article inspires you to begin your project today.
Please leave your sincere opinion and share suggestions for future tutorials—I would love to hear your feedback!